Gm Truck & SUV Master Cylinder Replacement (Brake Bleeding Tips)
In this video I show the steps and procedures necessary to properly replace a brake master cylinder in a Chevy Silverado, Tahoe, Avalanche, GMC Sierra, Yukon and Cadillac Escalade trucks and SUVs. Years 1999-2006. Although the replacement of the master cylinder is relatively straightforward, there A couple important steps that you need to follow, such as properly bleeding all the air out of the braking system and properly bench bleeding the brake master cylinder. Below are the proper procedures GM advises their technicians to use in order to properly bleed the brake system. Also below are links in the description of the parts and tools are used during this video. Please make sure to properly pick out which master cylinder you need depending on your year and weight of your vehicle. If you have any questions or comments feel free to leave something in the comment section. Thank you
OEM BRAKE MASTER CYLINDER 2003-2006:
https://amzn.to/3avWWVN
1999-2002 with hydroboost:
https://amzn.to/2GngC0t
1999-2002 with vacuum booster:
https://amzn.to/2v8sAsd
MASTER CYLINDER BLEED KIT W/ FITTINGS:
https://amzn.to/2Gd1eDu
LINE WRENCH KIT:
https://amzn.to/2RcuPn4
DOT 3 BRAKE FLUID:
https://amzn.to/3azEOdU
VACUUM BRAKE BLEEDER TOOL:
https://amzn.to/37eRc0P
GM Facotry brake bleeding procedures
-If you have performed a brake master cylinder bench bleeding on this vehicle, or if you disconnected the brake pipes from the master cylinder, you must perform the following steps:
- Ensure that the brake master cylinder reservoir is full to the maximum-fill level. If necessary add GM approved brake fluid from a clean, sealed brake fluid container. Refer to Fluid and Lubricant Recommendations (USA and Canada).
- With the rear brake pipe installed securely to the master cylinder, loosen and separate the front brake pipe from the front port of the brake master cylinder.
- Reconnect the brake pipe to the master cylinder port and tighten securely.
- Have an assistant slowly depress the brake pedal fully and maintain steady pressure on the pedal.
- Loosen the same brake pipe to purge air from the open port of the master cylinder.
- Tighten the brake pipe, then have the assistant slowly release the brake pedal.
- With the front brake pipe installed securely to the master cylinder, after all air has been purged from the front port of the master cylinder, loosen and separate the rear brake pipe from the master cylinder, then repeat steps 3.3–3.8.
-Fill the brake master cylinder reservoir with GM approved brake fluid from a clean, sealed brake fluid container. Ensure that the brake master cylinder reservoir remains at least half-full during this bleeding procedure. Add fluid as needed to maintain the proper level.
-Clean the outside of the reservoir on and around the reservoir cap prior to removing the cap and diaphragm.
--Install a proper box-end wrench onto the RIGHT REAR wheel hydraulic circuit bleeder valve.
Install a transparent hose over the end of the bleeder valve.
Submerge the open end of the transparent hose into a transparent container partially filled with GM approved brake fluid from a clean, sealed brake fluid container.
Have an assistant slowly depress the brake pedal fully and maintain steady pressure on the pedal.
-Loosen the bleeder valve to purge air from the wheel hydraulic circuit.
-Tighten the bleeder valve, then have the assistant slowly release the brake pedal.
-Wait 15 seconds, then repeat steps 8–10 until all air is purged from the same wheel hydraulic circuit.
With the right rear wheel hydraulic circuit bleeder valve tightened securely, after all air has been purged from the right rear hydraulic circuit install a proper box-end wrench onto the LEFT REAR wheel hydraulic circuit bleeder valve.
Install a transparent hose over the end of the bleeder valve, then repeat steps 7–11.
With the left rear wheel hydraulic circuit bleeder valve tightened securely, after all air purged from the left rear hydraulic circuit, install a proper box-end wrench onto the RIGHT FRONT wheel hydraulic circuit bleeder valve.
Install a transparent hose over the end of the bleeder valve, then repeat steps 7–11.
With the right front wheel hydraulic circuit bleeder valve tightened securely, after all air has been purged from the right front hydraulic circuit, install a proper box-end wrench onto the LEFT FRONT wheel hydraulic circuit bleeder valve.
-Install a transparent hose over the end of the bleeder valve, then repeat steps 7–11.
-Fill the brake master cylinder reservoir to the maximum-fill level with GM approved brake fluid from a clean, sealed brake fluid container.
-Slowly depress and release the brake pedal. Observe the feel of the brake pedal.
How to Replace a Brake Master Cylinder in Your Car (Bleed Brakes). How to Replace a Master Cylinder - EricTheCarGuy
Видео Gm Truck & SUV Master Cylinder Replacement (Brake Bleeding Tips) канала Aaron Hines
Показать
Комментарии отсутствуют
Информация о видео
Другие видео канала
 How to Bleed your Brakes by Yourself
 GM TRUCK & SUV BRAKE MASTER CYLINDER REPLACEMENT & BLEEDING SIERRA SILVERADO YUKON TAHOE SUBURBAN
 Sinking/Spongy Brake Pedal -With ABS SYSTEM?? Nothing Works? Watch Fixed!
 3 Signs of a Bad Master Cylinder failing Symptoms brake pedal sinks to floor
 How to Test For a Bad Brake Booster / Brake Booster Testing
 2005 GMC Yukon Denali XL 6.0 - 1,600 - AWD - How to Remove and Rebuild Hydro Brake Booster DIY
 How To Fix a Spongy Brake Pedal Chevy Truck
 GM Hydroboost Brake Booster Leak Repair
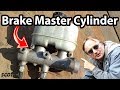 How to Replace a Brake Master Cylinder in Your Car (Bleed Brakes)
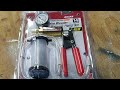 Harbor Freight Pittsburgh brake bleeder vacuum pump demo and review
 Make a Bench Bleeding Tool! DIY Bleed Car / Truck Master Cylinder
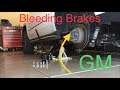 Bleed Brakes GM Yukon, Tahoe, Suburban, Sierra, Silverado, Escalade GMC, Chevy, Cadillac
 2006 Chevy Silverado master cylinder replacement and bleed
 Brakes won't bleed - Weak stream of brake fluid - Removing air pocket from ABS module - FIXED!
 Auto Bleed ABS brakes Like a PRO with this affordable scan tool.
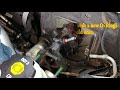 How To Replace a Leaking Power Brake Booster 2009 GMC Sierra LMM 2500
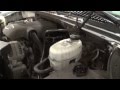 DIY: Bleed Brakes like a Pro!
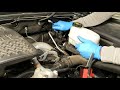 Chevy Duramax Hydroboost Replacement
 NEVER Fix A Sinking Brake Pedal Until Watching This!