- Популярные видео
- Авто
- Видео-блоги
- ДТП, аварии
- Для маленьких
- Еда, напитки
- Животные
- Закон и право
- Знаменитости
- Игры
- Искусство
- Комедии
- Красота, мода
- Кулинария, рецепты
- Люди
- Мото
- Музыка
- Мультфильмы
- Наука, технологии
- Новости
- Образование
- Политика
- Праздники
- Приколы
- Природа
- Происшествия
- Путешествия
- Развлечения
- Ржач
- Семья
- Сериалы
- Спорт
- Стиль жизни
- ТВ передачи
- Танцы
- Технологии
- Товары
- Ужасы
- Фильмы
- Шоу-бизнес
- Юмор
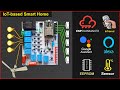
ESP8266 Project using Blynk IFTTT and Google Assistant | ESP 01 Home Automation 2021
In this IoT tutorial, I have made the ESP8266 Project using Blynk IFTTT and Google Assistant to control relays with voice commands or manual switches. To make this ESP-01 home automation system I have used all the FREE IoT applications.
PCBA from $0 (Free Setup, Free Stencil) https://jlcpcb.com/RHS
Download PCB Gerber file for this ESP8266 ESP01 project
https://iotcircuithub.com/wp-content/uploads/2021/12/PCB_Gerber_ESP01_Relay2_Manual_01.zip
I have covered the following topic in this ESP8266 Blynk project:
00:47 Demonstrate this ESP8266 home automation project.
01:36 Required Components for the IoT Project
01:57 Circuit for the NodeMCU ESP8266 control relay
04:09 Configure the Blynk cloud account for ESP8266
05:40 Code for the Blynk ESP8266 control relay
07:05 Set up Blynk IoT app to connect the ESP01
08:14 Configure the IFTTT account, connect Blynk with Google Assistant
14:50 Control relays with Blynk Google Assistant using ESP01
Required Components for this NodeMCU home automation project
1. ESP8266 NodeMCU or ESP01
2. 2-channel 5V SPDT Relay Module
3. Push Buttons
Amazon India Affiliate links:
NodeMCU: https://amzn.to/3fJA4EG
ESP01 Module: https://amzn.to/3E6BC72
2-channel 5V Relay Module: https://amzn.to/30CB4rF
Amazon United States Affiliate links:
NodeMCU : https://amzn.to/2WoR2A2
Required Components for the ESP-01 control Relay Module PCB:
1. Relays 5v (SPDT) (2 no)
2. BC547 Transistors (2 no)
3. PC817 Optocuplors (2 no)
4. 510-ohm 0.25-watt Resistor (2 no) (R1 -- R2)
5. 1k 0.25-watt Resistors (3 no) (R3 -- R5)
6. LED 5-mm (3 no)
7. 1N4007 Diodes (2 no) (D1 -- D2)
8. Push Buttons (3 no)
9. Terminal Connectors
10. Jumper (2no)
11. Switch (1no)
12. 5V DC supply
---------------------------
⚠️ This video took a long time to make if you would like to buy me a coffee to say thanks, link below: ☕
PayPal: https://paypal.me/sdaspay
Patreon: https://www.patreon.com/techstudycell
---------------------------
Download Code for this ESP8266 Blynk home automation project from the following article
https://iotcircuithub.com/nodemcu-projects-using-blynk-google-assistant/
Important Links:
Create Blynk Cloud Account: https://blynk.cloud/dashboard/register
Create IFTTT Account: https://ifttt.com/
Blynk URL syntax: https://docs.blynk.io/en/blynk.cloud/update-datastream-value
Blynk Server Address: https://docs.blynk.io/en/blynk.cloud/troubleshooting
Previous Videos:
NodeMCU Blynk control 4 relays
https://youtu.be/CpUVssHPm_s
ESP32 Blynk control 8 relays with sensors
https://youtu.be/Vgyj3cCAioI
Important points:
1. In code, you have to update only the BLYNK_TEMPLATE_ID & BLYNK_DEVICE_NAME as shown in the video.
2. Uncomment GPIOs in the code as per the microcontroller (NodeMCU or ESP01).
3. Keep all the 10 files (.ino & .h) in the same folder.
4. Connect the GPIO-0 with GND before programming ESP-01.
**Please take proper safety precautions while working with high voltages.
During the video, I have explained the syntax for updating the Datastream Value in the Blynk cloud server so you can connect any Blynk projects with Google assistant through the IFTTT to control the appliances with the voice commands from anywhere in the world. For this internet of things project, I have used NodeMCU and ESP01. If the NodeMCU or ESP01 is connected with WiFi then you can control the relays from anywhere in the world from mobile, and monitor the real-time feedback in the Blynk IoT applications.
#homeautomation #esp8266 #ifttt #blynk
-------------------------------------------------------
Thanks For Watching...
✅ SUBSCRIBE ✅LIKE ✅SHARE ✅ COMMENTS
Find out more such projects: https://iotcircuithub.com/
Facebook: https://www.facebook.com/techstudycell/
Instagram: https://www.instagram.com/techstudycell/
Telegram: https://t.me/techstudycell/
-------------------------------------------------------
-------------------------------------------------------
WARNING:
This video is for demonstration and educational purposes only.
Each demonstration presents risks and hazards that must be fully understood before attempting.
And should be performed only by professionals
------------------------------------------------------
Other useful IoT projects:
Latest NodeMCU projects playlist:
https://www.youtube.com/playlist?list=PLlBmS9EKFydcv9ffXm72-cU9_EusicIjO
Latest ESP32 projects playlist:
https://www.youtube.com/playlist?list=PLlBmS9EKFydee7YsvVP_5TiPDeH38PwlK
ESP32 Smart Home System with Amazon Alexa app & Manual Switches
https://youtu.be/b5yr-H6jJAc
Видео ESP8266 Project using Blynk IFTTT and Google Assistant | ESP 01 Home Automation 2021 канала Tech StudyCell
home automation esp8266 ifttt blynk nodemcu esp01 blynk esp8266 iot internet of things google home automation esp2866 ifttt google home nodemcu esp8266 homeautomation esp8266 project iot project iot applications blynk app esp8266 arduino home automation system esp8266 wifi module smart home automation best smart home system smart home esp8266 wifi esp8266 arduino ide esp 01 arduino techstudycell google assistant blynk ifttt ESP 01 Home Automation
Комментарии отсутствуют
Информация о видео
18 декабря 2021 г. 20:09:14
00:15:35
Другие видео канала