Wrist Stability Training for Climbing - Part 1 - Hooper's Beta Ep. 22
For more content like this as well as in-depth blog writeups and links to research articles, go here: https://www.hoopersbeta.com/
// Support the channel by shopping with these links (we're not sponsored by these companies) //
- Hooper's Beta T-Shirts: https://teespring.com/stores/hoopersbeta
- Therabands: https://amzn.to/3mRUwFX
- Lacrosse/Massage Ball: https://amzn.to/3hot8OD
- Stainless Steel Massage Tool (or just use a butter knife): https://amzn.to/2L5F1xa
- Adjustable Dumbbells (pricey but useful!): https://amzn.to/38FPG9Q
- Emile's Favorite Climbing Shoes: https://amzn.to/3hpC1Yq
- Jason's Favorite Climbing Shoes: https://amzn.to/2WS8QE0
- Our Favorite Chalk: https://amzn.to/3pqTa6T
- Wrist Widget: https://amzn.to/2F1gXoN
In this video we cover some introductory wrist stability exercises which can be used to recover from or prevent an injury. Be aware that just because these exercises are in the introductory video doesn't mean they're easy! You can simply add more resistance to match your current skill level.
1. Eccentric wrist to finger curls
Start with your wrist in supination (palm up) and with a weight in your hand. Fully flex your wrist. Next, slowly lower the weight down first by extending at the wrist then start to open your hand as if the weight were to fall from your fingertips. You should count to at least 5 full seconds during this motion. Once at the end of the movement, curl the weight back to the starting position. Hold briefly at the starting position, then repeat.
Note: 1-hand is easier than 2 hand setups as most 2 handset ups require use of an olympic bar which may be a standard 45 pounds. Once you can tolerate this weight, I recommend performing 2 hand because it is more efficient and forces you to remain in supination.
2. Eccentric reverse curls
Again, 2 hand is preferred for efficiency and because with a 1 hand set up you are more likely to leave the pronated position of the wrist and rather will perform more of a hammer curl which will work your brachioradialis more, rather than working the wrist extensors.
With a two hand grip in the pronated position, wrap your thumb OVER the bar (thumb will be next to your index finger) rather than under the bar. This over grip will force you to use your finger flexors, which is ideal for climbing.
Start with the bar by your thighs, elbows in extension. Curl the bar up to your chest. Next, slowly lower the bar down over at least 5 full seconds. Raise the bar back up and repeat.
3. Eccentric pronation / supination
This can be accomplished in many ways, but one way I love is with a PVC pipe as you can easily change the weight. This also allows you to work on both eccentric pronation and eccentric supination. A free weight is also possible but is more challenging to adjust to the proper level of difficulty.
Grab the pipe and start with it facing straight up. Slowly lower the pipe down until it is parallel to the floor. You should count at least 5 seconds before you return to the start position. Next, lower the pipe down the opposite direction. Again, wait until it is parallel with the floor.
Note: you can perform both hands at the same time if you use a free weight.
4. Knuckle push ups
This is a basic initiation into closed chain wrist stabilization. This is necessary to build proprioception or joint awareness during your exercise.
If you cannot do a push up it is OK to perform them on your knees. Also, if you cannot go through a large range of motion, no worries! Keep them shallow at first and work on increasing your depth.
If you have pain at the knuckles simply add a yoga mat or light padding. This will add some instability so be careful, but it also has the benefit of working on more stability!
5. Plank shoulder taps
Start in a push up position with a closed fist. It is easier if you start with your hands narrow and your feet wide. Keep your core tight, and tap the right hand to the left shoulder. Hold briefly, replace your hand, then perform on the other side.
Progression: touch your thigh on the same side (right hand touches right thigh) or make your feet more narrow, this will force you to use more core.
6. Plank Clocks
Place an exercise band such as a theraband loop around both wrists. Keep the band just above the bend at your wrist to force your body to stabilize itself. Position: feet wide and your starting hand under the center of your chest. Movement: take your right hand and reach towards 1:00, 3:00, and 5:00. Repeat as tolerated or until fatigued. Switch hands and repeat
Use a light band initially or you may fall over.
Ran out of room!! See the rest of the show notes here: https://www.hoopersbeta.com/library/wrist-stability-training-for-climbing-part-1
Видео Wrist Stability Training for Climbing - Part 1 - Hooper's Beta Ep. 22 канала Hooper's Beta
Показать
Комментарии отсутствуют
Информация о видео
Другие видео канала
 Bullet Proof Wrists - Wrist Stability Training for Climbing - Part 2 - Hooper's Beta Ep. 23
 I was rock climbing and now my wrist hurts - TFCC Injuries - Hooper's Beta Ep. 21
 Let's End the Climber's Hunch Epidemic (How to Fix "Bad Posture")
 This Average Climber Trained Wrist Rolling for 30 days - Ft. Hooper’s Beta
 Fingerboard Training - 3 Common Mistakes for Climbers
 Stretch Your Forearms the Right Way (BECAUSE ANATOMY!)
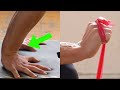 Bulletproof Wrists | Decrease Pain & Increase Strength
 Here's how to Crimp without getting injured - Hooper's Beta Ep. 2
 How to NOT Get Injured Climbing (NO GYM - PRO’S ROUTINE)
 Can You Pass These Simple Shoulder Mobility Tests? (Recommendations for Climbers!)
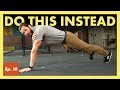 Top 8 exercises that are BETTER than PUSHUPS for climbers - Hooper's Beta Ep. 10
 How to Increase Shoulder Mobility for Climbers (Another Underrated Skill!)
 Lower Body Flexibility Follow Along | Lattice Training
 I Use Anatomy to Make a 10-Minute Warm-Up for Climbers Who HATE Warming Up
 Sofya Yokoyama VS Spicey World Cup Problems
 Rock Climbers' Shoulder Pain: Cause & Treatment - Biceps Tendinopathy Pt. 2 - Hooper's Beta Ep. 27
 How To Warm Up Your Fingers And Wrists For Climbing | The Climbing Doctor
 Golfer's Elbow From Climbing - Solutions, Causes and Assessment
 Should Climbers Weight Train? (MY PERSPECTIVE AS A PHYSICAL THERAPIST)
 Home Workout For Climbing: Level 2 Difficulty!