- Популярные видео
- Авто
- Видео-блоги
- ДТП, аварии
- Для маленьких
- Еда, напитки
- Животные
- Закон и право
- Знаменитости
- Игры
- Искусство
- Комедии
- Красота, мода
- Кулинария, рецепты
- Люди
- Мото
- Музыка
- Мультфильмы
- Наука, технологии
- Новости
- Образование
- Политика
- Праздники
- Приколы
- Природа
- Происшествия
- Путешествия
- Развлечения
- Ржач
- Семья
- Сериалы
- Спорт
- Стиль жизни
- ТВ передачи
- Танцы
- Технологии
- Товары
- Ужасы
- Фильмы
- Шоу-бизнес
- Юмор
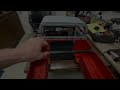
Creality K2 Plus Full Head Removal Tutorial
Ready to upgrade, clear a massive clog, or maintain your Creality K2 Plus? In this video, we walk you through the complete process of safely removing the entire print head assembly. This is a straightforward process, but there are a few delicate ribbon cables and screws you need to be mindful of!
If this video helps you out, please give it a Like and Subscribe for more Creality K2 Plus guides, mods, and 3D printing tutorials!
Time Line
0:00 Intro
0:19 Front Cover Removal
0:26 PTFE Tube Removal
0:55 Unplug Heater and Thermistor
1:20 Hot End Removal
2:25 Extruder Removal
4:20 Mistake 1
5:14 Lower head Removal
6:35 Back Cap Removal
6:55 Mistake 2 Part 1
7:22 Cable Chain Removal
8:45 Unclipping Back Clips For Lower head
9:47 Mistake 2 Part 2
10:39 The Lower Head Screws (That I Missed)
11:05 Botton Head Cable Removal
13:02 Break Out Board Removal
14:01 Mistake 3
14:39 head Comes Off
18:06 Reinstalling Top Of Print Head
19:46 Reinstalling Break Out Board
20:30 Reconnecting Bottom Head Cables
21:16 Reinstalling Bottom Of Print Head
22:31 Reinstalling Cable Chain
24:57 Reinstalling Back Cap
25:25 Reconnecting Motor
26:20 Reinstalling Extruder
31:56 Reinstalling Print Head
33:53 Reinstalling Front Cover
33:59 Outro
⚠️ Disclaimer
3D printing maintenance involves delicate electronics and hot components. Ensure your machine is fully powered off, unplugged, and completely cooled down to room temperature before attempting this repair. Proceed at your own risk!
#crealityk2plus #3dprinting #techtutorial #howto #k2plus
Видео Creality K2 Plus Full Head Removal Tutorial канала GingerGeekStudios
Комментарии отсутствуют
Информация о видео
20 ч. 38 мин. назад
00:34:05
Другие видео канала