How to Visually Tune PID Control Loops
This video shows how I tuned the PID control loop of a balancing robot. The behavior of the robot is shown, and perhaps more importantly, I also show live graphs of the error, set point, proportional component, integral component and derivative component. Finally the source code is shown and explained.
The video starts with a brief demo of how the robot performs with a tuned PID control loop. The balancing robot does not have any wheel encoders or other position feedback, so the only control loop inputs are the pitch of the robot and the throttle input from the user. Because of that, the robot can drift a little if it picks up speed, but even so, with a properly tuned PID control loop it performs fairly well.
I then show a proportional-only control loop and we see how it performs when the gain is too low or too high.
Next I add the integral part, forming a PI control loop. Again, I show how it looks when the gain is set too low or too high.
Then I add the derivative part, forming the PID control loop. The derivative part helps to dampen oscillations and really brings everything together. Like before, I also show how it behaves when the gain is too low or too high.
Finally I show the source code written for an STM32F0 microcontroller, and explain how it works.
The source code is available here:
https://github.com/farrellf/Balancing_Robot_Firmware/tree/e6681bd67639bed7cd1b115c7f6c5bafada79cbc
This video is part of a series showing how to build a balancing robot:
Part 1: Modify RC Servos for Continuous Rotation and External H-Bridge Control
https://www.youtube.com/watch?v=cQuLKN0oYms
Part 2: Building a Robot Chassis with Brass Square Tube, a Dremel, and Solder
https://www.youtube.com/watch?v=XhtnTBbiJTI
Part 3: First Steps with a GY-86 10DOF Sensor: MPU6050, HMC5883L and MS5611
https://www.youtube.com/watch?v=hvjNaIlHPV0
Part 4: 6DOF & 9DOF Sensor Fusion with Madgwick's Filter, MPU6050, HMC5883L (GY-86 Module)
https://www.youtube.com/watch?v=WqQ3HZCI3nA
Part 5: How to Use CC2500 PA LNA 2.4GHz Wireless RF Modules
https://www.youtube.com/watch?v=OY45ZNGy0Sk
Part 6: GPU-Accelerated Data Logging and Telemetry
https://www.youtube.com/watch?v=yYyW16FYqE0
Part 7: [THIS VIDEO] How to Tune PID Control Loops Visually
https://www.youtube.com/watch?v=-bQdrvSLqpg
Видео How to Visually Tune PID Control Loops канала upgrdman
Показать
Комментарии отсутствуют
Информация о видео
Другие видео канала
 Tuning A Control Loop - The Knowledge Board
 Arduino Unboxing: Self-Balancing Robot Kit ELEGOO Tumbller
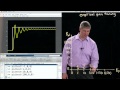 Empirical PID gain tuning (Kevin Lynch)
 Controlling Self Driving Cars
 How to Tune a PID Controller
 Easy Arduino Data Logging and Telemetry
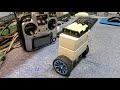 My Self Balancing Robots
 The Ultimate Beginners Guide to Powder Coating - How to Powder Coat at Eastwood
 6DOF & 9DOF Sensor Fusion with Madgwick's Filter, MPU6050, HMC5883L (GY-86 Module)
 Understanding PID Control, Part 1: What Is PID Control?
 PID brushless motor control tutorial
 Flight Control System Design: Hardware and PCB Design with KiCAD
 Hardware Demo of a Digital PID Controller
 Beginner Guide // How To Build FPV Drone 2019
 PIDs Simplified
 EEVacademy #6 - PID Controllers Explained
 How-To: Visuino, Shift Register, LED Bar, Encoder And More
 How to Balance Robot PID tutorial in under 2 minutes! #BalanceBot
 Advanced Arduino Telemetry and Data Visualization