ZBrush to Arnold for Maya - 32 Bit Displacement UDIM Tutorial
In this ZBrush to Arnold tutorial, we cover the entire workflow of working with displacement maps from ZBrush to Arnold. We use the Multi Map Exporter plugin in ZBrush to generate our maps, which we then bring into Arnold for Maya 2018. The tutorial is showing you how to work with UDIMs and how to get an accurate result in the end.
Important Correction! 20:20
In the video we say that you change the mid value under 'Bounds Padding'. This is wrong. You change it under 'Scalar Zero Value' instead. It's the same place.
We use the FlippedNormals Lighting Scenes 2.0 to light and render the character:
https://flippednormals.com/tutorial/flippednormals-lighting-scenes/
We hope you enjoyed this tutorial, make sure to follow the links below for even more content.
Website - https://flippednormals.com/
Facebook - https://www.facebook.com/flippednormals
Twitter - https://twitter.com/flippednormals
Vimeo - http://vimeo.com/flippednormals
Subscribe now to stay up to date with future videos!
https://www.youtube.com/c/FlippedNormals?sub_confirmation=1
Видео ZBrush to Arnold for Maya - 32 Bit Displacement UDIM Tutorial канала FlippedNormals
Показать
Комментарии отсутствуют
Информация о видео
Другие видео канала
 Ten Reasons Your 3D Art Isn't Improving
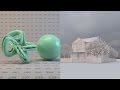 Tutorial No.58 : A Quick Introduction to Arnold 5 for 3ds Max 2018 (MAXtoA)
 Getting Started with Sculpting - ZBrush for Beginners Tutorial
 ZBrush to V-Ray for Maya - 32 Bit Displacement Maps
 UDIMs - Modelling and Texturing Essentials
 How to transfer polypaint data to Maya, Arnold (no uvs)
 #AskZBrush: “Is there a way to bake out the small details when creating a Normal/Displacement Map?”
 ZBrush Displacement Rendering in Maya with Arnold
 Zbrush Multi Map Exporter - Correctly exporting UDIMs and Displacement
 Realistic Portraiture with Kris Costa
 ZBrush to Blender Workflow - Using GoB
 Introduction to Mari - Getting Started with Texturing
 ZBrush to Blender 2.8 Displacement Maps - Ultimate Guide
 Displacement in Arnold 5 & Maya 2018.
 What's new in Maya 2022?
 Polypaint a Head in ZBrush - Color Theory
 Displacement Maps in Arnold
 Lighting in Arnold for Maya | Lighting Tutorial
 #AskZBrush: “How can I create a Normal Map for a model inside of ZBrush?”