How to mount a sliding patio door
To get the best performance out of your new sliding patio door, it is important to mount it correctly.
- DISMOUNT THE OPENING PART OF THE SLIDING PATIO DOOR
First, block up the foundation. Dismount the opening part of the sliding patio door. Then remove the wooden plates which were protecting the jambs during transport. Then lift the sliding patio door from the transport plank to the three blocks which you have already positioned in the brickwork aperture.
- BLOCKING-UP THE SLIDING PATIO DOOR
It is important that the blockings form a horizontal and totally level line so that the cill will be completely straight. When you install a sliding patio door, it is important to block it up very carefully. You must block up the sliding patio door below each vertical frame and at all the points in the sides and bottom where the frame is to be fastened. Remember that the cill has to be blocked up to be firm to step on. The maximum distance between each block is 30cm. For additional information about correct blocking, see the label on the pane. We recommend that you always block up at the closing point on the jamb. This will make it more difficult for a burglar to break open the door.
- ADJUST THE SLIDING PATIO DOOR
Please note however, you do not block up the head as there must be room for it to move under a variable roof load.
- FIX THE SLIDING PATIO DOOR
Then ensure that the sliding patio door is plumb and level. Always start by measuring diagonally to ensure that the door is positioned absolutely correctly in the brickwork aperture. When you have adjusted the sliding patio door and checked that it is plumb and level, you can start to fix it. Use at least 3 frame screws in each jamb: 1 frame screw in the cill and, if possible, 2 flexible frame screws on the head. Fix the sliding patio door by drilling through the aluminium profile. When you are mounting the frame screws, you must ensure that you screw them into the wall, not into a joint. You can now fit the cover caps on the screws. Finally, you must check that the door opens and closes correctly. The sliding patio door has now been installed correctly and you are now ready to joint or mount expanding sealing strips.
Видео How to mount a sliding patio door канала RationelWindowsDoors
Показать
Комментарии отсутствуют
Информация о видео
Другие видео канала
 How to Install a Sliding Glass Door | This Old House
 How to Take Out a Screen - Double Hung Window | Wonder Windows
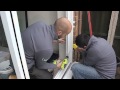 How to install patio doors
 3 part sliding Aluminium door
 Installing a New Door in an Exterior Brick Wall
 How to Install a Sliding Patio Door
 How to Transition Wood floors to Sliding Glass Doors and Tile
 How to adjust Rationel AURAPLUS sidehung windows
 How to Install a Patio Door | BEST Way To Install Is...
 How to Replace a Sliding Glass Door Latch
 Replacing Windows In A Brick Home The RIGHT WAY
 Sliding Glass Door Installation Tips
 Patio Door Installation
 How To Remove Sliding Patio Doors
 How to Install 350 Series Sliding Patio Door
 Installing New Sliding Patio Doors and Aluminium Copings
 Barn Door Track Installation | Step by Step Guide
 How To Reframe A Wall For A Larger Window
 Sliding Door - Aluminium - 3 panels
 Removing your screen from New York Sash Double Hung Window