CENTRO DE NAVIDAD,DIY,DIVINO💒
CENTRO DE NAVIDAD,DIY,DIVINO💒
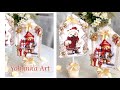
Precioso centro navideño, ideal para fiestas y celebraciones en familia.
Pinchar en este enlace para descargar el patrón de el vestido de los angelitos
https://yobanka-art.com/centro-de-navidad-diy-divino/
https://www.facebook.com/yobankaarte/
https://www.facebook.com/groups/385506815198633/
https://www.instagram.com/yobanka_art/?hl=es
Paso a paso. Step bu Step
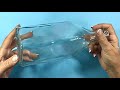
Sobre una base de madera de 50 por 25 cm. montaremos nuestro centro.Primero pegaremos dos círculos de cartón , en uno de los laterales. Este cartón nos servirá para poder poner nuestro arbolito.
Uniremos los dos trozos de cartón con silicona y lo pegaremos a la base de madera con cola blanca.
Esta base que hemos hecho, vamos a endurecerla con trozos de papel de cocina y cola blanca.
A continuación, sobre el cartón circular haremos 8 orificios para introducir unos palitos de madera , con los que haremos el árbol, con ayuda de un punzón agujerearemos la base para poder introducirlos y los pegaremos con cola blanca Cuando lo tengamos seco lo pintaremos con pintura en spray de color dorado
Luego decoraremos el árbol, primero colocamos unas luces led a pilas en el árbol y también pondremos con cola de ratón unas tiras alrededor de nuestro árbol, todo esto lo fijaremos a al árbol con cola blanca. Con un cortador de forma de estrella aremos estrellas blancas y doradas y las pegaremos a nuestro árbol
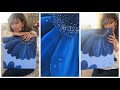
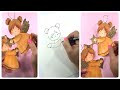
Ahora pasaremos a hacer los angelitos, mas abajo tienes un enlace donde poder descargar el patrón de el vestido. Recortaremos el patrón sobre dos trozos de fieltro, lo cosemos uno con otro , le damos la vuelta al vestido y hacemos un rulo con goma eva, que nos servirá como armazón del cuerpo y también sera el cuello de el angelito, tenemos que decorar el vestido con encaje y unas estrellitas doradas y rellenarlo con relleno de cojín
Pasamos a hacer la cabeza, sobre una esfera de pòprexpan, pegaremos goma eva , con ayuda de calor , ablandamos la goma eva y lo adaptamos a la forma de la esfera, haremos media de color carne y media de color marron
pegamos la cabeza sobre el cuerpo que ya tenemos hecho, y empezamos a poner el pelo, el cual moldearemos también con ayuda de calor, e iremos pegando mechón a mechón hasta poner todo el pelo
Dibujaremos la cara con un rotulador permanente y le daremos color a la cara con colorete. Le hacemos unas manitas con goma eva, hacemos la partitura con un trozo de cartón, y se la pegamos a la mano.
Con un trozo de gasa y con ayuda de silicona caliente decoramos la parte de abajo, pegamos los angelitos, las cajitas de regalo, decoramos con estrellas, y le ponemos un poco de purpurina
On a wooden base 50 by 25 cm. we will mount our center.First we will stick two circles of cardboard, in one of the sides. This card will serve to put our little tree.
We will join the two pieces of cardboard with silicone and we will stick it to the base of wood with white tail.
This base we have made, we will harden it with pieces of kitchen paper and white glue.
Then, on the circular cardboard we will make 8 holes to introduce some wooden sticks, with which we will make the tree, with the help of a punch we will pierce the base to be able to introduce them and we will glue them with white glue. When we have it dry we will paint it with painting in golden spray
Then we will decorate the tree, first we put some lights led battery in the tree and also we will put with tail of strips around our tree, all this we will fix it to the tree with white tail. With a star-shaped cutter we make white and golden stars and stick them to our tree
Now we will make the little angels, but below you have a link where you can download the pattern of the dress. Cut the pattern on two pieces of felt, sew it with each other, we turn the dress and make a roll with eva rubber, which will serve as a body frame and will also be the neck of the angel, we have to decorate the dress with lace and some golden stars and fill it with padding
We go to make the head, on a sphere of pòprexpan, we will paste eva rubber, with the help of heat, we soften the rubber eva and we adapt it to the form of the sphere, we will do average of color meat and average of brown color
we put the head on the body that we have already done, and we started to put the hair, which we will also mold with the help of heat, and we will be strumming a strand until we put all the hair
We will draw the face with a permanent marker and we will give color to the face with rouge. We make a little hand with rubber eva, make the score with a piece of cardboard, and stick it to the hand.
With a piece of gauze and with the help of hot silicone we decorate the bottom, paste the little angels, gift boxes, decorate with stars, and we put a little glitter
-~-~~-~~~-~~-~-
Please watch: "Transforma una Caja De Cartón en una Bandeja Espectacular"
https://www.youtube.com/watch?v=6t5I6bh8suI
-~-~~-~~~-~~-~-
Видео CENTRO DE NAVIDAD,DIY,DIVINO💒 канала Yobanka Art - Decoracion DIY - Recetas - Costura
Precioso centro navideño, ideal para fiestas y celebraciones en familia.
Pinchar en este enlace para descargar el patrón de el vestido de los angelitos
https://yobanka-art.com/centro-de-navidad-diy-divino/
https://www.facebook.com/yobankaarte/
https://www.facebook.com/groups/385506815198633/
https://www.instagram.com/yobanka_art/?hl=es
Paso a paso. Step bu Step
Sobre una base de madera de 50 por 25 cm. montaremos nuestro centro.Primero pegaremos dos círculos de cartón , en uno de los laterales. Este cartón nos servirá para poder poner nuestro arbolito.
Uniremos los dos trozos de cartón con silicona y lo pegaremos a la base de madera con cola blanca.
Esta base que hemos hecho, vamos a endurecerla con trozos de papel de cocina y cola blanca.
A continuación, sobre el cartón circular haremos 8 orificios para introducir unos palitos de madera , con los que haremos el árbol, con ayuda de un punzón agujerearemos la base para poder introducirlos y los pegaremos con cola blanca Cuando lo tengamos seco lo pintaremos con pintura en spray de color dorado
Luego decoraremos el árbol, primero colocamos unas luces led a pilas en el árbol y también pondremos con cola de ratón unas tiras alrededor de nuestro árbol, todo esto lo fijaremos a al árbol con cola blanca. Con un cortador de forma de estrella aremos estrellas blancas y doradas y las pegaremos a nuestro árbol
Ahora pasaremos a hacer los angelitos, mas abajo tienes un enlace donde poder descargar el patrón de el vestido. Recortaremos el patrón sobre dos trozos de fieltro, lo cosemos uno con otro , le damos la vuelta al vestido y hacemos un rulo con goma eva, que nos servirá como armazón del cuerpo y también sera el cuello de el angelito, tenemos que decorar el vestido con encaje y unas estrellitas doradas y rellenarlo con relleno de cojín
Pasamos a hacer la cabeza, sobre una esfera de pòprexpan, pegaremos goma eva , con ayuda de calor , ablandamos la goma eva y lo adaptamos a la forma de la esfera, haremos media de color carne y media de color marron
pegamos la cabeza sobre el cuerpo que ya tenemos hecho, y empezamos a poner el pelo, el cual moldearemos también con ayuda de calor, e iremos pegando mechón a mechón hasta poner todo el pelo
Dibujaremos la cara con un rotulador permanente y le daremos color a la cara con colorete. Le hacemos unas manitas con goma eva, hacemos la partitura con un trozo de cartón, y se la pegamos a la mano.
Con un trozo de gasa y con ayuda de silicona caliente decoramos la parte de abajo, pegamos los angelitos, las cajitas de regalo, decoramos con estrellas, y le ponemos un poco de purpurina
On a wooden base 50 by 25 cm. we will mount our center.First we will stick two circles of cardboard, in one of the sides. This card will serve to put our little tree.
We will join the two pieces of cardboard with silicone and we will stick it to the base of wood with white tail.
This base we have made, we will harden it with pieces of kitchen paper and white glue.
Then, on the circular cardboard we will make 8 holes to introduce some wooden sticks, with which we will make the tree, with the help of a punch we will pierce the base to be able to introduce them and we will glue them with white glue. When we have it dry we will paint it with painting in golden spray
Then we will decorate the tree, first we put some lights led battery in the tree and also we will put with tail of strips around our tree, all this we will fix it to the tree with white tail. With a star-shaped cutter we make white and golden stars and stick them to our tree
Now we will make the little angels, but below you have a link where you can download the pattern of the dress. Cut the pattern on two pieces of felt, sew it with each other, we turn the dress and make a roll with eva rubber, which will serve as a body frame and will also be the neck of the angel, we have to decorate the dress with lace and some golden stars and fill it with padding
We go to make the head, on a sphere of pòprexpan, we will paste eva rubber, with the help of heat, we soften the rubber eva and we adapt it to the form of the sphere, we will do average of color meat and average of brown color
we put the head on the body that we have already done, and we started to put the hair, which we will also mold with the help of heat, and we will be strumming a strand until we put all the hair
We will draw the face with a permanent marker and we will give color to the face with rouge. We make a little hand with rubber eva, make the score with a piece of cardboard, and stick it to the hand.
With a piece of gauze and with the help of hot silicone we decorate the bottom, paste the little angels, gift boxes, decorate with stars, and we put a little glitter
-~-~~-~~~-~~-~-
Please watch: "Transforma una Caja De Cartón en una Bandeja Espectacular"
https://www.youtube.com/watch?v=6t5I6bh8suI
-~-~~-~~~-~~-~-
Видео CENTRO DE NAVIDAD,DIY,DIVINO💒 канала Yobanka Art - Decoracion DIY - Recetas - Costura
CENTRO DE NAVIDAD-DIY- DIVINO navidad Como hacer un centro de navidad como hacer un angel nanualidades de navidad decoracion de navidad manualidades para navidad angel de foami como hacer un arbolito de navidad arbol de navidad diy como decorar en navidad arbol de navidad con led centro de navidad con luz adornos navideños manualidades Diy christmas yobanka art CENTRO DE NAVIDAD DIY DIVINO💒 diy christmas ornaments fiestas centro de navidad
Комментарии отсутствуют
Информация о видео
27 октября 2017 г. 14:54:40
00:32:59
Другие видео канала