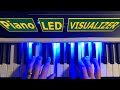
How to make a Reactive LED Piano Visualizer - Step by Step Guide
Buy me a Coffee: https://www.buymeacoffee.com/Pecfi1z
Here is a step-by-step for making a reactive LED Piano Visualizer. All thanks to Frederick (Github: Onlaj) for the help.
Don't forget to subscribe my channel and to hit the notification bell while you are here. Your support to my work is greatly appreciated.
Checkout my website: https://adityaprk04.wixsite.com/website
Connect with me on Facebook: https://fb.me/APPianoMusic
Connect with me on Twitter: https://twitter.com/adityaprk04
Here are the step by step instructions I followed original instructions here https://github.com/onlaj/Piano-LED-Visualizer
Parts List:
Raspberry Pi (Kit): https://amzn.to/3dOdmdY
Raspberry Pi (Presoldered GPIO): https://amzn.to/2QWQVcu
Power Adapter: https://amzn.to/39vGRxA
LCD Hat: https://amzn.to/2UsS3Xv
LED Strip: https://www.aliexpress.com/item/32832420003.html?spm=a2g0s.9042311.0.0.260f4c4dMUKJaH
Instructions:
1. Install Raspbian on RPi. (https://projects.raspberrypi.org/en/projects/raspberry-pi-setting-up)
2. Connect the LED strip to RPi. Just follow the instructions from this guide to make wired connections. You can skip the commands this guide has for "Preparation and Installation" (https://tutorials-raspberrypi.com/connect-control-raspberry-pi-ws2812-rgb-led-strips)
3. Enable SPI (https://www.raspberrypi-spy.co.uk/2014/08/enabling-the-spi-interface-on-the-raspberry-pi/)
4. Configuring automatic midi connection - Follow the instructions here for configuring automatic midi connection and skip everything else from the guide. If you want to also configure midi Bluetooth, the follow those optional steps from this guide. In my case i just wanted to light the led from my piano so i skipped the bluetooth. (https://neuma.studio/rpi-as-midi-host.html)
5. Open a terminal window and run the following commands (I recommend running the commands one by one so if there is an error you can easily see it)
sudo apt-get install libjack0
sudo apt-get install libjack-dev
sudo apt-get install libasound2-dev
pip install RPi.GPIO
pip install webcolors
pip install psutil
pip install mido
pip install Pillow
pip install python-rtmidi
pip install rpi-ws281x
git clone https://github.com/onlaj/Piano-LED-Visualizer.git
6. At this point everything should be setup. to test you can go to the folder containing the cloned library and test if things are working
cd Piano-LED-Visualizer
sudo -E python visualizer.py
Once everything works you can break out to command prompt by pressing CTRL+C
7. (optional) If you intend to use this device only for the LED visualizer, i changed the boot settings to automatic in non gui mode and configured autostart for the script
At the command prompt:
sudo raspi-config
- Select “Boot Options” then “Desktop/CLI” then “Console Autologin”
- save and exit
sudo nano /etc/profile
- scroll to the very bottom and insert the following command
sudo -E python /home/pi/Piano-LED-Visualizer/visualizer.py &
- Type “Ctrl+X” to exit, then “Y” to save followed by “Enter” twice.
- sudo reboot - everything should work now and the visualizer program should auto start when you reboot.
Видео How to make a Reactive LED Piano Visualizer - Step by Step Guide канала AP Music
Показать
Комментарии отсутствуют
Информация о видео
Другие видео канала
 How To Make a DIY Piano LED Visualizer
 Ten Things Serious Pianists Do Every Day
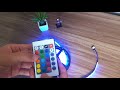 FITA LED RGB - ILUMINAÇÃO
 How To Make A Remote Viewable Camera With Raspberry Pi (Beginner Project)
 MozART group - How to impress a woman (Official Video, 2017)
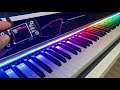 Piano LED Visualizer
 How to Make a Girl Smile
 Setting up your Raspberry Pi Zero Starter Kit - A guide for beginners
 How to make Piano videos (like Rousseau) without Synthesia
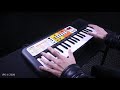 Yamaha's Astonishing $50.00 Keyboard (PSS-F30)
 Design Patterns in Python by Peter Ullrich
 Violin Timelapse: Age 4 to 22 (Violin Progress)
 Natural Language Processing With NLTK & Python - NLP In 2021
 How To Play Can't Help Falling In Love by Elvis Presley on Piano - Very Easy Piano Tutorial
 When Russian Plays MAGIC PIANO on Omegle...
 Wish YOU can make piano particle videos like these? Try this!
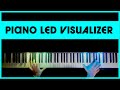 Piano or Keyboard LED Bar - Visualizer - Tutorial for build (Rousseau / Kassia like)
 How to Film Yourself Playing Keyboard to Live-Stream, Record or Zoom!
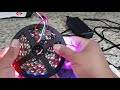 SP107E setup + Multiple LED's
 Kris Nicholson Unboxed his new KORG MicroKEY AIR 61 his new Airline Keyboard for Travel