DIY 200W Portable Bluetooth Boombox Speaker Kit Build | Parts Express Blast Box
Purchase speaker kit here (US) 👉🏼 https://bit.ly/2N0JTV3 📦🔊
• 21V Battery board - https://bit.ly/39txaC4
• Power LED cables - https://bit.ly/3nIwI86
Purchase speaker kit here (EU) 👉🏼 https://bit.ly/38Tzmn0 📦🔊
• 21V Battery board - https://bit.ly/3p1H1Wk
• Power LED cables - https://bit.ly/2XQrKvo
• 18650 batteries - https://bit.ly/35mzetn (for 21V battery board)
𝗠𝗮𝘁𝗲𝗿𝗶𝗮𝗹𝘀:
Carbon fiber vinyl - https://bit.ly/2tbmYMY
Acoustic foam - https://bit.ly/3i6z1As
3mm double-sided tape - https://bit.ly/3bF7oxl
𝗧𝗼𝗼𝗹𝘀:
TS100 soldering iron - https://bit.ly/3kndDam
Wire stripper - https://bit.ly/34kBgLn
Cordless drill - https://bit.ly/2UiMSbL
Drill bit set - https://bit.ly/3kgSG0V
Center punch - https://bit.ly/2FWc3xu
Orbital sander - https://bit.ly/2Uncq7z
Wood router - https://bit.ly/3aPdISq
Router bits - https://bit.ly/3kkQXYo
Tack cloth - https://bit.ly/3og3qiv
Solder - https://bit.ly/2XNOUSt
Flux - https://bit.ly/33eXs5I
Soldering Stand - https://bit.ly/2P4QOK7
Hi everyone! Thank you for checking one more project of mine. On this one I was reached out by Parts Express to see if I could assemble one of their DIY boombox speaker kits that they have. This kit has incredible value for what it provides. The kit includes:
• CNC Cut Plywood Enclosure
• TPS3116D2 Class D 2.1 Bluetooth 5.0 Amplifier Board
• Dayton Audio DCS165-4 6-1/2" Classic Subwoofer 4 Ohm
• Dayton Audio DS215-PR 8" Designer Series Passive Radiator
• Dayton Audio LBB-3 3 x 18650 Lithium Battery Charger Board/Module 12V
• 2 x Dayton Audio ND25TA-4 1" Titanium Dome Neodymium Tweeter
• 2 x Dayton Audio DSA90-8 3" Aluminum Cone Full-Range Driver 8 Ohm
• Wire, Hardware, and Other Components
Crossover Components:
• 2 x Dayton Audio DNR-8.0 8 Ohm 10W Precision Audio Grade Resistor
• 2 x Dayton Audio 1.00mH 20 AWG Air Core Inductor Crossover Coil
• 2 x Dayton Audio 0.10mH 20 AWG Air Core Inductor Crossover Coil
• 2 x Dayton Audio DMPC-1.5 1.5uF 250V Polypropylene Capacitor
• 4 x Dayton Audio DMPC-3.3 3.3uF 250V Polypropylene Capacitor
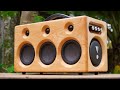
As you can see the kit includes many high-quality components for the speaker. The enclosure itself is made of precisely CNC cut 1/2 inch plywood.
I'll start the speaker assembly process by inserting the speaker terminals on the side panels of the enclosure, making sure the cables with crimp terminals will be inside the separate woofer enclosure. Using the wire stripper / crimp tool (in the tools list above) I cut and crimp two pieces of wire for the woofers. Make sure you use to of the larger terminals for the midrange speakers.
I then cut two pieces of MDF for the crossovers that would nicely fit on the bottom of the enclosure once assembled. Drilled the holes for the screws and marked the same locations accordingly on the bottom panel. I also drilled two holes next to the charging port hole for the power LEDs and I cut a small piece of plywood for the battery level LEDs.
Before assembling the enclosure I routed the inside of the amplifier panel - not necessary but makes it look neat and removes sharp edges.
For gluing the enclosure I used plain PVA wood glue and a brush to spread it along the edges. The pieces fit really nicely and don't require effort to assemble. A few clamps will ensure a good bond between the panels.
Once the enclosure has dried, I used an orbital sander to make it nice and smooth. After that I routed and sanded the outer edges of the enclosure.
I used a few screws as stands while spraying the enclosure. I started by wiping any dust with a tack cloth and spraying the front panel with matt clear coat. I then carefully flipped the enclosure and proceeded on other sides.
I then soldered the crossover components for which you can find the schematic in the kit purchase link. I made sure to use epoxy to glue the components on the board. Using the amazing TS-100 soldering iron I connected the wires to the crossover and placed them inside the enclosure.
Important step of the build is to seal any holes that the air inside the enclosure could leak through. I covered the LEDs with a bit of silicone to make sure of that. I also used double sided tape for sealing the amplifier plate and the battery LED panel.
Once all the components wire wired, I mounted the speaker drivers, charged the speaker using the provided power brick and gave the speaker a test.
I can honestly say that this 2.1 boombox sounds amazing. It is currently my go to speaker for everyday listening and small parties. The camera microphone that I use for testing does not do its justice but the speaker truly has some powerful bass and clear soundstage.
I hope you will give this speaker build a try and as always feel free to leave any comments or questions!
Thanks!
- 𝒟𝑜𝓃𝓃𝓎
Видео DIY 200W Portable Bluetooth Boombox Speaker Kit Build | Parts Express Blast Box канала Donny Terek
• 21V Battery board - https://bit.ly/39txaC4
• Power LED cables - https://bit.ly/3nIwI86
Purchase speaker kit here (EU) 👉🏼 https://bit.ly/38Tzmn0 📦🔊
• 21V Battery board - https://bit.ly/3p1H1Wk
• Power LED cables - https://bit.ly/2XQrKvo
• 18650 batteries - https://bit.ly/35mzetn (for 21V battery board)
𝗠𝗮𝘁𝗲𝗿𝗶𝗮𝗹𝘀:
Carbon fiber vinyl - https://bit.ly/2tbmYMY
Acoustic foam - https://bit.ly/3i6z1As
3mm double-sided tape - https://bit.ly/3bF7oxl
𝗧𝗼𝗼𝗹𝘀:
TS100 soldering iron - https://bit.ly/3kndDam
Wire stripper - https://bit.ly/34kBgLn
Cordless drill - https://bit.ly/2UiMSbL
Drill bit set - https://bit.ly/3kgSG0V
Center punch - https://bit.ly/2FWc3xu
Orbital sander - https://bit.ly/2Uncq7z
Wood router - https://bit.ly/3aPdISq
Router bits - https://bit.ly/3kkQXYo
Tack cloth - https://bit.ly/3og3qiv
Solder - https://bit.ly/2XNOUSt
Flux - https://bit.ly/33eXs5I
Soldering Stand - https://bit.ly/2P4QOK7
Hi everyone! Thank you for checking one more project of mine. On this one I was reached out by Parts Express to see if I could assemble one of their DIY boombox speaker kits that they have. This kit has incredible value for what it provides. The kit includes:
• CNC Cut Plywood Enclosure
• TPS3116D2 Class D 2.1 Bluetooth 5.0 Amplifier Board
• Dayton Audio DCS165-4 6-1/2" Classic Subwoofer 4 Ohm
• Dayton Audio DS215-PR 8" Designer Series Passive Radiator
• Dayton Audio LBB-3 3 x 18650 Lithium Battery Charger Board/Module 12V
• 2 x Dayton Audio ND25TA-4 1" Titanium Dome Neodymium Tweeter
• 2 x Dayton Audio DSA90-8 3" Aluminum Cone Full-Range Driver 8 Ohm
• Wire, Hardware, and Other Components
Crossover Components:
• 2 x Dayton Audio DNR-8.0 8 Ohm 10W Precision Audio Grade Resistor
• 2 x Dayton Audio 1.00mH 20 AWG Air Core Inductor Crossover Coil
• 2 x Dayton Audio 0.10mH 20 AWG Air Core Inductor Crossover Coil
• 2 x Dayton Audio DMPC-1.5 1.5uF 250V Polypropylene Capacitor
• 4 x Dayton Audio DMPC-3.3 3.3uF 250V Polypropylene Capacitor
As you can see the kit includes many high-quality components for the speaker. The enclosure itself is made of precisely CNC cut 1/2 inch plywood.
I'll start the speaker assembly process by inserting the speaker terminals on the side panels of the enclosure, making sure the cables with crimp terminals will be inside the separate woofer enclosure. Using the wire stripper / crimp tool (in the tools list above) I cut and crimp two pieces of wire for the woofers. Make sure you use to of the larger terminals for the midrange speakers.
I then cut two pieces of MDF for the crossovers that would nicely fit on the bottom of the enclosure once assembled. Drilled the holes for the screws and marked the same locations accordingly on the bottom panel. I also drilled two holes next to the charging port hole for the power LEDs and I cut a small piece of plywood for the battery level LEDs.
Before assembling the enclosure I routed the inside of the amplifier panel - not necessary but makes it look neat and removes sharp edges.
For gluing the enclosure I used plain PVA wood glue and a brush to spread it along the edges. The pieces fit really nicely and don't require effort to assemble. A few clamps will ensure a good bond between the panels.
Once the enclosure has dried, I used an orbital sander to make it nice and smooth. After that I routed and sanded the outer edges of the enclosure.
I used a few screws as stands while spraying the enclosure. I started by wiping any dust with a tack cloth and spraying the front panel with matt clear coat. I then carefully flipped the enclosure and proceeded on other sides.
I then soldered the crossover components for which you can find the schematic in the kit purchase link. I made sure to use epoxy to glue the components on the board. Using the amazing TS-100 soldering iron I connected the wires to the crossover and placed them inside the enclosure.
Important step of the build is to seal any holes that the air inside the enclosure could leak through. I covered the LEDs with a bit of silicone to make sure of that. I also used double sided tape for sealing the amplifier plate and the battery LED panel.
Once all the components wire wired, I mounted the speaker drivers, charged the speaker using the provided power brick and gave the speaker a test.
I can honestly say that this 2.1 boombox sounds amazing. It is currently my go to speaker for everyday listening and small parties. The camera microphone that I use for testing does not do its justice but the speaker truly has some powerful bass and clear soundstage.
I hope you will give this speaker build a try and as always feel free to leave any comments or questions!
Thanks!
- 𝒟𝑜𝓃𝓃𝓎
Видео DIY 200W Portable Bluetooth Boombox Speaker Kit Build | Parts Express Blast Box канала Donny Terek
Показать
Комментарии отсутствуют
Информация о видео
Другие видео канала
 Pallet Bluetooth Speaker V3 DIY
 Restoration Ancient Cabinet Speakers | Reuse Antique Sounds
 Upgrade JBL Extreme Fake
 TOP 5 BEST DIY INVENTIONS OF THE YEAR 2020
 Sony SS-D501 3-way speaker system restoration
 JVC PC-W300 Restoration - Part 2 - Speaker Restoration
 DIY 200W Active Subwoofer from Old Logitech Subwoofer
 DIY Executive 200 Watt Portable Bluetooth Speaker Kit Quick Build
 DIY Subwoofer Build With Music Reactive LED Light
 How to Make: STEREO BOOMBOX! I turned OLD Audio Gear into a sound system!
 AMAZING IDEA bluetooth audio player with HDD BROKEN
 DIY Speaker SUPER Bass 6 inch Bluetooth ( 20.000mah battery)
 DIY speaker system - a design that will surprise you
 How To Make Bluetooth Speaker From PVC Pipe At Home
 SOUND BAR V2 - Speaker Build - by SoundBlab
 DIY: Portable Bluetooth Speaker Loud Boombox Led VU
 Rebuild of Vintage Hi-Fi Speakers from 1985 (Radiotehnika S-90)
 Building an invisible Speaker Table
 DIY MultiMedia Bluetooth Speaker 4.1ch | Arduino VU Meter | Acrylic
 DIY Portable Bluetooth Boombox Speaker With Power bank