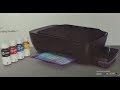
Unbox and Set Up the HP Ink Tank 110 Printer Series | HP Ink Tank | @HPSupport
Chapters:
00:00 Introduction
00:07 Remove ink bottles and printheads
00:10 Remove the printer from the box
00:12 Remove packaging from printer
00:16 Fill ink tanks with ink bottles
01:33 Prepare power cable and plug into the printer
01:40 Install printheads
02:39 Prime the printer
02:46 Load plain white paper and adjust guides
02:55 Prepare for software setup
Learn how to unbox and set up the HP Ink Tank 110 printer series.
For other helpful videos go to https://youtube.com/hpsupport.
More support options for your HP device are available at https://hp.com/support.
For step-by-step guidance, connect with our Virtual Agent: https://virtualagent.hpcloud.hp.com/?botClient=social&botSubClient=YouTube&cc=us&lc=en
Follow these steps to unbox and set up the HP Ink Tank 110 printer series:
- Remove all supplies and the printer from the box.
- Remove the plastic from around the printer.
- Remove the black ink bottle from its packaging.
- Unscrew the cap, remove the seal and throw it away, and then screw the cap back on.
- Open the ink tank lid, and then remove the black ink tank plug.
- Open the black ink bottle cap, turn the bottle upside down, and set it on the ink tank spout.
- Without squeezing, allow the bottle to fill the ink tank.
- When the ink approaches the maximum fill line, remove the bottle, and close the cap.
- Reinstall the black ink tank plug.
- Repeat the filling process for cyan, magenta, and yellow, using all the ink in each bottle.
- Close the ink tank lid.
- Remove the warning sticker from the top of the printer.
- Open the front door and remove the blue tape and cardboard.
- Open the printhead access door and remove the blue tape and carboard.
- Close the printhead access door and front door.
- Plug the power cord into the printer and a wall outlet, and then press the Power button.
- Open the front and printhead access doors.
- With the carriage in the center, turn the orange handle clockwise.
- Push down on the blue latch to open it.
- Remove the orange plastic piece and throw it away.
- Remove the Tri-Color printhead from its package, remove the orange plug, and then remove the plastic tape.
- Avoid touching the contacts or ink nozzles.
- Hold the Tri-Color printhead by its sides and slide it into the left slot until it snaps into place.
- Repeat this process to install the Black printhead in the right slot.
- Push down firmly on the blue latch to close it.
- Close the printhead access door, and the front door.
- Press and hold the Power and Resume buttons for three seconds to begin priming your printer.
- Load plain white paper into the input tray and adjust the guide.
- Finish setting up your Ink Tank printer by visiting 123.hp.com on your mobile device or computer.
Continue the Conversation:
SUPPORT FORUM: https://hp.care/SupportForums
FACEBOOK: https://hp.care/FacebookSupport
TWITTER: https://hp.care/TwitterSupport
INSTAGRAM: https://www.instagram.com/hp
LINKEDIN: https://www.linkedin.com/company/hp
#HP #HPSupport #HPInkTank
SUBSCRIBE: https://www.youtube.com/HPSupport
SHOP NOW: https://www.hp.com/online-store
About HP:
HP Inc. creates technology that makes life better for everyone everywhere – every person, every organization, and every community around the globe. Through our portfolio of printers, PCs, mobile devices, solutions, and services, we engineer experiences that amaze.
This video was produced by HP.
Unbox and Set Up the HP Ink Tank 110 Printer Series | HP Ink Tank | @HPSupport
https://youtu.be/-DrUA3lAo9o
Видео Unbox and Set Up the HP Ink Tank 110 Printer Series | HP Ink Tank | @HPSupport канала HP Support
Показать
Комментарии отсутствуют
Информация о видео
Другие видео канала
 HP 410 || 415 || 416 || 419 ink tank wireless printer installation, ink filling and Test print
 Fix a Cartridge Missing Error | HP Ink Tank 110 Printers | @HPSupport
 HP Ink Tank 110 | 115 | 118 printer : Unbox, Fill Ink Tank, Install printheads & Load paper
 Replace a Printhead | HP Ink Tank 110 Printers | HP
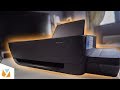 HP Ink Tank 115 Review: A quality printer that won’t break the bank
 HP Ink Tank Wireless 415 Unboxing Testing
 HP Deskjet Ink Tank 115 Test Print
 HOW TO CLEAN PRINTER HEADS ON A HP OFFICEJET PRO 6960/6962/6968/6978 PRINTERS
 E4 Error on HP Ink Tank 319 Printer | Paper Jam Issue | Paper Pickup Sensor issue| Printer Repairing
 hp ink tank printer error| Error 3 | E3 solved| 2021
 HP Ink Tank 310 series Print head Alert light (How to Fix)
 Fix a Paper or Carriage Jam | HP Ink Tank 110 Printer Series | HP
 How to Refill a black ink cartridge hp 60 60xl 61 62 63 64 65 65xl 302 303 303xl 304 304xl 662 680
 HP Ink Tank Series Printers : Repacking the printer for transportation & Unpacking at Destination
 HP Deskjet 2700 WiFi Direct SetUp, Wireless SetUp, Wireless Scanning & Printing !!
 Moving or Transporting The HP Ink Tank 110 Printer Series | HP Ink Tank | HP
 Why the printer is not printing black color/HP Ink Tank 310 Series-Solve this issue at home
 Fixing an Ink Cartridge Missing Error for HP Ink Tank 310, 410 Printer Series | @HPSupport
 HP Ink Tank 315 Cartridge Error