How to make a wooden hair pin / hair fork
Here is a quick video of how I make wooden hair pins or as some call them hair forks. I've made a few fixtures to speed up the process since I try and make them in batches. There is a great deal of hand work but it makes for great practice with hand tools and surfacing. One unique feature is vacuum infusing the mineral oil in a shop made vacuum chamber. This pulls more oil into the wood allowing the finish to last longer.
This hair pin is made with Black Walnut and it is finished with food grade mineral oil and beeswax.
Detailed video breakdown below.
I hope this helps. Get out to the shop and make one!
Or if you’d rather, you can find them here - https://etsy.me/2QCzxH4
Be well,
_Mike
0:05 - Ripping strips of walnut on the table saw
0:11 - Reducing the thickness of the strip with a shop built thickness sander
0:23 - Gluing up three strips of walnut in curved cauls
0:32 - Testing strength of lamination
0:37 - Truing up one edge of blank (preparing a reference edge)
0:42 - Marking width of blanks, trimming on band saw and final dimension on thickness sander
0:55 - Marking length, trimming and sanding to exact length
1:04 - Milling slots with 3D printed fixture to start the shaping process
1:16 - Marking profile and rough carving and sanding interior surfaces
1:54 - Shaping exterior profile
2:06 - Finish sanding body
2:17 - Releasing forks by trimming off excess and shaping with sandpaper
2:23 - Vacuum infusing with food grade mineral oil
2:53 - Finish coat of beeswax
2:58 - All done!!!
Видео How to make a wooden hair pin / hair fork канала MustCreateThings
Показать
Комментарии отсутствуют
Информация о видео
Другие видео канала
 How to Carve a Driftwood Hair Fork
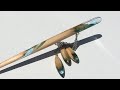 木とレジンのかんざし の作り方 How to make wood and epoxy hairpin.
 3 Easy Bun Hairstyles Using a Hair Prong 🖤 Hair Fork For Long Hair
 wooden wheel making .wheelwrights.
 Making a Copper Wire Hair Fork with Burgundy Pearls
 How to use wooden sticks to make a epoxy hair pin| Epoxy Resin Art 【Handmade Societies ·手工社】
 Woodturning A Pair of Hair Sticks in Iroko
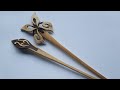 How to Make Hair Stick from Coconut shell/coconutshell craft ideas/Handicraft
 Craft with me | Easy DIY Resin Hairpins / Hairsticks
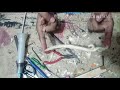 Handmade Wooden Hair stick
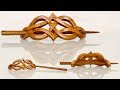 Handmade Wooden Seltic Hair Pin Barrette | Wooden Jewelry For Women and Men
![how to make 3-way leg joinery [woodworking]](https://i.ytimg.com/vi/lxz5s_7w8XM/default.jpg) how to make 3-way leg joinery [woodworking]
how to make 3-way leg joinery [woodworking] Magic wand?Hairpin?How to make wood and epoxy .
 How to carve "Hairsticks"
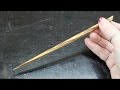 Turning a Hair Stick Without a Lathe
 Cool idea! Don't throw away pieces of wood!
 Carving Fork - wood from discarded bed ( 木 フォーク 作り方 )
 Woodworking- Making a wooden pipe
 Free Tip Friday Hairpins with wire and beads
 How To Use A Hair Fork!