How to Create a Bas-Relief Triptych
Learn How To Create A Bas
Relief Triptych using Red Devil Light Weight Spackling Compound.
Supplies And Directions for The Red Devil Bas Relief Triptych-Winter
Supply List.
3 wood panels 36’ x 12” each
1 gallon bucket of Red Devil Lightweight Spakling
Black Chalk Paint
White acrylic paint
Various stencils-Moon 4.5”, Large tree with branches, 4 sizes of evergreen trees and distant flock of birds.
Deer, fox and elk molds. (From Etsy or Amazon)
Mold spray Release
Painters Tape
Water
Palette knives
Paint brushes
Ruler
Chalk or white watercolor pencil
Cake Decorating Bags
Bowls for mixing
Step #1Priming Your Panel. Paint your panels (front and sides) with Black Chalk paint.Two layers.
Step #2 Stencil The Moon and water. Lay moon stencil on the center panel towards the upper left. Use the white acrylic paint and stencil the moon. Measure 12” from bottom and draw a line across all 3 panels. Tape off line on the bottom.Measure 18” from the bottom and draw a line all the way across the 3 Panels. Tape off the line from the top. Paint this area white. This is your water. You can add a cast shadow from the moon onto the water. Take the moon stencil and place it off center over the painted moon and trowel in RD spackling compound through the stencil.
Step #3 Applying the Mountains. Apply the Red Devil lightweight spackling compound over stencils using a small pallet knife. Create two mountain ranges.
Step #4 Create distant foreground. Mix some of the black paint into the spackling to create a dark gray. Using the distant mountain range stencils, stencil the grey spackling over the stencilsAdd white acrylic paint to the grey spackling and stencil more mountain ranges.
Step #5 Sculpting your tree. Use a large tree stencil and apply the RD spackling through the stencil. Create mass when applying the RD spackling through the stencil.Remove stencil and add more spackling to the tree and branches.
Step #6 Cleaning, Sculpting and Texturing Your Relief.Using a paint brush clean up edges of tree trunk and branches. Add texture to the tree creating a bark like texture.
Step #7 Add Various Size Evergreen Trees. Start with the Larger Evergreen Stencils and trowel RD spackling through the stencils. Remove stencils and let dry. Once dry, add more spackling over the trees creating branches and depth.
Step # 8Create foreground. Trowel on spackling creating the foreground. Think snow drifts. Be liberal with the RD spackling and create depth and texture.
Step #9 Making animals from Molds. Use various molds of different animals, Deer, Fox and Elk. Spray molds with mold release and press in RD Spackling. Let dry overnight. Remove elements from the molds. To adhere the animals, paint white glue on the back and press the animals onto the panels.
Step #10 Paint in shadows,birds and stars. Add grey shadows to the snow in the foreground,left side of the large tree and the evergreen trees.Using a distant bird stencil, stencil in birds flying over the moon. Dab on white paint speckles creating stars and constellations.
Step # 11 Seal the panels. Using a matte clear acrylic sealer paint or spray the entirety of the relief.
Happy Creating!
Best,
Ellie Ellis, CMS
Видео How to Create a Bas-Relief Triptych канала Ellie Ellis, CMS
Показать
Комментарии отсутствуют
Информация о видео
Другие видео канала
 İlginç bir Rölyef çalışması & Kabartma Tablo & Relief Panel
 DIY/Magic Castle from recycled cardboard/Paper crafts/Wall decor
 Барельеф за час. 1 часть
 Rölyef Tablo Çalışması & Beta Balığı kabartma tablo
 Барельеф цветы 1 урок Bas-relief flowers 1lesson
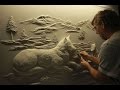 Drywall Art Sculpture by Bernie Mitchell
 لوحات أربح منها سهلة وبمواد رخيصة
 Glue Gun Art: Step by Step Process
 I made my own bas-relief of Napoleon / Cement is amazing / Floating on the wall
 DIY Blue and Silver Glitter Wall Art || Crushed Glass Wall Art
 WOW! Huge 3ft x 6ft Acrylic Pour Painting - A Floating Cup Triptych - Abstract Acrylic Art
 Drywall Art step by step 🤩
 2 Super Unique Metallic Wall Art For Your Home Decor|gadac diy|Room Decorating Ideas|Handmade Crafts
 ADRIANA LEONEL STRAMBI - TELA COM TEXTURA ( PRIMEIRA PARTE)
 Relieve con Yeso, Tutorial. (tips)
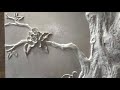 Student reviews Her Bas Relief Class taught by Ellie Ellis March 20, 2021
 cuadro al alto relieve con pasta texturizada paso a paso
 Relaxing ASMR POTTERY ART: mesmerizing clay and ceramic masterpieces
 Botanical Plaster Casting Art / Ideas for cement or plaster/ How to make DIY
 #7 - Glue Gun Tree with DMB Firedancer / Glue Gun Art / Mixed Media Art