Oil Change - Kawasaki Vulcan 900 - Step-by-step Instructions
In this video I provide step-by-step instructions on how to change oil and filter on Kawasaki Vulcan 900.
Oil: Mobil 1 Racing 4T 10W-40 Full Synthetic - 3.2 Liters (https://mobiloil.com/en/motor-oils/mobil-1/mobil-1-4t-motorcycle-oil)
Oil filter: K&N KN-303C - Chrome plated with 17 mm nut on the top (https://www.knfilters.com/search/product.aspx?prod=KN-303C)
Tools: 10 mm wrench, 17 mm wrench, home-made $20 Jack (https://www.youtube.com/watch?v=CWeI_B0fjI8).
Used Clymer Manuals for Kawasaki Vulcan 900
Check my other videos:
Kawasaki Vulcan 900 Upgrades and Mods for Safety and Comfort: https://www.youtube.com/watch?v=raNVfmu1TRw&t=662s
Mustang vs. Stock Seat - Kawasaki Vulcan 900 Classic: https://www.youtube.com/watch?v=KBB22dU6nTM&t=917s
Transcript:
Hi, this is Max again and the new season is here. It's time to do the oil change of my Kawasaki Vulcan 900. I'll show you how I do oil change, what kind of filter, oil I use. So let's go ahead. I'm gonna use my home made $20 jack. Alright, ready to go. It is always recommended to remove this oil filler cap. So it actually helps to drain oil much faster because it allows air to get into the crankcase. I'm gonna drain the old first and then we'll talk about the rest. So I used by seventeen millimetres wrench. While oil is draining let's, let's talk about the filter and oil I use. I use Mobil One Racing 4T, 10W-40 and it is full synthetic four cycle motorcycle oil. I think you can buy it pretty much anywhere. I bought it at Walmart.
I use K&N filter. It is KN303-C, and I think C stands for Chrome. So if we take it out, this is how it looks like, so it's chrome-plated and there is a... a nut, it really, really helps to take the filter off. I'll show how it works when I'm gonna remove the old one. When I did my first oil change, I used this manual. It’s Clymer Manuals for Kawasaki 900. While oil is still draining into the pan, I'm gonna remove a rectifier and its bracket. So you use 10 millimeters head. And don't forget to warm up your motorcycle before you change the oil, so the oil is warm and drains well. So we remove the rectifier. Now we need to take off the bracket. Why I like to use my homemade jack. It actually keeps motorcycle at level and it's much easier to do all work on it, and check the oil level as well when you're done. Next step. I'm going to remove the oil filter.
I'm going to use 17 millimeters head, so you can see it how easy it is to remove this filter with this nut on the top. I love it. Clean surface around the oil filter sealer. Clean it with the rag. You don't want any dirt or debris to get in. And you want to make sure it's all clean when you install your filter. What you do next is... you would lubricate the seal, rubber seal on the filter, and I usually put some oil inside, so to fill it a little bit so it's not dry-dry. So let's do this.
Now we install the filter. And we tighten it with, with hands so it touches it, and then we need to turn it around for another three quarters. One, Two and Three. Now I put the oil drain bolt back with a new gasket. It is recommended to tighten it with the... to 15 foot pounds. Done. So you don't want to over-tighten it and damage the thread, so that's why I use the wrench to go with the measure and how tight I did. I tied it. I cleaned everything around the filter and around the oil drain bolt. Now I'm gonna fill with the oil. So we gonna add some oil, and this time I bought three cans.
Three cans of the oil, and I had about half left from last time. So I'm gonna add three cans and I know exactly it's going to be three liters. After I added three liters you can see that the oil level shows right in the middle, which you might think would be the perfect level. What we need, we need to start the engine and let it run for a little bit, and then we can add a little bit more oil. Actually according to the book here then you change oil and filter, you need three point two litres, so I thought I would add a little bit before I start the engine. Right now the level just slightly higher than the middle of the glass. So, I'm starting and I'm gonna run it for, for a couple of minutes for the oil to go through all the system and fill the filter, and also I don't have my rectifier back yet, so I'm going to take a look after I run it for a second, for a few minutes if oil is leaking around the oil filter or from the drain bolt. That's had it run for a couple of minutes, maybe a little bit more, and I'm gonna let it sit just for a few minutes, and we'll check it for the oil level. As you can see while level dropped a little bit, so I will need to add just a little bit. I added about 100-150 milliliters, and we can see the level is perfect. Don't forget to put the oil filler cap back. Now we check if oil is leaking anywhere around the bolt, or if oil leaking anywhere around the oil filter. It looks like it's all nice and clean...
#KMaxVideo
#KawasakiVulcan
#Vulcan900
Видео Oil Change - Kawasaki Vulcan 900 - Step-by-step Instructions канала K Max Video
Показать
Комментарии отсутствуют
Информация о видео
Другие видео канала
 FULL How To Oil Change (and Screen Clean) 2012 Kawasaki Vulcan 900
 Is this better than My Road King?: SRK Cycles
 How to Install H4 LED "Sealight" Headlight on Your Bike - Step-by-Step Instructions for VN900
 Kawasaki Vulcan 900 Clutch Replacement - COMPLETE HOW TO
 Kawasaki Vulcan 900 - air filter cleaning
 The Kawasaki that puts Sportsters to SHAME! 2008 Kawasaki Vulcan 900 Custom Ride Along!
 Kawasaki Vulcan 900 Classic Coolant Change
 Do It Yourself $20 Motorcycle Jack in 20 Minutes (Made for Vulcan 900 Classic)
 How to change motorcycle oil, Kawasaki Vulcan
 VLOG: Vulcan 900 Classic LT Review - Taking the Vulcan for a spin
 Longest Vulcan highway run
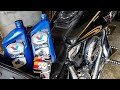 How to change motorcycle oil - Kawasaki Vulcan
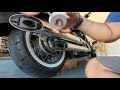 Stage 1 - How to debaffle a Vulcan 900 Classic pipes
 10 Cheapest Cruiser Motorcycles on Sale Today (Detailed Specifications and Price Information)
 Vn 900 Front brake pad change
 Kawasaki Vulcan 900 Disassembly and Valve Clearance Inspection
 Kawasaki Vulcan 900 - fork seal replacement, part 1
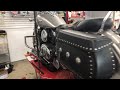 Kawasaki Vulcan oil changes. Do you know about the screen?
 Kawasaki Vulcan 900 Disassembly
 Kawasaki Vulcan 900 Rear Brakes.AVI