How To: Change Rear Brake Pads On Harley-Davidson Sportsters
This video is brought to you by: http://www.lowbrowcustoms.com
Are your brake pads on your Harley-Davidson Sportster on their last centimeter of life? Are you lost when it comes to changing them out? Don't worry, Todd is here for you. Watch as he walks you through how easy it is to change out those old wore out brake pads with a new set in this short how to tech tip. Proper care and maintenance is very important and should never be overlooked. It's recommended by Harley-Davidson to inspect your brake pads every 2500 miles.
00:01 - Intro
00:26 - Compress the pistons in the caliper explanation.
01:12 - Clean of the caliper and brake pad area with brake clean and some air.
01:58 - Use a pri-bar or putty knife to compress the brake caliper pistons.
03:12 - Remove the two pins holding the brake pads in.
04:32 - Remove the pads if they haven't already fallen out of the caliper.
04:43 - Note the orientation in which the brake pads go with the new ones, see the difference between the inside and outside pads.
05:20 - Clean the 2 pins off.
05:38 - Apply pin lube to the 2 pins.
06:15 - Install the new pads.
08:53 - Install the 2 pins into the caliper and torque to factory spec.
09:33 - Review
10:28 - Pump those brakes
10:37 - Check the brake fluid level. Don't mix Dot 3,4, or 5 always use same fluid.
12:31 - Brake pad change complete now GO FOR A RIDE!
Music by:
"Travel In Your Mind"
Composed by: Loyalty Freak Music
Видео How To: Change Rear Brake Pads On Harley-Davidson Sportsters канала lowbrowcustoms
Показать
Комментарии отсутствуют
Информация о видео
Другие видео канала
 How To: Harley-Davidson Sportster & Dyna Springtime Motorcycle Maintenance with Lowbrow Customs
 How To Change a Motorcycle Tire By Yourself
 Delboy's Garage, Harley Sportster Rear Brake service.
 How to Replace Brake Pads on a Harley with ABS
 How To Install S&S Cycles 1200cc Hooligan kit 883cc Harley-Davidson Sportsters Part 1 - Disassembly
 Rear Brake done on the Dyna lowrider
 How to Harley Davidson Sportster rear brake pads install.
 Delboy's Garage, Harley Davidson, Brake Fluid change.
 How To Change Motorcycle Brake Pads at RevZilla.com
 How To, Harley Road King Rear Brake Pad Install.
 How-To: Leaky Rocker Box Gasket Fix on Harley-Davidson Sportster
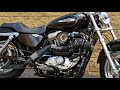 How to Install a Trask Turbo Kit on a Harley-Davidson Sportster
 How to Replace Install Inspect Brake Pads on Harley Davidson | Guide & Instructions
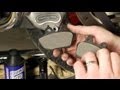 How to Install Brake Pads on a Harley-Davidson Road Glide by J&P Cycles
 How To Remove & Install REAR WHEEL + Tire Change! - Harley Sportster!
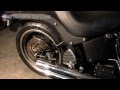 How To Remove & Install Rear Wheel - Harley Davidson Softail
 How to Bleed & Flush Harley-Davidson Brake System Fluid-ABS & Non-ABS Systems
 Harley Davidson Sportster rear brake pads installed.
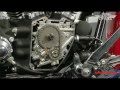 Cam Replacement on a Harley Davidson Twin Cam, including Pushrod Removal • J&P Cycles
 How to: Harley Davidson Sportster Rear Disk Brake service