Brake Line Double Flares
How to do-it-yourself instructional showing correct procedure for making standard double flares in double wall steel tubing.
Transcript provided for the hearing impaired:
Alright, so today on Repairs101 I thought I'd show you the procedure for making standard double flares using double wall steel tubing. We're going to make some brake lines. Stick around., so you know the first thing I gotta say is that your brakes are the most important system on your vehicle. You know, it doesn't have to start and it doesn't have to turn. It doesn't have to have a kick adze stereo. It just needs to be able to stop. you need to be absolutely sure that you're using the correct type of fitting, the correct type of line and the correct type of fluid, for that matter. If you don't know what kind of fluid to use look in your vehicle's owner's manual or sometimes the information will be right there on the cap of the master cylinder, under the hood. well it would be fair to ask: first of all what does a single flare look like? here's a single flare with the flare nut on it to give you an idea of what that looks like. As you can see the flare on the tubing matches the flare on the fitting and they lock together. Perfectly good fitting for low pressure but not for high pressure applications. you can buy your brake lines ready made at your local auto supplies store and they'll come with the flare nut on them and the standard double flare already installed for you there. what I've done here is I've taken a standard piece of double wall and cut it in section and polished it up with a diamond file so that we could see how it's folded over onto itself and that's what's meant by the double flare. You can see how it's curled back inside. in fact it has two sealing surfaces now, the inside edge here as well as the face of it here. And it's a lot less likely to crack on the radius, which is a common problem for single flares. you'll need a double flaring tool kit. I got this nice Blue-Point set from my Snap-on dealer. I've got his little tubing cutter alright? In the idler there are these notches cut into the idler rollers. And what they're for is so you can load your flare right into that notch on the followers and now the cutter is just going to take off the very end of it. after you've cut it there's three things you need to do to prepare the end. First of which is you need to cut a chamfer on the edge here. you're either going to do that using a flat file or you're going to use your bench grinder. I generally like to mount my flaring bar right into my vise just to hold things steady but you can actually do this pretty much freehand if you need to. You can see at this end I've already created a nice flare. now at this end, before I go any further I'm going to drop one on that way and the other one on the opposite way -- you see how they're going to both work: this one is going to work for this end, and this guy's going to work for this end. I put those on and I open it up and I put it in just proud, just barely. I'm going to do that down this side then this side. Every time, always going to do the side that the tube is on first, and then the far side. I'll take my flat file, and just make sure it's got a nice flat top on it. And then I'm going to take my reaming tool. it has been well prepared by chamfering the edge, levelling the top and reaming out the inside. Alright so now I'm going to flip it back over to the correct wayGoing to put it in the three sixteenths loosely, just holding until I grab the three sixteenths anvil and I'm going to put that beside it and match the height. you set the protrusion of your tube from your flaring bar to the same height as the shoulder here on the anvil that is the correct size --Make sure the bar's nice and square, that it's lined up flat. The only thing you want to lubricate your brake system with is brake fluid, so I keep a little DOT3 brake fluid in here. I'm just going to use a little drop of DOT3... well a couple of drops. you've got them set up to be the same height, and then you're just going to drop the anvil in there. Check that it's the right height. Drop it in. Fit the yoke with the flaring cone over the anvil. Get it so that it's nice and straight, and then turn it down by hand. Then turn the flaring cone down on the anvil. Turn the flaring cone down onto the anvil until the anvil is flush with the flaring bar. now we're going to put the flaring cone directly into the end of the tube and turn that down until it's flush. It goes fairly easily, you don't need to use big heavy wrenches or anything to get this done. And then it's done. That's what it will look like. I'm just going to clean that up with a little brake cleaner and some compressed air. I'll undo this. Get that free. As you can see I've got my flare nut on the end, and there's the finished product, double flared with the flare nut on it. That's a standard double flare.
Видео Brake Line Double Flares канала Repairs101
Показать
Комментарии отсутствуют
Информация о видео
Другие видео канала
 How to Flare Brake Lines for Your Truck, Car, or SUV
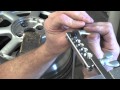 How To Double Flare A Brake Or Fuel Line
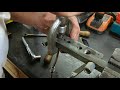 How to Make Double and Bubble flares
 How to safely repair leaking and rusted brake lines
 Reparatur Bremsleitung. Bördeln und Biegen einer Bremsleitung.
 Brake Line, Inline Flaring Tool - First Look & Demo - Napa Service Tools
 Best Brake Double Flare tool-Titan Brand Demo LONG VERSION
 Brake Tube Flaring & Bending
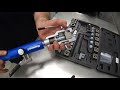 Brake line flaring made easy. Mastercool flaring kit review
 How to do a double flare and a bubble flare with double flare tool
 a better way to make a double inverted flare
 How To Bend and Flare Brake Lines -EricTheCarGuy
 Évasement double tube cuivre
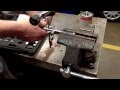 Bubble flare
 Bubble Flare Tool Harbor Freight | How To Make a Double Flare
 How to Make Brake Pipes 16 Tips / Stages!
 BENDING BRAKE LINES & CREATING INVERTED FLARES ON BRAKE TUBING
 How to Flare a Brake Line
 Stainless Steel Brake/Fuel Line How To Flare and Bend
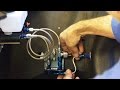 How To Build A Custom Brake Plumbing System for Classic or Race Cars