Samsung Galaxy J7 Pro Teardown Repair Guide - Fixez.com
Samsung Galaxy J7 Pro Repair Parts: http://bit.ly/2myUZQf
https://www.fixez.com presents the official 2017 Samsung Galaxy J7 Pro Teardown Repair Guide. This comprehensive repair video will show you how to replace a cracked screen, swap a faulty battery, and also how to completely teardown and reassemble your Galaxy J7 Pro smartphone. Visit Fixez.com for all of the DIY Samsung replacement screens, parts and tools you need to quickly, and affordably, fix your device!
Subscribe to our YouTube Channel for additional DIY smartphone and tablet teardown and repair videos! https://www.youtube.com/channel/UCDJrZCUtdJQaJq0akRCt3Ng
Like us on Facebook: https://www.facebook.com/fixez.com
Follow us on Twitter: https://twitter.com/fixezdotcom
Samsung Galaxy J7 Pro Teardown Repair Guide Steps:
Step 1
• Power down the 2017 Samsung Galaxy J7 Pro.
Step 2
• Eject the SIM card and microSD card tray, and second SIM card tray, from the side of the phone.
Step 3 (Samsung Galaxy J7 Pro Display Assembly)
• The 5.5-inch Galaxy J7 Prime display assembly is glued on solidly. Apply heat to soften the adhesive.
• Use the precision knife to create enough space to insert a playing card.
• With the playing card slice through the sticky adhesive and carefully decouple the Galaxy J7 Prime screen from the phone.
• The super AMOLED display assembly is still connected to the phone, so don’t try to remove it entirely just yet.
• Remove the bracket that covers the display cable.
• Detach the cable from the motherboard and free the Galaxy J7 Pro display assembly.
Step 4 (Samsung Galaxy J7 Pro Midframe)
• Remove the following 17 Phillips screws.
• The Galaxy J7 Pro midframe is secured by snug, press-fit notches. Use the triangle opening tool to release the clips and separate it from the rear enclosure.
Step 5 (Samsung Galaxy J7 Pro Power Button Cable and Volume Buttons Cable)
• The next 2 components extracted are ribbon cables that contain the power buttons switch and volume button switches. The Samsung Galaxy J7 Pro power and volume button covers are nuzzled securely in the rear case, defying conventional removal.
Step 6 (Samsung Galaxy J7 Pro Motherboard)
• Starting with the battery, detach the 2 cables from the motherboard.
• Remove the following 2 Phillips screws.
• Carefully lift out the Galaxy J7 Pro motherboard.
Step 7 (Samsung Galaxy J7 Pro Front-Facing Camera and Rear-Facing Camera)
• Remove the impressive 13-megapixel Galaxy J7 Pro front-facing “selfie” camera.
• Detach the 13-megapixel Galaxy J7 Pro rear camera from the motherboard.
Step 8 (Samsung Galaxy J7 Pro Loudspeaker, Earpiece Speaker, and Vibrator)
• Remove the following 3 Phillips screws and then tweeze out the loudspeaker.
• Pry the spring-contact-connected Galaxy J7 Pro earpiece speaker up from the chassis.
• Pluck out the vibrator.
Step 9 (Samsung Galaxy J7 Pro Home Button with Fingerprint Scanner and Capacitive Sensors for the Bottom Buttons)
• Pry the Galaxy J7 Pro home button and fingerprint scanner up from the midframe.
• Pop out the capacitive sensors for the bottom buttons.
Step 10 (Samsung Galaxy J7 Pro Battery)
• A good amount of adhesive secures the 3,600 milliampere-hour Samsung Galaxy J7 Pro battery to the midframe. With help from the triangle opening tool we free it from the adhesive.
* To reassemble your device, follow the steps in reverse order.
Видео Samsung Galaxy J7 Pro Teardown Repair Guide - Fixez.com канала Fixez.com
Показать
Комментарии отсутствуют
Информация о видео
Другие видео канала
 Samsung Galaxy A20 Glass Replacement
 Samsung Galaxy J7 Pro Ekran Değişimi #samsunggalaxyj7pro
 iPhone X Teardown Repair Guide - Fixez.com
 Samsung J7 Battery replacement
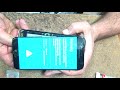 Galaxy J7 (2017) lcd replacement
 PARAMPARÇA!!! Samsung Galaxy J7 Prime Ekran ve Kasa Değişimi #samsunggalaxyj7prime
 Samsung Galaxy Note8 Teardown Repair Guide - Fixez.com
 How to samsung j7pro disassembly and charging jack replacement
 Samsung Galaxy J7 Prime Teardown and Reassemble - Fixez.com
 Samsung j7 pro touch glass replacement
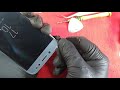 Cómo desarmar j7 pro/como destapar j7 pro Como quitar display Samsung SM-j730G/Desarme j7 pro.
 Samsung J7 Pro SM J737 screen, battery and charging port replacement step by step
 🔧Galaxy J7 2017 Glass Only Replacement - Complete guide 60FPS
 Samsung Galaxy J7 (J700) Take Apart Repair Guide - RepairsUniverse
 Pano Palitan ang LCD ng Samsung J7 Pro
 All Galaxy J7 Phones FIXED! Black Screen, Can't See Display, Blank Screen, Does Not Turn On, etc
 Cara Ganti Lcd Samsung J7 Pro | Samsung J7 Pro Lcd Repair
 Samsung Galaxy A7 (2017) Screen Repair, Teardown and Reassemble - Fixez.com
 Found broken phone in the rubbish | Restore Galaxy J7 Pro | Restoration destroyed abandoned phone