Rode Videomic Pro R Rycote Review and Test - vs Rode VideoMicro and iPhone
Rode Videomic Pro Rycote Review+Test- vs VideoMicro, iPhone
Buy the Rode VideoMic Pro R(Rycote Lyre): http://amzn.to/2eZ9sF1
Rode VC10 Extension cord for Videomic Pro R: http://amzn.to/2uOUMvU
Boom Pole Adapter: http://amzn.to/2v9MIZh
Today I’m looking at the Rode VideoMic Pro R, an On-camera shotgun microphone. The Pro R improves on the original Pro by adding this sturdier Rycote Lyre Vibration mount. The Rode VideoMic Pro measures in at a little over 6 inches long and is pretty compact when mounted to most mirrorless cameras and DSLRs. The Pro mounts to most cameras that have a shoe mount on top and can be secured in place by this knurled nut. The mic also has a ⅜” female thread on the bottom, which allows you to mount it to most boom poles and mic stands. You will however need a ⅝” female to ⅜” male adapter to do this, and I’ll leave a link to one below. Other than adding the new Rycote mount, the Videomic Pro is largely unchanged. The body is made from plastic, it has a foam windscreen on the front and the 9V battery still lives in that awkwardly-placed compartment on the front. Now the Pro doesn’t require phantom power or an audio interface, it plugs directly into your camera, tablet or phone. The cord on the Videomic pro is about 8 inches long and will plug easily into any DSLR or mirrorless camera. However, if you’d like to mount it to a boom pole or mic stand, you’ll need Rode’s VC10 extension cord. I’ll leave a link to that as well, below. The Rycote mount is definitely much sturdier and more effective than the older version’s rubber band system. The rubber bands on the older version were a constant headache and snapped over time. However, the most unique feature about the Videomic Pro is the +20db boost. The +20db boost can be turned on from the control panel on the back of the mic. This control panel has two, 3-position switches. The first switch powers the mic on. This switch also activates the high-pass filter which filters out low-frequency sounds, I am not a big fan of this mode and don’t really recommend using it. The second switch has three amplification settings. A -10db pad, for when you use the mic very close to your sound source, a 0db pad for use on most mirrorless cameras and camcorders and a +20db boost for use on most Nikon and Canon DSLRs. And why is this boost important? Most Nikon and Canon DSLRs have absolutely horrible audio pre-amps. So rode added a +20db boost to ensure that you used less amplification from the camera and more amplification from the Mic. This ensures that there is less noise, or DSLR hiss as it’s commonly referred to, in your recording. So how does the mic perform?To test it out, I’ve connected it to my Panasonic G7 and mounted the mic on top of the camera. I then placed the rig about 5 feet away from me and is directly pointed at me.
Видео Rode Videomic Pro R Rycote Review and Test - vs Rode VideoMicro and iPhone канала ReviewLamp
Показать
Комментарии отсутствуют
Информация о видео
Другие видео канала
 Every Rode Shotgun Video Mic Compared! $59 - $299
 10 TIPS to Improve AUDIO in Your Videos
 I got all the Rode VideoMics so you don't have to
 Best Video Microphone? The Ultimate RODE VideoMic Showdown!
 Which Boom Mics Do I Use? 2020 Edition
 Deity D3 Pro vs Rode VideoMic Pro - Microphone Comparison
 Best Rode Videomic Pro Settings For Any Context
 RODE VideoMic Go VS VideoMic Pro
 BEST SMALL MICROPHONE for Sony ZV1 // Rode Wireless GO, VideoMicro, Saramonic SR-XM1 Comica CVM-VS07
 Rode Videomic Pro Test | The Best Shotgun Mic For You 🔥
 How to choose your first microphone for filmmaking
 Best Microphone for Vlogging in 2020 - Comparing ALL the Microphones I've Used
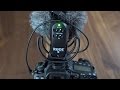 How to Setup Your Rode VideoMic Pro to Your Canon DSLR & Adjusting your DSLR Internal Mic Settings.
 RØDE Videomic Pro vs Rode Videomic Pro Plus | Best Video Mic in 2021
 SONY a6400 | 10 MINUTE SETUP GUIDE FOR PHOTO + VIDEO!
 Canon SX540 HS Review + Photo and Zoom Video Test - Serious Zoom on a budget?
 RODE wireless Go review | Amazing | Best Value Audio Kit |
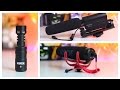 BEST Budget Shotgun Mics! Rode VideoMic Go vs Micro vs Takstar SGC-598
 Best Vlogging Microphone Rode VideoMicro VS Boya BY-MM1 External Video Mic - Which One Is Best?