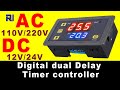
T2302 Timing Delay Relay Module Cycle Timer Digital LED Dual Display
•| Tutorial/Test and Review |•
12v T2302 Timing Delay Relay Module Cycle Timer Digital LED Dual Display
•| Buy Link |•
- 12v T2302 Timing Delay Relay Module
https://s.lazada.com.ph/s.bNYGZ
•| Music |•
×ROFEU - Midnight Lover
https://youtu.be/A8zChZlq-Ws
×Jarico - Island https://youtu.be/gZlDn4EmTvo
×Ehrling - You and Me
https://youtu.be/8HJSl7AiJNg
•| Specifications |•
Working voltage: DC 12V
Relay: 140v20a / 250v10a
Timing range:
0-999 seconds
0-999 minutes
0-999 hours
Working mode:
delay on, delay off, timing on, timing off, cycle on, cycle off
Size:
45.5mm*26.5mm*30mm 1.79*1.04*1.18"
Weight: 25g
Product Instructions:
Please pay attention for your first use.
You need wait 6s after your setting data, the module will save the date you have set after 6s.
Short press button SET: If you start the time setting mode, Nixie tube will blink. You could adjust the time T1 and T2 by button+ and button-. Please wait 5s after your setting date, the module will save the date you have set after 5s.
Long press button SET: if you start the parameter setting mode. There are two group parameter for your choice :
PO and P1. You could switch PO or P1 by short press SET. Under the parameter P0 and P1, you could set the timing
mode by the button+ and button-
PO - 0: Timing time mode : 0-999 sec.
PO - 1: Timing time mode : 0-999 min.
PO - 2: Timing time mode : 0-999 hrs.
P1 - 0: The relay will connect after you delay the T1 time.
P1 - 1: The relay will disconnect after you delay the T1 time.
P1 - 2: The relay will connect after you delay the T1 time first, Then the relay will disconnect after you delay the T2 time, it finish.
P1 - 3: The relay will disconnect after you delay the T1 time first, Then the relay will connect after you delay the T2 time, it finish.
P1 - 4: The relay will connect after you delay the T1 time first, Then the relay will disconnect after you delay the T2 time, it is cyclic.
P1 - 5: The relay will disconnect after you delay the T1 time first, Then the relay will connect after you delay the T2 time, it cyclic.
Example: A customer needs 10 seconds to start up and 20 seconds off.
Setup is as follows:
T1 set time 10, T2 set time 20
PO - 0 (T1 time range is seconds)
P1- 5 (timer work mode)
Thank you for watching
If you enjoy the video Please Like, Comment and Subscribe
Видео T2302 Timing Delay Relay Module Cycle Timer Digital LED Dual Display канала VIN Invents
Показать
Комментарии отсутствуют
Информация о видео
Другие видео канала
 Home Automation: How to use 0.1s-999 hours Digital Time Delay Relay Dual LED Display
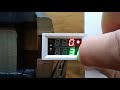 T2302 Timer - Short Setup Instruction
 Timer Digital 12 Volt Timer Digital LED Dual Display 0-999 Adjustable T2302 Time Digital Relay
 Cara setting timer delay relay T2303 #KakexChannel
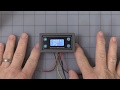 Multi Function Time Relay 35874 RL
 Temporizador Digital para CHOCADEIRA, HORTA E ALIMENTADOR DE PEIXES.
 DIY - Digital Multifunction Outlet Timer
 How to program and wire W3230 temperature controller
 Temporizador Digital, Instalação e Configuração
 12V Digital Delay Timer Demo Tagalog w/ Eng sub
 Complete Guide to Setup Digital Timer Module Switch for Automatic Egg Incubator
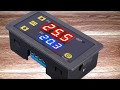 DIGITAL DISPLAY TIME RELAY (Time Delay Relay Module)
 Zaman Rölesi Kuluçka Motor Bağlantısı (Timer Relay Motor Connection)
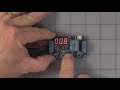 Programmable triggered timing board 35238 MP
 DC 8-70v Battery Capacity & Voltage Tester
 Timer Temporizador da SinoTimer
 Membuat Timer Relay Terprogram - Project Arduino #35
 ReviEW KiT Delay TIMER ON OFF
 HOW TO MAKE AUTOMATIC EGG TURNER FOR INCUBATOR (ROLL TYPE) (ENGLISH SUB)
 How to set a digital timer for digital display timer 220V AC