How to RENDER and EXPORT FASTER HD / 4K in Adobe Premiere Pro CC / Render Video Definition + Meaning
What is the DEFINITION of RENDER? What does RENDER MEAN? What even is RENDERING? DID YOU KNOW, that using RENDERING you could Export Video in Adobe Premiere Pro FASTER (up to 25x or more) ?! SO, if you want to export 4k videos faster - you should learn how to RENDER and use RENDER PREVIEWS!
In this Tutorial, we discuss HOW to Render Video in Adobe Premiere Pro CC 2020, what RENDER and RENDERING is / means, and WHY it is SO important to your entire Editing Process.
As well as the knowledge we gain about Rendering, we will also know How to EXPORT 4K / UHD / 1080p Videos 25x while still maintaining the highest possible quality video!
The definition of "rendering" usually refers to the actions of converting and compressing our video footage, photos and other assets - into a single compressed video file appearance. We render so that we can see our video edit including colour grading, transitions and other video effects before we hit export.
Essentially, the meaning and purpose of Rendering is to enable us to see what our Video will look like with our added effects and changes, without exporting. Sometimes it just makes video editing easier, other times it is necessary to render just in order to see the playback of your Drone 4K footage or 6K Footage alone.
--------
VIDEO CHAPTER TIMECODES:
--------
0:00 - RENDER Common Questions
0:27 - RENDER Example (EXPORT 25x Faster)
0:50 - RENDER Definition
1:45 - EXPLAINING RENDER PREVIEWS (Adobe Premiere Pro TIMELINE)
2:48 - Change/Create RENDER Previews
3:49 - Apple ProRes
4:07 - Recommended RENDER CODEC
4:40 - RENDER SEQUENCES SETTINGS
5:16 - RENDER #1 - Effects
6:00 - RENDER #2 - In to Out
6:33 - RENDER #3 - Selection
6:53 - WHY RENDER?
7:33 - WHY do you NEED to RENDER?
7:42 - WHY you SHOULD RENDER
8:59 - the EXPORT Process
9:35 - HOW TO EDIT / Complete Premiere Pro Guide
9:57 - NOTE - File Sizes / DELETE FILES
--------
APPLE PRO-RES
https://support.apple.com/en-ca/HT202410
-------
---- WHEN TO RENDER:
Notice that there are a few differently coloured lines above your footage.
Green, Yellow and Red or BLANK
These are relatively straightforward - Green means that your footage has rendered preview files associated with the assets below. If you change ANYTHING underneath the green bar whether it be on the clip or even bringing text in, it will shift to being Yellow or RED.
The Yellow bar is a reminder that there are no render files for this section, so Premiere will do it’s best to playback the clip in real-time, it is possible that it can playback fine in Real-Time **ADD INFOBOX** without being rendered.
However, if it is RED, that means that you have applied something intensive to the footage. It is a warning that Premiere probably won;t be able to play that back in Real-Time.
Before you spend the time render and create previews - you should know what you are creating in order to save computer space and preserve your video quality.
---- RENDER PREVIEW SETTINGS
I typically prefer using Quicktime for my projects because it is a way higher quality. If you are not looking for details or are limited by file storage or computing power, you can just keep I-Frame. HOWEVER, we are going to use Quicktime for the Render files because with it, I am going to change your life and the way you export videos.
My new favourite process here is Using the AppleProRes 422 Proxy. It is the smallest file (double check with DNxHR) and still holds a TON of the resolution. So let’s select that and then check our frame size. So in order to export 25x faster, your previews HAVE to match your intended output. So for this we will RENDER AT MAX and set our sequence width and height to match our desired output, in this case, 4K (3840 x 2160).
We will hit ok and it will delete all of our already rendered files.
---- DIFFERENT WAYS TO RENDER
-- RENDER Effects (only) --
Go up to SEQUENCE → Render Effects in to out
Or with default keyboard shortcuts, you can just hit Enter
This method will only render the effects that you have applied to your footage, essentially the RED scenes.
-- RENDER In and Out--
If you only want to render a section - like a few clips, you can set an in and an out point, then go back up to SEQUENCE → RENDER IN TO OUT
If you didn’t set an in to out, it will render the entire timeline
This WILL render both your Red and Yellow, and create previews for your whole timeline!
-- RENDER Selection --
If you just have a single clip or file that is Red or is troublesome and needs render files, you can highlight it then go back up to SEQUENCE → RENDER SELECTION
REMEMBER TO DELETE YOUR VIDEO PREVIEWS AFTER YOU ARE DONE WITH YOUR PROJECT!
Видео How to RENDER and EXPORT FASTER HD / 4K in Adobe Premiere Pro CC / Render Video Definition + Meaning канала Colin Dougan
Показать
Комментарии отсутствуют
Информация о видео
Другие видео канала
 How to Export HD / 4K Video in Adobe Premiere Pro CC for YouTube, Vimeo -Best Settings 2020 TUTORIAL
 5 TIPS to EXPORT FASTER from PREMIERE PRO
 5 Ways to make PREMIERE PRO FASTER! (Instead of rage smashing your office)
 Export Video 4X FASTER in Premiere Pro! (Works with Nvidia & AMD)
 EXPORT FASTER in Adobe Premiere Pro w/ NVIDIA NVENC
 Slow Computer? EDIT SUPER FAST! Premiere Pro Proxies Workflow
 How to Render Fast High Quality After Effects Projects | Render 3x Faster!
 Render 300X FASTER | Premiere / After Effects / Media Encoder | Adobe | 2020
 Export Video 5X FASTER From PREMIERE PRO CC!
 Why I Export EVERY VIDEO in ProRes
 5 Effects in Premiere Pro
 Small Size Render in After Effects - After Effects Tutorial - Media Encoder - Quick Friday - E02
 Color Grading in Premiere Pro CC - Get Pro Film Look
 10 Tips to Edit 10x Faster in Premiere Pro
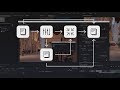 4 Tricks to Speed Up Exports in Premiere Pro
 Best Video Export Settings Adobe Premiere Pro CC 2020 For Youtube
 How To COLOR GRADE in Adobe Premiere PRO CC from scratch (NO LUTS)(NO PLUGINS)
 SPEED UP Adobe Premiere Pro Performance NOW
 Export FAST by working SMART in Premiere Pro
 Export / Render Video - Adobe Premiere Pro CC Class 20 - Urdu / Hindi