Antique Pruning Saw Restoration - How To Make New Saw Teeth
This saw restoration was very challenging because I tried to keep as much of it as possible. The saw belongs to my father-in-law, and he says he has memories of this saw from the 60's .
As you can see, the saw is in a very bad condition. The blade is very rusty and has deep holes and the handle is simply destroyed. In this restoration I will show you how to restore the blade , no matter how destroyed it is and also how to make a new handle.
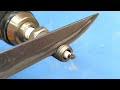
So I started the restoration. I disassembled the handle from the blade, I cleaned the dirt before blasting it, after which I sandblasted the blade. For a deep cleaning I did an electrolysis of the blade. In this restoration process, the blade needed some repairs. I had to restore his teeth, I had to remove his sharp and irregular edges, I had to repair the holes through which the new rivets will enter. The blade had deep pits, for this reason I could not sand it and bring it to a smooth and glossy shape. And so that the blade would not be exposed to rust quickly, I decided to apply a bluing solution. I know that a restoration means bringing the product back to the factory condition but that was the only solution to keep the blade in a decent shape.
After these stages the restoration of the saw continued by producing a new handle. I chose to use oak wood. I had a good piece of wood in the workshop, well dried, for more than 10 years. I tried to keep the shape of the old handle, in the smallest detail.
After which, the restoration continued by making new rivets. I chose to make the so-called "Chicago rivets". I saw those rivets made by My Mechanics and I can't wait to produce them too. It was challenging because it was the first time I did something like that, but I say they turned out well.
Towards the end of the restoration, I reassembled everything, sharpened the blade and finished the wood with oil. I also applied a layer of oil on the blade. My grandfather applied oil to all the tools, so they didn't rust anymore.
I have tried my best as I always do, to make the restoration easy for you to understand, but if you have questions about the restoration or anything else regarding the process or materials used in the restoration, just ask me and I will answer you all.
Thanks a lot for watching, I hope you liked the video!
Suggestions and comments are welcome.
Leave a like and share to anyone who might be interested...and please consider subscribing !!
Cheers and Enjoy !!
#pruningsaw #pruningsawrestoration #antiquesawrestoration
Видео Antique Pruning Saw Restoration - How To Make New Saw Teeth канала Cool Again Restoration
As you can see, the saw is in a very bad condition. The blade is very rusty and has deep holes and the handle is simply destroyed. In this restoration I will show you how to restore the blade , no matter how destroyed it is and also how to make a new handle.
So I started the restoration. I disassembled the handle from the blade, I cleaned the dirt before blasting it, after which I sandblasted the blade. For a deep cleaning I did an electrolysis of the blade. In this restoration process, the blade needed some repairs. I had to restore his teeth, I had to remove his sharp and irregular edges, I had to repair the holes through which the new rivets will enter. The blade had deep pits, for this reason I could not sand it and bring it to a smooth and glossy shape. And so that the blade would not be exposed to rust quickly, I decided to apply a bluing solution. I know that a restoration means bringing the product back to the factory condition but that was the only solution to keep the blade in a decent shape.
After these stages the restoration of the saw continued by producing a new handle. I chose to use oak wood. I had a good piece of wood in the workshop, well dried, for more than 10 years. I tried to keep the shape of the old handle, in the smallest detail.
After which, the restoration continued by making new rivets. I chose to make the so-called "Chicago rivets". I saw those rivets made by My Mechanics and I can't wait to produce them too. It was challenging because it was the first time I did something like that, but I say they turned out well.
Towards the end of the restoration, I reassembled everything, sharpened the blade and finished the wood with oil. I also applied a layer of oil on the blade. My grandfather applied oil to all the tools, so they didn't rust anymore.
I have tried my best as I always do, to make the restoration easy for you to understand, but if you have questions about the restoration or anything else regarding the process or materials used in the restoration, just ask me and I will answer you all.
Thanks a lot for watching, I hope you liked the video!
Suggestions and comments are welcome.
Leave a like and share to anyone who might be interested...and please consider subscribing !!
Cheers and Enjoy !!
#pruningsaw #pruningsawrestoration #antiquesawrestoration
Видео Antique Pruning Saw Restoration - How To Make New Saw Teeth канала Cool Again Restoration
Показать
Комментарии отсутствуют
Информация о видео
14 августа 2021 г. 15:40:37
00:13:31
Другие видео канала
 1976 Soviet Hand Pump Restoration - Perfect Restoration
 НОЖ как БРИТВА за две минуты! РЕЖЕТ ДАЖЕ СВЕЧИ! Мало кто знает эту функцию свечи зажигания!
 НЕ ВЫБРАСЫВАЙ старый ДИСК от циркулярки!!! Изготовил из него шикарный инструмент для мастерской!!!
 Rusty Hand Pruners Restoration With AMAZING Outcome / Restoring old pruning shears
 Rusted and Fully Jammed Plier Restoration - With Surprising Handle
 Antique Rusty Saw Restoration | With Epoxy Handle Repair
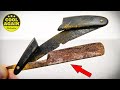 Restoration Rusty Straight Razor with Amazing Masterpiece Handle
 RUSTED Wood Cutting SAW Blade Turned into a Razor Sharp WAR AXE
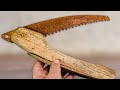 Antique Broken Pruning Saw - Amazing Restoration
 Old German "Helko Werk" Axe Restoration with Laminated Palm Swell Handle
 Antique Hatchet Restoration. SORT OF...
 Barn Find Oil Lamp - Perfect Restoration
 technique of making sandals using used motorcycle tires
 AMAZING Idea With an Ax !
 Few people know about the ANGLE GRINDER job !! قلة من الناس يعرفون عن الوظيفة الجديدة للصاروخ
 Мало кто знает этот секрет молотка.
 I turn a Railroad Track into an Anvil! Simple & Easy DIY - Homemade Anvil
 Restoration of a very rusty Record No4 Plane - ASMR
 1930 Belgian Hammer Drill Restoration - The Coolest Tool You Ever Seen