CUBE CU002/KIT-CUBE2 Brewing Controller Assembly Video
DIY KIT Part#:
KIT-CUBE2-240 https://bit.ly/2qunnoW
Click "SHOW MORE" for more details.
Tools Needed:
1) Philip Screw Driver(s).
2) Pliers (for tightening nuts).
3) Wire cutter, stripper and crimping tool.
4) Hot Glue Gun or Multi-Purpose Sealant (for NEMA 5-15R sockets and controller).
5) Ruler.
Installation Time: About 1-2 Hours
Видео CUBE CU002/KIT-CUBE2 Brewing Controller Assembly Video канала Auber Instruments Official
Показать
Комментарии отсутствуют
Информация о видео
Другие видео канала
 Auber Brew Buddy I Control Panel Building Video Part One
 Upgrades to the boil kettle.
 Assembly Tutorial for Auber KIT-PCO101 Powder Coating Oven Controller Kit
 Copper wire stripper / Nitech CableX video
 Ramp & Soak PID Programming Tutorial, Auber SYL-23X2P Series
 How to build a DIY PID temperature controller box with a DIN rail and SSR
 Ramp & Soak PID Basic Tutorial, Auber SYL-23X2P Series
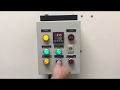 Auber SWA-2451 Temperature Controller with Timer Tutorial Video
 How To Setup Your Inkbird Temperature Controller | Home Craft Brewing 🍻
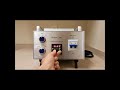 Auber EZBoil DSPR320 -- Operating Tips
 AMAZING BEARRING PULLER HOMEMADE TOOL
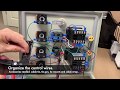 Assembly Tutorial for Auber KIT-PCO301 Powder Coating Oven Controller Kit
 SmartPID integration in single vessel BIAB system
 4 Brilliant Uses for an old SATELLITE DISH!
 Electric motor assembly
 Wire Strippers
 Wiring & Testing An Electric Brew Controller with Joe & Erik
 SmartPID crowdfunding campaign promo
 SmartPID - homebrewing smart application tutorial (ENG)
 World's Coolest Tools & Equipment