Make a Hardwood Floor Patch
http://www.ronhazelton.com
Learn how to disguise a patch job in a hardwood floor; includes step-by-step instructions along with finishing tips, materials, and tools lists.
Not too long ago, I widened a doorway and installed French doors between our living room and family room. I was pleased with the way the project turned out, but there was a little repair work left to do afterward. When I removed a portion of the wall, I had to put in several new strips of flooring. This left me with two problems: the strips were slightly higher than the surrounding floor and they were unfinished. I needed to level the floor and then match the color of the finish. Here is the process I used.
Follow Us On Twitter: https://twitter.com/ronhazelton
Like Us On Facebook: https://www.facebook.com/RonHazeltonHouseCalls
View Our Pinterest: https://www.pinterest.com/ronhazelton/
Transcript:
Well, a few days ago, I made this entryway into the dining room a little bit wider and in doing so I exposed some flooring right down here that is in pretty rough shape compared to the flooring around it. So I know I'm going to have to replace at least two boards.
Now before I start performing surgery on my hardwood floors right here, let's just take a look at how a typical flooring system like this works. This is three quarter inch thick, solid oak, tongue and groove. A groove has been milled on this side and a tongue on this side. Now, when this is put down, typically it's nailed right through the base of the tongue, the nail goes through at an angle. You can see it sticking out right down here and then the groove of the next board just slips right over that tongue. The result is there are no nails visible on the surface, which is great, gives you a good looking floor, but it makes it a little tough to take one or two pieces out. In fact, the only way I know to do it is to actually split pieces by cutting right down the center and that's what I'm going to do.
I'm setting the blade depth on the circular saw just deep enough to cut through the flooring. This is called a plunge cut and should be done very cautiously. With the saw running, I lower it slowly until the base plate is resting firmly on the floor, then push the saw forward. To make the end cuts I first score a line using a utility knife, then set the edge of a chisel into the hollow groove left by the knife blade. Using a series of straight and angled chisel cuts I can slice quickly and neatly all the way through the plank. With the end cuts made and the board cut down the middle I can now begin prying it out. Once the first piece is removed, the rest comes more easily.
Well, I've gotten those two boards out fairly cleanly, very happy with the way that turned out, so that takes care of the hole right here, which we will replace those and a little bit. Now though, I've got to resurface this part of the floor that was up underneath the old wall and I think the best tool for this is going to be a belt sander. Since my main objective right now is to remove material I'm using a rather coarse belt, 60 grit in this case.
This is cleaning up very nicely and I've gotten to the point now where I can put in those two pieces of wood that were damaged and I had to remove. Now, you will notice the only way I'm going to get this in because of this groove is to cut off the bottom half of this groove right here. And that will allow this piece just to drop in. I've set the table saw blade just high enough to make the cut I need. Next, I'll mark the length of the board and cut it the size on the miter saw. OK, so we've got a fit going here. I repeat the process for the second board, give everything a few taps and now, that's what I'd call a good fit, even if I do say so myself.
Now, because of the way we put this down, it's not possible to edge nail it through the tongue. The only choice is to face nail it and that's what I'm doing right now.
The trickiest parts of a flooring repair job like this is touching up or matching the finish. Now, if you look over here at the section of the floor, you'll see that this is an oak floor and that all the boards really are different colors and different grain patterns and I'm going to use that to my advantage, because if I can break the finish, that is the break between the old finish and a new finish, along the edge of a board like this or at the end of a board like this, the eye is really not going to notice the difference because there's so much natural variation.
So I've taken the finish off this board, this one, this one and this one. This one I haven't, you see? I sanded it back to here, what I want to do now as we move the finish back to this joint right here.
Видео Make a Hardwood Floor Patch канала Ron Hazelton
Показать
Комментарии отсутствуют
Информация о видео
Другие видео канала
 How to Patch Strip Flooring | This Old House
 Restoring Hardwood Floors Without Sanding on a Budget with Rejuvenate Professional Wood Restorer
 How to Replace Damaged Hardwood Floor Boards
 How to fix a spot on a hardwood floor
 How to Self Level a Floor
 Wood Floor Refinishing FAILS! (YouTubers Called Out!)
 How To Patch Hardwood Floors
 How to Patch a Chipped Wood Floor | Ask This Old House
 How To Sand and Finish Wood Floors
![DIY Wood Floor Repair Project | Cheap Quick Fix [Wood Filler Putty and Furniture Touch Up Marker]](https://i.ytimg.com/vi/oA4o5z9FuSI/default.jpg) DIY Wood Floor Repair Project | Cheap Quick Fix [Wood Filler Putty and Furniture Touch Up Marker]
DIY Wood Floor Repair Project | Cheap Quick Fix [Wood Filler Putty and Furniture Touch Up Marker] Refinishing Hardwood Floors - Costs and Home Depot Rentals
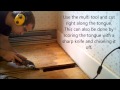 How to Replace Hardwood Floor Boards in a Tongue and Groove Floor
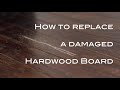 Removing & replacing a damaged hardwood flooring board
 patch hardwood floor after removing wall
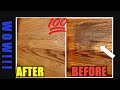 HOW TO REMOVE A SOLID OXIDIZED STAIN SAME AS PET STAIN ON YOUR HARDWOOD FLOOR REFURBISHING IT 2019
 Gap Filling With Hardwood Where A Wall Has Been Removed Converting Two Rooms Into One
 Hardwood Floor Weaving, Installing A Wood Vent, Trip To The Dump Sound Hardwood Floors
 How to connect your new hardwood to your existing hardwood
 How to lace-in a new floor with an old one.
 How To Repair A Burned Hardwood Floor | THE HANDYMAN |