RV REMODEL - Recliner Install on RV Slide
We're remodeling our 11 year old class C RV and installing powered wall hugger recliners in place of the dinette. In this video I'll repaint the walls, install carpet on the slide out, install electrical outlet, and install the RecPro recliners.
WATCH THE ENTIRE RV REMODEL SERIES HERE
https://www.youtube.com/playlist?list=PLIsusUNNN2JaTOI03gbTh_fmDhzTAWQsC
CLICK HERE for a Full List of REMODEL PARTS
https://www.rvwithtito.com/parts/rv-remodel
RecPro Recliners We Installed (Get 5% OFF)
https://www.rvwithtito.com/recpro-discount-coupon-code/
SEE ALL DISCOUNTS for RVWITHTITO Viewers
https://www.rvwithtito.com/discounts
FAVORITE GEAR
https://www.rvwithtito.com/gear
MORE ABOUT THIS EPISODE
This video is the fourth in our RV remodel series. Watch the entire remodel series here:
https://www.youtube.com/playlist?list=PLIsusUNNN2JaTOI03gbTh_fmDhzTAWQsC
Prior to ordering the recliners from RecPro.com I carefully measured the existing dinette to see how the new furniture would fit. The 70 inch wide recliners fit the 71 inch space perfectly.
Here are the recliners we ordered: https://www.rvwithtito.com/recpro-recliner
The wall hugger recliners needed 3-4 inches of clearance from the back wall, which placed the front of the recliners right at the front of the slide out. Again...perfect.
Here’s what I did to prepare the dinette area for the new recliners:
(1) Removed the dinette (video: https://youtu.be/UA-vYhHxysw)
(2) Removed the seat belt bracket under the dinette
(3) Removed the carpet under the dinette
(4) Installed inexpensive carpet over the plywood floor
(5) Added a 120VAC outlet to power the recliners
(6) Mounted cables, wires and receptacles near the back wall of the slide out
(7) Positioned remaining cables and boxes to fit within the metal frame of the recliners
The recliner components come in pieces small enough to fit in the door of the RV. The chair back is separated from the chair base.
To install the recliner and center console:
(1) Position the right-most recliner base
(2) Align the center console mounting pins and lock them with the first recliner
(3) Align the mounting pins in the second recliner with the locking bracket of the center console
(4) Connect power cords to a nearby outlet (powered recliners only)
(5) Slide the seat backs into the two vertical mounting brackets in the base until they lock
That’s it! Sit back and enjoy.
#rvwithtito #rvwithtitoremodel #rvremodel #rvdiy #classcrv #rvrenovation
DISCLAIMER
The opinions expressed in our videos are our own or from a contributor. Before taking on any project or making a large purchase, we recommend you do your own research and consult a professional for advice. We are NOT liable for any damage to your RV or injury incurred as a result of following our tips, advice or instructions. We are not RV professionals or certified technicians. We are simply RV owners who work on our own RVs and have a desire to share what we learn with others. Be responsible and know your limits.
AFFILIATE DISCLAIMER
This video may include links to merchants with affilliate programs who pay us a commission on purchases made or actions taken after clicking the link. We are a participant in the Amazon Services LLC Associates Program. As an Amazon Associate we earn from qualifying purchases.
Видео RV REMODEL - Recliner Install on RV Slide канала RV with Tito DIY
Показать
Комментарии отсутствуют
Информация о видео
Другие видео канала
 RV Renovation and Remodel - New Loveseat Recliner Install from RecPro
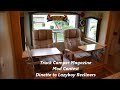 How to change an RV Dinette to Lazyboy Recliners
 RecPro RV Recliners! WOW! - Easy Install PT 2
 7 DIY RV Upgrades That Had The BIGGEST IMPACT
 Installing a Reclining Loveseat in our RV
 Our 32' Class C RV Renovation - 2 Year Update and FULL Walk-Through
 RecPro RV Recliner Upgrade: RV Full Time Living
 RV COUCH REPLACED WITH RECPRO RECLINERS / WHAT WE THINK OF RECPRO RECLINERS / EASY INSTALLATION
 RecPro Sofa Bed install - Replaced our Recliners!
 RV REMODEL - Flooring Installation Start to Finish
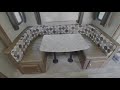 We replaced our RV dinette with a sofa.
 Goodbye Dinette - RECPRO 70'' Charles Reclining Loveseat Assembly
 RV furniture replacement - RecPro - Jayco Whitehawk 26RK
 RV Renovation is DONE! RecPro Dinette Install and Review
 RV Reclining Loveseat Installation
 RV Renovation--Replacing the Old Dinette with a Second Sofa Bed - RV Tips & Tricks
 RV Furniture - Recliners Chairs Sofas Sleepers
 Remodel RV dinette to recliner, be comfortable.
 Installing new RV Recliners