How to Combine Photos & Graphics in Photoshop
Download the Sample Image:
https://phlearn.com/tutorial/combine-photos-graphics-photoshop/
Learn to combine graphics and photos to create beautiful visual effects. In this tutorial, you will learn to transform graphics in perspective to fit photos and use displacement maps to make graphics interact with images.
-----------------
In this tutorial we are going to be combining photographs and Graphics to create some stunning effects.
The original photograph portrays a man against a blank concrete wall, we want to create a rainbow flag pattern behind him on the concrete wall in a way that blends in with the original photo. To do this we are going to start by reproducing a certain part of the included rainbow graphic to obtain the colors that we would like and then stretch them into create a horizontal pattern. After creating our horizontal pattern we are going to stretch in perspective warp to make a match with the background. Next we need to cut out our subject so that they appear in front of the rainbow background making the composition perfect. Then, all we have to do is change the blending mode to Multiply which will allow the colors in the flag to interact with the background and blend seamlessly.
Next we are going to cut out the pride graphic from its background and place it roughly on our subject’s t-shirt. We would like to change the blending mode to multiply in order to have it interact better with our subject's shirt. From here you can see that although the colors are interacting well, it doesn't look as though the graphic is actually placed on her subject's shirt, and for that reason we are going to need to use displacement Maps.
To create a displacement map from the original image, all we have to do is save a black and white version of the original photo and if you would like you can enhance the contrast to make greater separation between the vertical and horizontal displacement. Be sure to save the document as apsd in black and white at the same image resolutions as the image in which you were going to be placing your displacement map.
Once we have saved our displacement map, which is included in the download, you can apply the displacement map on to The Graphic to make it look like the text is actually interacting with the subject t-shirt,. you can see that the text moves up and down with the texture of the t-shirt making it look like it has a perfect transition and appearing as though the graphic is actually printed on the T-shirt.
After we combine these text and graphics we reproduced the highlights of the subject's shirt and place them over top of the graphic to make it look like the fabric is integrated into the graphic, and that is it we are done!
Join this channel to get access to perks:
https://www.youtube.com/channel/UC47XN5bhLTBH5TRFyKaUpKg/join
―
What is PHLEARN PRO?
◦ 200+ In-Depth Courses on Photoshop, Lightroom & Photography
◦ 500+ Actions, Brushes, Presets & LUTs
◦ Master Retouching, Compositing, Special Effects & More
◦ Monthly & Annual Subscription Options
Join today: https://phlearn.com/
―
Follow us on social!
Instagram: https://www.instagram.com/phlearn/
Facebook: https://facebook.com/phlearn
Twitter: https://twitter.com/phlearn
Видео How to Combine Photos & Graphics in Photoshop канала PHLEARN
Показать
Комментарии отсутствуют
Информация о видео
Другие видео канала
 How to Adjust Perspective in Photoshop
 Master the 2023 Photoshop Gradient Tool Update: Full Guide and Techniques
 How Generative Fill in Photoshop will Change Everything You Know About Editing
 The Power of AI: Creating Graphics in Midjourney and Compositing Them into Portraits in Photoshop
 AI Super Scaling: A Game-Changer for Graphic Integration in Portraits
 Color Your World: Creating Stunning Artistic Portraits in Photoshop
 How to Use the Pen Tool in Photoshop
 Automatic Photo Restoration - New AI Neural Filters in Photoshop
 Artificial Intelligence Masking - New in Photoshop! 2022 Update
 How to Instantly Remove Anything from Photos - New Fill & Delete Photoshop 2023
 How to Supercharge Photoshop with Luminar Neo
 Let's Create an Epic Animation in Photoshop!
 How to Make a free project with Adobe Express!
 Professionally Remove any Background from an Illustration, Text, or Graphic in Photoshop (EXTENDED!)
 How to Enhance the Subject and Background Separately in Lightroom Desktop
 How to Create Sunset Color & Light in Lightroom Desktop
 How to Clean Up any Photo with Content-Aware Fill
 Change Colors in LR Desktop
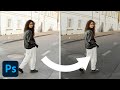 How to Correct Exposure in Lightroom Desktop
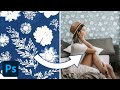 How to Create Patterns from Any Image! Plus Composite as Wallpapers and Textures.