Roadmaster Rear Anti-Sway Bar Review - etrailer.com
Click for more info and reviews of this Roadmaster Anti-Sway Bars:
https://www.etrailer.com/Anti-Sway-Bars/Roadmaster/RM-1139-147.html
Check out some similar Anti-Sway Bars options:
https://www.etrailer.com/Vehicle-sway-bar.htm
https://www.etrailer.com
Don’t forget to subscribe!
https://www.youtube.com/user/etrailertv
Full transcript: https://www.etrailer.com/tv-review-roadmaster-rear-anti-sway-bar-rm-1139-147.aspx
Today we're going to be taking a look at the Roadmaster line of rear anti-sway bars. Here, with our factory sway bar, you'll see that we're going to have a lot of axle movement in relation to the vehicle. That's going to transfer into a lot of movement at the top of our RV. This is going to make for a lot more movement in the RV as we're heading down the road, making it a little more difficult to control. Here, with our new sway installed, you're going to see a noticeable difference. You'll also feel a noticeable difference from inside the vehicle. We don't have nearly the weight transfer side to side at the top of the RV, handling has been improved dramatically, and so has the ride quality.
This is going to cause us to work a lot less heading down the road any time we want to travel. Here's our sway bar once we get it installed. As you can see, the custom design allows for clearance around all of our areas, make sure we're not going to have any interference. It's a very nice upgrade, it's something that's going to look really nice for a long time. Not often are you going to look under your RV, but it's going to hold up. This is going to take care of leveling out our vehicle on turns on the uneven pavement, when we maybe go off the edge of the road a little bit, it's going to keep everything from tilting, and this does make an immediate and noticeable difference, whether you do rear, or front, or if you do them in conjunction with one another, really makes a noticeable difference that you'll be able to feel as soon as you get out on the road. Unlike the steel bar that we're remove, this is going to resist corrosion.
It's got that nice cadmium coating on it, so not going to have to worry about corrosion, it's going to look good for a long time. Same with our straps here, our clamp bands as they come up, going to have that nice corrosion-resistant finish, so something that will stand up to the test of time and really last a long time and give a superior driving and handling performance. Installation really is pretty simple in the whole deal, you're going to use our existing hardware and mounting locations here underneath the axle. We'll only need to drill two holes in our frame rail, where our end links come up and connect, and it's in, so it's a pretty straight-forward installation that you should be able to take care of at home. Look at our side-to-side comparison here. This is our new Roadmaster kit vs. our factory kit.
Looking at sway bar to sway bar, our factory is one-inch steel, that's going to work out fine for your vans and things like that that don't carry much of a load, but once we turn this into a motor home, we're adding thousands and thousands of pounds, and our center of gravity is getting higher, this just doesn't cut it. What we do with our roadmaster upgrade is we move up to an inch and 1/8th bar, so this gives us superior rigidity, great strength, and it makes worlds of difference. Also, we're replacing our small rubber factory bushings with polyurethane bushings, we've got some lubricant to put in there, you want to be sure to put that in there so you don't get any squeaks. Our straps, as you can see again, much heavier duty, corrosion-resistant material there, that's going to prevent corrosion. You see our end link diameter, significantly different. We've got a nice heavy-duty end link. We're going to have urethane bushings at each end, that's going to replace our rubber bushing here, and also the two rubber pinch-bushings that we had at the other end where it actually connected into the sway bar.
Here's the bolt that we removed previously, as you can see, we're going to have one much sturdier. That's going to replace both the circle here at the end link, and it also replaces our bar, it's a little bit different design. We're going to use mainly all factory mounting locations, just one 1/2 inch hole to drill on each side, so should go pretty smoothly. This is where our rear sway bar's going to be located, here's the rear differential. It just comes right around the back side of it, connects up here into the side of the frame on each side. These are called the end links. We're going to come to the top of the end link, we're going to find a nut up there, we can use a 15 millimeter socket, we'll find a bolt right up there going through the frame and it comes out here on the inside, we're going to remove that with a fifteen millimeter socket. Now we'll go to the other side, we'll do the same thing there. Now we'll travel here from our end link to the actu
Видео Roadmaster Rear Anti-Sway Bar Review - etrailer.com канала etrailer.com
Показать
Комментарии отсутствуют
Информация о видео
Другие видео канала
 Our Gas RV Experience - Improving the Suspension & Ride Quality
 Installing Sumo Springs on a Class A RV Pt 2
 Roadmaster Front Anti-Sway Bar Installation - 2006 Ford E-450 - etrailer.com
 ACE 29.3 handling after modifications
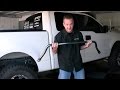 How to Install Hellwig Sway Bars Ford F-150 Motorz #10
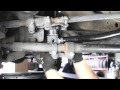 ReadyLIFT Ford Super Duty F250 F350 Anti Wobble Trac Bar Installation
 4/6 DROP KIT INSTALL 88-89 CHEVY PICKUP PART 3 ANTISWAY BAR FROM BELLTECH
 Sway Bar Servicing Solutions
 2004-2017 Ford F-150 Rear Shock Replacement: Featuring Bilstein 5100 Series Shocks
 Valterra RV Stabilizer Review
 Integra DC2 Whiteline Sway Bar Install + STREET TEST - LOWER BODY ROLL
 145-DIY How to; Cheap Handling Fix-CHF on Ford F53 Chassis, 2015 Fleetwood Flair 26E
 How To Install an RV Steering Stabilizer by RV Education 101®
 Wandering Steering Problem Diagnosis 2003 F350 Superduty F350 4x4 (Part 3 of 4)
 RV Suspension upgrades - Winnebago View
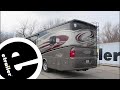 Roadmaster Rear Anti-Sway Bar Installation - 2015 Ford F-53 - etrailer.com
 Hellwig Suspension Products - Sway Bar Installation How To
 Safe-T-Plus, The Greatest RV Upgrade Ever? - Nomadic Native
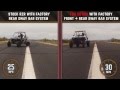 Sway Bar Testing
 gas motorhome noise level 2016 ford f53 6 speed.