How to make a penguin with paper. 3D origami tutorial.
(We need 65 red, 36 white and 3 orange pieces)
Let me show you how to make a paper penguin in the art 3D origami.
Subscribe to get more paper craft ideas:
https://www.youtube.com/channel/UCwNBvoJ2WZGUf2C9VmY4jyQ
Timestamps for your convenience:
0:05 Hello! Let me show you how to make a funny paper penguin.
0:11 We will make a red penguin with you. But you can use any colors, if you want.
0:15 Take 3 sheets of red paper, 2 sheets of white and one orange sheet.
0:23 Take the sheet of paper and cut it into 32 identical rectangles. Please repeat it after me.
0:58 Take 3 orange rectangles, 36 white and 65 red.
1:07 Take one small rectangle and start folding the piece. Please repeat it after me. If something wrong for you, you can always rewind the video and look again at lower speed. Fold it as I show.
2:00 That’s all! We made a piece for the paper penguin. The piece’s size is called 1/32nd.
2:10 To make the pieces more comfortable to put on, you need to expand their pockets. This is easy to do if you do such a trick. Insert the pieces into each other. Such pieces will be much more convenient to use in the assembly of any figure.
2:55 Make 65 red, 36 white, and 3 orange pieces.
3:03 Start to make the penguin.
Take two red pieces and put one white on them. Take another red, white and white. Put on pieces with the long side up. Not short side, but long side.
Red, white and another white. Red, red and white. Red, red and another red. Red, red and red. Red, red and another red.
Red, red and red.
Connect the pieces into a ring and secure with one red piece. White and red.
4:50 Here is what you should get.
4:56 Start making the fourth row. Squeeze the little figure around the edges and put on the white pieces. Just put on 3 white and 6 red.
5:27 Make the 5th row: 2 white and 7 red.
5:57 Here is what you should have.
6:04 In the 6th row, put the pieces with the short side out, not the long one. Put on 9 pieces of white color.
6:43 In the 7th row put the pieces with the long side out (4 white and 5 red pieces).
7:22 There are 5 white and 4 red pieces in the 8th row.
7:51 We begin to do the 9th row. Put on 4 white and 5 red.
8:24 10th row: white, red, white, 6 red.
9:02 11th row: 9 red pieces.
9:39 Make penguin’s wings of red pieces.
10:00 Take 2 orange triangles and bend them as I show. These will be the penguin’s paws.
Insert them. You can glue them, if you want.
10:56 Take the third orange piece and expand it. Cut the blank in half. Fold and cut off excess. You must get a square. Fold it as I show. We make a beak.
11:38 You must make two folds along the diagonals of the square and one on the horizontal center line. And then repeat the origami folds after me.
12:12 Take paper glue, such as PVA, and glue the creases.
12:28 Bend the beak. Make such a chubby beak for the penguin. And glue it.
13:07 Cut out the paper eyes. And glue them.
13:30 You can make a collection of colorful penguins.
13:34 And if you watched a cartoon about penguins Lolo and Pepe, then you can make them. Or you can make a paper Pororo penguin. And if you liked the video, then subscribe to the channel and click on the bell!
Subscribe to Arthur3Dorigami channel to get more good creations ideas
https://www.youtube.com/c/Arthur3Dorigami
And don’t be afraid to put your likes or write comments.
See other video tutorials:
HOW TO MAKE AN ORIGAMI and other DIY PAPER CRAFT
https://www.youtube.com/playlist?list=PLbUAy4EbbEob4Pew4ZPSBzJaN9_SZLXgq
HOW TO MAKE 3D ORIGAMI: clearly tutorials by Arthur 3D origami channel
https://www.youtube.com/playlist?list=PLbUAy4EbbEoat2PB0soE7G2F2o8VBWTdX
Видео How to make a penguin with paper. 3D origami tutorial. канала Arthur 3D origami
Показать
Комментарии отсутствуют
Информация о видео
Другие видео канала
 How to make paper vase origami 3D. Tutorial DIY
![Origami amazing swan 3D [How to make a paper swan]](https://i.ytimg.com/vi/fjizU9ZsA6M/default.jpg) Origami amazing swan 3D [How to make a paper swan]
Origami amazing swan 3D [How to make a paper swan] 3D Origami Dog Tutorial 1/32 Ultra HD - Origami 3d Cane Tutorial 1/32 Ultra HD
 Origami vase from pieces of paper ♡ DIY How to make an origami vase 3D Tutorial
 Penguin - Ying 3D Origami - Creagami
 How to make a PAPER 3D BIRD (Easy Origami)
 How to make a paper owl. 3D origami tutorial
 How to make a 3D origami Swan Basket
 Origami: MAGIC BALL - Yakomoga EASY Origami tutorial
 3D Origami Penguen Yapımı (Penguin Tutorial)
 Easy Origami Turtle - How to Make Turtle Step by Step
 10 DIY TOYS made of paper / 10 крутых АНТИСТРЕСС ИГРУШЕК из бумаги /Бумажные игрушки своими руками
 Fish - Ying 3D Origami - Creagami
 Origami Schwan falten - Basteln mit Papier - DIY Geschenkideen - Bastelideen Deko - 3D
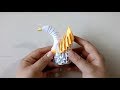 Tutorial Mini Cisne Origami 3D
 COMO HACER UN PINGÜINO EN ORIGAMI 3D (PASO A PASO) -ABCpapel
 CESTA ORIGAMI 3D con ARCO en forma de CORAZÓN/PASO A PASO.
 3D Origami Paper Egg for Easter ♡ Awesome Clear Tutorial
 Make pieces FAST & EASY | 3D origami Machine
 How to Fold Pieces Faster Tutorial - 3D Origami Basics