Raspberry Pi Remote Camera with motionEyeOS - Build a Surveillance System
Detailed article for this video at https://dbot.ws/motioneyeos
More tutorials and projects at https://dronebotworkshop.com
Stay Informed! Join the DroneBotWorkshop Newsletter at https://dbot.ws/dbnews
Today we are going to put together a very sophisticated motion-sensitive surveillance system using a Raspberry PI (any Raspberry Pi) and a free open-source product called motionEyeOS. Our cameras will have the following features:
- Very easy installation and setup.
- Has a web-based, mobile/tablet-friendly user interface that can be customized in many ways.
- Uses both the Raspberry PI camera module as well as several USB cameras.
- Can use multiple cameras on the same Raspberry Pi.
- Also has support for IP (network) cameras.
- Has motion detection with email notifications.
- Can be set up with a schedule.
- Uses JPEG files for still images.
- Several file formats available for movies.
- Can record time-lapse movies.
- Connects to your local network using ethernet or wifi.
- Store images and videos SD card, USB drive or network share.
- Store images and videos on cloud storage services (Google Drive, Dropbox).
- Media files are visible in the local network as SMB shares.
- Media files can also be accessed through the built-in FTP server or SFTP server.
Despite the complexity of this system, it’s probably the easiest Raspberry Pi project you will ever build! That’s because motionEyeOS is available as an image file for a Raspberry PI, as well as for many other single board computers.
We will start by looking at a few different Raspberry Pi cameras and we will look at the CSI (Camera Serial Interface) connector used to hook them up.
Then we’ll build two motionEyeOS cameras - one using a Raspberry Pi 3B+ and a second one using an inexpensive Raspberry Pi Zero W.
Heres a breakdown of what you’ll be learning:
Raspberry Pi Camera Intro - 2:14
Different Pi Cameras - 4:45
motionEyeOs intro - 8:02
Getting the right motionEyeOS image file - 10:07
Testing your Raspberry Pi Camera with Raspbian - 13:40
Raspberry Pi 3 & motionEyeOS - 18:03
Using an IP scanner - Angry IP Scanner - 22:12
Setting a fixed IP address - 25:07
Raspberry Pi Zero W & motionEyeOS - 31:49
Create a WiFi connection file - 34:31
Display Multiple Cameras - 39:58
Advanced features - 43:00
I’m sure you’ll be amazed at the number of features that this surveillance system has, as well as how easy it is to put together. It would make an ideal first-time Raspberry Pi project.
As always I have a detailed article on the website that goes along with the video, you can read it at https://dbot.ws/motioneyeos. And while you are there please consider subscribing to my newsletter, it’s my way of getting your opinion on the content I've created as well as helping select subjects for future videos and articles. You can sign up at https://dbot.ws/dbnews.
And of course please subscribe to the DroneBot Workshop YouTube Channel!
Видео Raspberry Pi Remote Camera with motionEyeOS - Build a Surveillance System канала DroneBot Workshop
Показать
Комментарии отсутствуют
Информация о видео
Другие видео канала
 Raspberry Pi MotionEyeOS Network Camera
 Raspberry Pi GPIO - Getting Started with gpiozero
 ATX Bench Power Supply - Convert a Computer Power Supply
 RCWL-0516 Microwave Proximity Sensor - With & Without Arduino
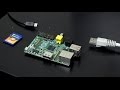 Setup a Raspberry Pi Web Server with Your Own .COM Using Google Domains
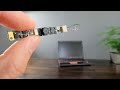 DIY Home Security - ON A BUDGET!
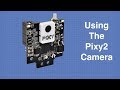 Pixy2 Camera - Image Recognition for Arduino & Raspberry Pi
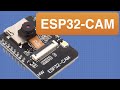 ESP32 CAM - 10 Dollar Camera for IoT Projects
 Raspberry Pi Surveillance Monitor v2
 Raspberry Pi Cameras - The BIG Picture
![Raspberry Pi Zero surveillance cameras [MAKER'S REPORT]](https://i.ytimg.com/vi/JNVFfqtHj3k/default.jpg) Raspberry Pi Zero surveillance cameras [MAKER'S REPORT]
Raspberry Pi Zero surveillance cameras [MAKER'S REPORT] Raspberry Pi: Using GPIO Inputs
 MOSFETs and Transistors with Arduino
 Raspberry Pi Servo Motor Control
 Raspberry Pi Camera Shootout
 Raspberry Pi 4 Getting Started
 Using the HC-SR04 Ultrasonic Distance Sensor with Arduino - Everything you need to know!
 Raspberry Pi Zero W Surveillance Camera
 Top 10 New Raspberry Pi Project Ideas In 2020 | #2.0