Air Lift LoadLifter 5000 Rear Air Helper Springs Installation - 2006 Winnebago Chalet Motorhome
Click for more info and reviews of this Air Lift Vehicle Suspension:
https://www.etrailer.com/Vehicle-Suspension/Air-Lift/AL57131.html
Check out some similar Vehicle Suspension options:
https://www.etrailer.com/suspension-enhancement.htm
Search for other popular Winnebago Chalet Motorhome parts and accessories:
https://www.etrailer.com/vehicle/2006/Winnebago/Chalet+Motorhome
https://www.etrailer.com
Don’t forget to subscribe!
https://www.youtube.com/user/etrailertv
Full transcript: https://www.etrailer.com/tv-install-air-lift-air-helper-springs-2006-winnebago-chalet-motorhome-al57131.aspx
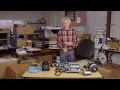
Hey there, RV owners. Today on your 2006 Winnebago Chalet motor home, we're going to be installing Air Lift's LoadLift 5000 air helper springs for the rear axle. This is what our air bags look like when they're installed. They're going to sit between your frame and your rear axle to provide load leveling support across the back of your vehicle. They offer up to 5,000 pounds of load leveling support. Now you want to keep in mind that this doesn't increase the amount of weight that you can carry in your vehicle, just how much it can assist in supporting.They operate between five and 100 psi.
Five psi is for when your vehicle's unloaded, and 100 psi is when it's at its maximum load. In most situations, you won't really exceed about 50 psi, as that's pretty sufficient for the loads that most vehicles are designed to carry. Compared to your factory jounce bumper, this is going to provide support throughout the entire length of suspension travel. Your jounce bumper only contacts once the suspension has bottomed out. This is going to provide a smoother support across that so you won't have a sudden bang impact when the jounce bumper contacts.
It's going to ease it in smoothly.Additionally, these can be adjusted from side to side to vary for uneven loads. You could have higher pressure on one side than another to bring you back to center. Having a level vehicle can help restore some lost braking and handling performance. By leveling it out, your suspension is going to have the correct geometry, and your tires are going to be contacting the road the way they we're designed. This is going to cause them to wear properly instead of wearing excessively in certain spots, giving you more surface area contact to the road, ensuring that it's easier to maintain control of the vehicle.Additionally, when you brake, most of the braking force is done with the front of your vehicle, and the weight transfers onto that.
If you're not level and even, the weight may not transfer properly. By making it level, it transfers the way it should, and that increased contact of your tire to the road is going to reduce your stopping distance.On larger RVs like this, they can also help minimize sway. What this means for you is you're going to have a safer, more comfortable ride when taking your RV on vacation. You and your passenger side will appreciate the better ride quality and the safe trip that you're going to get on your way there.It's an easy no-drill installation. Let's show you how to do that now.
We'll begin our installation under the rear of the vehicle just above our rear axle. We need to remove the jounce bumpers that are located on each side. On your driver side, you may have some wiring that you need to pull up to get out of the way to access the bolt. There may also be a bracket that is just above your jounce bumper. This is going to attach to the stud that's attached to our jounce bumper. But we are going to need to leave that bracket there, so we'll use a 15mm socket to remove the nut. We'll take our jounce bumper off and then leave that bracket in that position, then slide our jounce bumper down and set it aside as we won't be reinstalling it.Now we're going to need to give ourselves some additional clearance in order to get our air bag installed. We're going to use a pole jack underneath the frame to lift up on the body. We're doing this because we have it on a lift. If you're going to be doing it on the ground, I recommend you just place a floor jack underneath the frame to lift it up. You could also use your leveling jacks if you have them installed. Whenever lifting your vehicle with hydraulics, you should always put jack stands underneath of it to stay safe.We'll now perform preassembly on our air bags. We'll start by taking the air fitting and threading it into the air port on the top of our air bag. Then we'll use a 1/2" wrench, tighten that down. You want to make sure you get at least a couple of threads that are covered in sealant tightened down in. We'll then place the roll plate on top. Then we're going to put our bracket on it. Your brackets are left and right, so you want to make sure you've got the appropriate side for the one you're working on. We're going to be doing the driver side first, so we've got our driver side bracket here. It will fit around your air fitting just like that. Line up the ho
Видео Air Lift LoadLifter 5000 Rear Air Helper Springs Installation - 2006 Winnebago Chalet Motorhome канала etrailer.com
https://www.etrailer.com/Vehicle-Suspension/Air-Lift/AL57131.html
Check out some similar Vehicle Suspension options:
https://www.etrailer.com/suspension-enhancement.htm
Search for other popular Winnebago Chalet Motorhome parts and accessories:
https://www.etrailer.com/vehicle/2006/Winnebago/Chalet+Motorhome
https://www.etrailer.com
Don’t forget to subscribe!
https://www.youtube.com/user/etrailertv
Full transcript: https://www.etrailer.com/tv-install-air-lift-air-helper-springs-2006-winnebago-chalet-motorhome-al57131.aspx
Hey there, RV owners. Today on your 2006 Winnebago Chalet motor home, we're going to be installing Air Lift's LoadLift 5000 air helper springs for the rear axle. This is what our air bags look like when they're installed. They're going to sit between your frame and your rear axle to provide load leveling support across the back of your vehicle. They offer up to 5,000 pounds of load leveling support. Now you want to keep in mind that this doesn't increase the amount of weight that you can carry in your vehicle, just how much it can assist in supporting.They operate between five and 100 psi.
Five psi is for when your vehicle's unloaded, and 100 psi is when it's at its maximum load. In most situations, you won't really exceed about 50 psi, as that's pretty sufficient for the loads that most vehicles are designed to carry. Compared to your factory jounce bumper, this is going to provide support throughout the entire length of suspension travel. Your jounce bumper only contacts once the suspension has bottomed out. This is going to provide a smoother support across that so you won't have a sudden bang impact when the jounce bumper contacts.
It's going to ease it in smoothly.Additionally, these can be adjusted from side to side to vary for uneven loads. You could have higher pressure on one side than another to bring you back to center. Having a level vehicle can help restore some lost braking and handling performance. By leveling it out, your suspension is going to have the correct geometry, and your tires are going to be contacting the road the way they we're designed. This is going to cause them to wear properly instead of wearing excessively in certain spots, giving you more surface area contact to the road, ensuring that it's easier to maintain control of the vehicle.Additionally, when you brake, most of the braking force is done with the front of your vehicle, and the weight transfers onto that.
If you're not level and even, the weight may not transfer properly. By making it level, it transfers the way it should, and that increased contact of your tire to the road is going to reduce your stopping distance.On larger RVs like this, they can also help minimize sway. What this means for you is you're going to have a safer, more comfortable ride when taking your RV on vacation. You and your passenger side will appreciate the better ride quality and the safe trip that you're going to get on your way there.It's an easy no-drill installation. Let's show you how to do that now.
We'll begin our installation under the rear of the vehicle just above our rear axle. We need to remove the jounce bumpers that are located on each side. On your driver side, you may have some wiring that you need to pull up to get out of the way to access the bolt. There may also be a bracket that is just above your jounce bumper. This is going to attach to the stud that's attached to our jounce bumper. But we are going to need to leave that bracket there, so we'll use a 15mm socket to remove the nut. We'll take our jounce bumper off and then leave that bracket in that position, then slide our jounce bumper down and set it aside as we won't be reinstalling it.Now we're going to need to give ourselves some additional clearance in order to get our air bag installed. We're going to use a pole jack underneath the frame to lift up on the body. We're doing this because we have it on a lift. If you're going to be doing it on the ground, I recommend you just place a floor jack underneath the frame to lift it up. You could also use your leveling jacks if you have them installed. Whenever lifting your vehicle with hydraulics, you should always put jack stands underneath of it to stay safe.We'll now perform preassembly on our air bags. We'll start by taking the air fitting and threading it into the air port on the top of our air bag. Then we'll use a 1/2" wrench, tighten that down. You want to make sure you get at least a couple of threads that are covered in sealant tightened down in. We'll then place the roll plate on top. Then we're going to put our bracket on it. Your brackets are left and right, so you want to make sure you've got the appropriate side for the one you're working on. We're going to be doing the driver side first, so we've got our driver side bracket here. It will fit around your air fitting just like that. Line up the ho
Видео Air Lift LoadLifter 5000 Rear Air Helper Springs Installation - 2006 Winnebago Chalet Motorhome канала etrailer.com
Показать
Комментарии отсутствуют
Информация о видео
Другие видео канала
 Why Not To Use Air Suspension On Your Class C Rv
 Better Weight Distribution - DIY Air Bags + Wireless Air Compressor Install on RV
 Air Lift LoadLIFTER 5000 airbag installation
 Installing Firestone Ride Rite Air Bags on Ford F53 Chassis
 Air Lift Install: WirelessAir (2nd Generation)
 SumoSprings vs. Timbren
 Practical Motorhome talks air suspension
 Air Lift Load Lifter 5000 Airbags, First drive impression!
 RV Suspension Upgrades
 etrailer | Air Lift LoadLifter Air Helper Springs Installation - 2016 Ram 1500
 DONT TOW ANYTHING WITHOUT THESE!
 Off-Road Caravan Monsters - Motorhomes For Adventures | Full Documentary
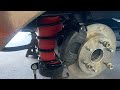 EASIEST HELPER BAG INSTALL EVER! Airlift 1000 helper springs!
 Air Bag supension install on a E450 motorhome - A Grave Adventure S01E10
 Is Air Suspension Right for You? | The Bottom Line
 How to Install a Firestone Air Bag Kit
 How to use Air Lift Wireless ONE Compressor with Ride Rite Air Springs
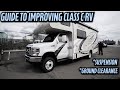 Class C Rv Ground Clearance and Suspension Improvement | Complete Guide To Lifting Your Rv
 Replacing Rear RV/Motorhome Air Bags | 1989 P30 Chevy Winnebago