DIY 18650 Battery Charger - How to make lithium-ion cell Charger
Subscribe to My Channel: https://bit.ly/2JHtlyc
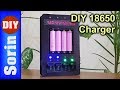
In this video I am showing you how to make a Li-ion 18650 Battery charger with Charging Discharging and Battery level monitoring features including every single step of making. Using this Battery Charger, you can check and identify 18650 battery capacity, whether it is Good one or bad one.
For this project I have used following parts:
1) 18650 Battery x4
2) TP4056 Charger module with discharge protection X4
3) 18650 Battery Holder (4 pcs Battery Holder) x1
4) Three Position 6 pin ON/OFF switches x4
5) LED 3V Red, Green & Blue x4each
6) LED panel Voltmeter 3wires x4
7) 10W 10R Ceramic Capacitors x4
8) 12AWG & 18AWG wires
9) Heat shrink tubes (heat Sleeves)
10) 1KOhms Resistors x4
11) PCB spacers 1inch with nuts x6
12) Acrylic Sheet
13) 5V 3-4A charger or power supply
14) Cable ties
15) Piece of Wood
16) Epoxy Glue / Glue Gun with Sticks
17) Color Spray (Juki Grey)
*Dimensions of the Panel available at 2.52 in the video.
*Circuit Diagram of the Battery Charger available at 11.57 at the video.
Note: Use 5V 4A Charger to reduce excessive charging time.
DIY Grinder Machine used in this video : https://youtu.be/HZZasnURcss
Thank you.
Subscribe for more future creative project videos.
Subscribe Here: https://bit.ly/2JHtlyc
#diycharger #18650battery #tp4056 #liionbatterycharger
Видео DIY 18650 Battery Charger - How to make lithium-ion cell Charger канала LahisTech
Показать
Комментарии отсутствуют
Информация о видео
Другие видео канала
 My DIY 18650 Battery Charger
 How to Make a 18650 Li-ion Battery Charger
 Arduino 8x Charger / Discharger Full Build Start to Finish
 How to make High Speed Drill Dremel Tool Using PVC parts 4 in 1
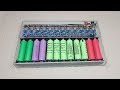 Estación de Carga Para Baterías de Litio 18650 12 Celdas, Cargador de Baterías Casero
 Adjustable Variable Power Supply | Battery Charger
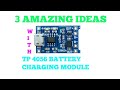 3 AMAZING IDEAS
WITH TP-4056 MODULE.
3 AMAZING IDEAS
WITH TP-4056 MODULE. Lithium Battery Charging Station
 Ultimate 18650 40 Cell Charger Build. Oh Yeah!
 DIY: How to revive a dead 18650 (or any) Li-ion battery cell
 How to Make a Brushless Motor Dremel Machine – DIY Drill Dremel
 HOW TO MAKE POWER BANK - DIY
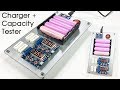 DIY 18650 battery charger discharging station (ZB2L3 battery capacity tester + TP4056)
 18650 - Part 4 - Battery cells bulk charging and discharging with TP4056
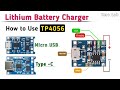 TP4056 Module for Charge Li-Ion Battery
 How to Make Mini 18650 Power Bank using Syringe
 How to Make the Ultimate 18650 Power Bank with Infinitely Expandable Capacity
 【創作DIY】18650充電器
 DIY - Lab Bench Power Supply