#73 nRF24L01 Send (and receive) data with your Arduino!
New! https://ralphbacon.blog
Use your Arduino to transmit (and receive) data reliably with this easy-to-use module.
The nRF24L01 module achieves this beautifully - and with the excellent RF24 library from TMRh20 we can do just about anything you might think of.
However, in this absolute beginners' guide, we just scratch the surface but still managed to produce a useful transmit and receive sketch (originally taken from the above library but simplified even further).
The nRF24L01+ boards (but available in many places):
https://www.amazon.co.uk/dp/B010N32X3U
The breakout board that prevents power-related issues:
https://www.amazon.co.uk/gp/product/B00NJCB7FS
The library I use is very mature, s/he has several others too. See his/her homepage here, choose the RF24 library as I showed in the video.
https://github.com/TMRh20 or a copy from here:
https://github.com/RalphBacon/nRF24L01-transceiver or here
https://github.com/nRF24/RF24 (thanks Ed19601)
Note that there are several good nRF24L01 libraries available out there. If you use another one bear in mind that the pin connections will be different. I chose the one above as it seemed to give us Arduinites a decent interface to the nRF24L01 module without too much mucking around.
My sketches (one for receive, one for transmit) even though both do actually transmit anyway (remember that each module will automatically acknowledge receipt of data unless you specifically switch off that capability - why would you do this?).
IMPORTANT NOTE: thanks to the Eagle Eyes of Arduinite viewer whitefields5595 please remember that pin 10, although not connected to the nRF24L01+ in this demo must NOT be used as a general purpose IO pin - it remains the standard CS pin of the SPI bus - and if that doesn't mean much just remember to leave pin 10 on your Uno or Nano unconnected whilst running this sketch!
------------------------------
DOWNLOAD HERE
------------------------------
https://github.com/RalphBacon/nRF24L01-transceiver --- click the Download button and choose the zip file, unzip and place each sketch in its own folder (of the same name as the sketch) in your usual Arduino sketches folder.
If you like this video please give it a thumbs up, share it and if you're not already subscribed please do so :)
My channel is here:
------------------------------------------------------------------
https://www.youtube.com/c/RalphBacon
------------------------------------------------------------------
How can I remember this? Memory tip: "See" Ralph Bacon, geddit?
Видео #73 nRF24L01 Send (and receive) data with your Arduino! канала Ralph S Bacon
Показать
Комментарии отсутствуют
Информация о видео
Другие видео канала
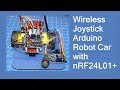 The nRF24L01 - Wireless Joystick for Arduino Robot Car with nRF24L01+
 #158 nRF24L01+ with STM32F103 (Blue Pill) - transfer more data! (Easy)
 #37 Advanced Tutorial for NRF24L01 and Arduino #1
 LoRa Module VS nRF24 VS Generic RF Module || Range & Power Test
 Raspberry Pi Pico - Control the (I/O) World
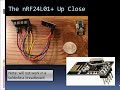 Getting Started with the nRF24L01 Transceiver
 #152 STM32 Blue Pill - Is this a modern NANO replacement (✅)
 #71 How to create an Arduino Library - easy!
 1-Day Project: Arduino and nRF24L01+ Data Transceiver
 Which radio module? NRF24, LoRa, CC1101, HC12, 433MHz, HC05
 #157 Top 5 Essential Arduino Workshop Tools 🛠️ - Beginner & Upgrader
 The Arduino Family - Uno - Mega - Nano - Pro Mini -ATtiny85
 nRF24L01 range test (arduino)
 ESP32 CAM - 10 Dollar Camera for IoT Projects
 Arduino + NRF24 simple tutorial and range test
 #38 Advanced Tutorial for NRF24L01 and Arduino #2 Reliable Connections
 Usare nRF24L01 con Arduino - Remote blink - #200
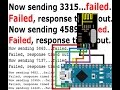 nRF24L01+ HOW TO FIX: Now sending ... failed. Failed, response timed out. RF24 nRF24
 #162 Arduino Water ☂️Level Detector (easy and cheap!)
 Cheap and Simple Radio Control Making for RC Models. DIY RC