DIY Pine Cone And Resin Scale / Blank
Making two set of stabilized pine cone and resing.
It's a pretty common blank, I've seen it used many time as handles or turned for pens and so on. Wanted to try and make it myself because I really like how it looks and now with the vacuum chamber and pressure pot that I built in previous video I have all tools necesarry to hopefully make it work. With the second set I did a better job at centering the pine cones and I also like better the contrast of orange and purple dye. With the first one I notices some tiny bubbles still present near the center of the pine cone so with the other one I tried to degass the whole assembly with the vacuum pump before the resin had a chance to thicken up and then I place it to cure under pressure. But, as I have already notice in another video while making micarca, that had very little effect to the end result and I still had a couple of tiny holes in the center.
All materials for this project kindly provided by RESIN PRO find everything here:
www.resinpro.it
www.resinpro.eu
www.resinpro.es
www.resinpro.de
www.art-smola.ru
And use code: "blackbeardprojects" For 10% off your orders (affiliate marketing).
Process of stabilizing is shown in details here:
https://youtu.be/E-P3KWctkk0
Video about making the vacuum pump and chamber:
https://youtu.be/BeiW_37rS-U
Video about making the pressure pot:
https://youtu.be/RuQWjLJndro
Video about pressure vs vacuum in composite materials:
https://youtu.be/oxzVWyvLHmE
Index of operation and materials:
0:15 Drying pine cones with pid controlled oven. 12 hours at 120°C (248°F)
0:27 Taking pine cones out of the oven before it cools down and placing it inside a sealed container so it does not absorb moisture
0:40 After the pine cones are cool completely covering in stabilizing resin
0:55 Slowly raising vacuum to prevent excessive bubbling
1:12 Taking to maximum vaccum and holding it for 4 hours or untill bubble stop rising
1:22 Slowly releasing vacuum then leave to soak inside the stabilizing resin overnight (12 hours)
1:45 Packing each piece individually in aluminum foil
2:06 Lefover resin can be collected and used over and over
2:24 Curing resin (stabilizing resin activates with heat) 2 hours at 95°C (203°F)
3:10 Removing excess resin
3:30 Grinding a flat side on the pine cones
3:45 Silicone mold and 3d printed petg holder box
4:00 Mixing epoxy resin (following manufacturer instructions)
4:14 Adding few drops of resin dyes
4:54 Mixing two glass of different color resin
5:20 Pouring one color on each side
5:33 Stick to hold pine cones down
5:41 Resing left to cure overnight under pressure to mitigate bubbles
6:37 Cutting eccess pine cone on band saw
7:05 Squaring up the blank to mark a precise center line
7:37 Cutting the blank in half to use it as scales in full tang
8:07 Sanding flat sides with sandpaper on a piece of flat glass
8:33 Sanded up to 320 grint and applied a clear coat to simulate mirror finish
9:26 Can be used matt if not buffed to a mirror finish
If you don't know where to find dyes and silicone mold here you go:
https://blackbeardproject.page.link/ResinDye
https://blackbeardproject.page.link/SiliconeMold
Yes, these are all affiliate links, buy wherever you want.
I found the silicone mold searching for soap and bread mold.
The one I bought are 16.5x7.5 cm (6.5x2.9 in) but I find them to be a bit short now that I've used them for some blanks.
The one I linked are 24.6x7 cm (9.7x2.8 in) and come with a wooden box ready to use so you don't have make one (or 3d print) like I did. But I haven't tried that one out so I can't guarantee for quality. Find one that fits your needs!
I bought the stabilizing resin here:
Cactus Juice: https://goo.gl/6M2odZ
I don't have any affiliation with brisa.fi but they offer a nice and fast service. Highly suggested for Europe supply.
Thanks a lot for watching, I hope you liked the video!
Suggestions and comments are welcome.
Leave a like and share to anyone who might be interested!
★Patreon★
https://www.patreon.com/blackbeardprojects
★Website★
http://blackbeardproject.com/
★Follow me★
Facebook ► https://www.facebook.com/BlackBeardProjects/
Twitter ► https://twitter.com/BlackBeardProje
Instagram ► https://www.instagram.com/black_beard_projects/
Видео DIY Pine Cone And Resin Scale / Blank канала Black Beard Projects
Показать
Комментарии отсутствуют
Информация о видео
Другие видео канала
 Honeycomb Scales Composite Material
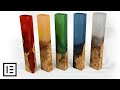 DIY Epoxy Resin Tap Handles
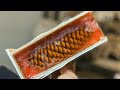 Wood Turning - The pine cone project
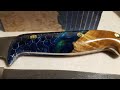 Stabilized Oak, Resin and Honey Comb Knife Scale
 How To Make Alumilite & "Worthless Wood" Burl Blanks
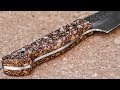 Cork Stabilization IKEA Pot Stand
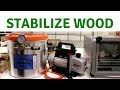 How to Stabilize Wood and Why Should You do it?
 Making the NightForce Glow in the Dark Knife
 Making the COPPERHEAD Fulltang Knife
 How To Make Micarta Marble Rag THE CLEAN WAY
 Woodturning the Amber Pinecone Lamp - Fiery Dragon Egg
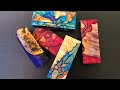 Making Wood and Resin Blanks
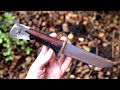 Making a Forged Knife w/ SPIDER 🕷 in Epoxy Resin Handle / Giveaway
 How To Make Micarta | A DIY guide to what its really like to make this stuff
 Ammo Casings and Resin.. A Screw Driver Handle
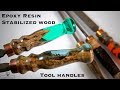 Epoxy resin & stabilized wood tool handles
 HDPE Knife Handle - Recycled Plastic Chef’s Knife Scales
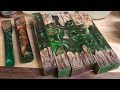 Hybrid Pen Blanks with Liquid Diamonds Epoxy Resin
 Dovetail Tomahawk
 красивая рукоять с радиусными вставками