Paw Patrol Balloon Art by Balloon Josh
Paw Patrol is one of the popular cartoon shows for kids nowadays!
So, you need to make sure you can at least create one or two of the characters in the show if you want to twist balloons in a kids' event!
Here's an easy and quick guide on how to create Paw Patrol characters brought to you by our favorite balloon master, Balloon Josh!
For this Paw Patrol character, we're going to need two brown balloons, one with about 5-6" uninflated, and the other with about 2-3" uninflated. We will also need a toffee colored balloon with about 4" uninflated, and two royal blue balloons with about 3-4" uninflated. And we're also going to need one white scrap with about 5" inflated.
We're going to start with the toffee colored balloon. You're going to make a loop twist, and pull the knot through to lock it in place. You're going to make another loop twist, and one more loop twist, so we have three loop twists. We're going to break that part off later, but first, we're going to grab one of our light brown balloons, the one with about 5-6" uninflated. We're going to tie the knot around the three loop twists. Once we have that tied in, we can now break off the extra part of the toffee colored balloon and wrap that around so those don't come undone.
Now we're going to make about a hands' width bubble, about 3-4", followed by a pinch twist, and then go back down with another hand width bubble. So as you can see, we just went up, pinch twist, and back down. Now we're going to attach the white scrap for the eyes. We tie the knot around the base, go up, tie it around, with the pinch twist, and now we're going to go back down and tie it back around the three loop twists.
As you can see, you have the three loop twists, and with the brown, you went up, and then pinch twist it back down, and with the white, we just went around the pinch twist and down.
Now we're going to use this remaining part of the brown to do the sides of the head and the ears. So we're going to go down, and it's going to be a little bit longer than the previous bubbles. Followed by a small loop twist. This is going to be one ear. Then we do a small bubble, and we will attach that to the pinch twist at the top of the head. And we're going to mirror this on the other side. Small bubble, followed by a small loop twist, and we're going to bring it back down and tie it around the three loop twists at the base of the head. Then you can go ahead and break that off and then just wrap it around so it doesn't leak out air. That's the base for our head.
Now we're going to be taking the blue, because we're going to be doing Chase. We take the knot, tie it around the ear, go over, and twist it around the other ear. Now we're going to go back over, and twist it around the other ear. We're going to do this two more times. So you should have four bubbles. We break off the excess, and tuck it in. And this is the head for Chase!
Now we could stop here, and just add a base, but we're going to continue and also make the body. So we'll take our other light brown balloon and tie it around the base of the three loop twists. Then we're going to make about a one and a half inch bubble, followed by two pinch twists. So one small pinch twist, followed immediately by a second small pinch twist.
Now we're going to make the legs. So you're down about a hands' width or about 3-4 inches, and then back up, wrap it around the pinch twists, and those will be your front legs. For this, you're going to make a small bubble, and then you're going to make a large loop twist, and then tie that knot around, essentially turning that first bubble into what looks like a pinch twist.
Then do a small spacer bubble, followed by a loop twist. You should have enough space to do three of these. One more spacer bubble and one last loop twist, and you should have a little bit of extra bubble left, and then just wrap the excess around. Now we're going to slide that onto the back part of the dog body, and now we're going to make two more legs. Do a simple lock twist, and then a pinch twist at the base to lock it in place and also to force the tail to go down. A little pressure squeeze to make sure everything's looking good. I turn the head sideways and I usually give the nose a little squeeze to make sure it's pointing up.
Get your twisting balloons here : https://www.clownantics.com/collections/twisting-balloons
Joshua Clark popularly known as Balloon Josh is a professional balloon twisting master! He made various tutorial videos for us and even did several Facebook Live sessions in our fan page.
Check out our channel and subscribe! New tutorials and fun videos every week!
We also have a blog where we post various tutorials and clowning stories : https://www.clownantics.com/blogs/clownantics-blog
Like us on Facebook and let me know how we're doing!
FACEBOOK: https://www.facebook.com/clownantics/
Thank you for watching! Subscribe for more clown videos!
Видео Paw Patrol Balloon Art by Balloon Josh канала ClownAntics
Показать
Комментарии отсутствуют
Информация о видео
Другие видео канала
 MARSHALL PAW PATROL Balloon Animal Tutorial - Learn Balloon Animals with Holly!
 Two-Minute Mickey Mouse Balloon by Balloon Josh
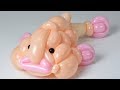 Artist Creates Stunning Balloon Animals
 Twixter Balloon Rose
 Los Angeles Balloon Artist Frank Alday "Mr. Shapalloons" Making A Michelle's Heart
 Собачка из шарика / One balloon Puppy dog (Subtitles)
 Paw Patrol Balloon Decoration Idea - Dollar Tree DIY
 Ballerina balloon tutorial. Ballet balloon art. Balloon doll. Balloon twisting. Easy, cute and fast.
 Mario Bross balloon tutorial. Super Mario balloon twisting
 Two Balloon Flower - Balloon Animal Lessons #6 ( globoflexia )
 One balloon star wand snowflake
 Triple Balloon Heart Wands! Twisting Tutorial
 Gorgeous Seahorses Balloon Twisting Tutorial
 How To Twist A Balloon Parrot - TutorVision Tutorial
 The Beginner's Guide to Making a Dog Balloon Animal
 Balloon Crown - Balloon Animal Lessons #43
 INFLATING our CHRISTMAS BALLOONS! Santa Snowman decorations | Blowing up Balloons with HELIUM
 Гончик из шаров (тело) / Paw Patrol body from balloons (Subtitles)
 How to Inflate a huge Spider-man Airwalker Balloon
 How to Make a Hot Air Balloon with Balloon Twisting by Stretch the Balloon Dude