E-Bike Motor Repair - Damaged Cable Bafang Hub Drive
!!! Make sure to read the pinned comment from Mels van Hoolwerff below !!!
This video gives an overview of how to fix a Bafang rear hub motor when you’ve got damage where cable enters the hub.
Before we get into the repair itself, let’s see how the problem shows up. The first sign of trouble on this e-bike was that the information display stopped showing the speed and started reporting error code 21. The manual for the C961 display tells us that error code 21 is for “Speed sensor abnormality”. Over the following weeks, another problem emerged – the power would cut off regularly and the e-bike would not work until the bike was turned off and on again. It seemed that the bike was particularly prone to losing power after going over bumps in the road. Finally, as you can see in this picture, the wire bundle coming out of the motor appears to show some damage. Putting all of these clues together, we can be pretty certain that damage to the wire coming out of the motor was causing problems.
Now for the fix. Make sure to take lots of photographs as you go along so that you’ll know how the motor goes back together. Remove the wheel from the bike, and take off the cassette. You’ll need a cassette lockring tool with a decent-sized hole in the middle so that it can slip over the cable coming out from the hub. Next, remove the six screws around the outside of the hub. These screws have strange heads, a bit like a Torqx head but with a little pin in the middle. Once the screws are loose, the motor should slide out of the hub. You will also need to remove three large screws and the circlip that hold the metal gear wheel onto the motor. I made the mistake of also removing the six screws that attach the freehub body to the end plate. These screws were so tight that I stripped the heads of three of them and had to drill them out. I should have allowed the penetrating oil to soak in for longer. As it turned out, removing the screws was an unnecessary step anyway. Learn from my mistake and leave the six screws around the freehub body in place.
Instead, unscrew the two axle nuts and simply slide the freehub body off the motor. With the freehub body removed, three more screw heads become visible. Remove these and pull the cable through the axle to reveal the point where the cable was damaged. Cut the cable below this point with a wire cutter. The cable contains nine wires. The three large wires (green, blue and yellow) carry three phase electricity to make the motor turn. The other six wires are for the various sensors inside the motor. The red wire is +5V, the black wire is 0V, and the other four wires carry signals.
De-solder the six old signal wire ends. Next, with the old wire ends out of the way, strip the new ends and solder them into position. Originally, the signal wires were soldered in from the bottom of the circuit board. However, it is not easily possible to remove the circuit board so it’s probably best to solder the wires in from above as shown here. Be as neat as possible because there isn’t much space to work with here. Next, join the three main power wires. Use some heat shrink to protect against short circuits. And there it is, the cable is fixed. And now with some new screws to replace the ones that I had to drill out, the repair is complete and everything is ready to go back together. But before you do put your motor back together, it’s worth taking the opportunity to clean and lubricate the moving parts. And, with everything re-assembled, the is e-bike back in action.
One more thing to note is the way that you position the cable when you put the wheel back on the bike. Make sure to route the cable out of the axle in so that it passes through the notch in the side of the axle. This way the cable is less likely to get damaged if the bike falls or gets hit from the side. This motor might not have needed to be repaired in the first place if the cable had been installed this way from the beginning. And be careful about using panniers because the weight of a pannier resting on the cable could damage it over time.
Thank you for watching.
Видео E-Bike Motor Repair - Damaged Cable Bafang Hub Drive канала Dominic Ó Gallachóir
Показать
Комментарии отсутствуют
Информация о видео
Другие видео канала
 How to Replace a Damaged Hall Sensor in an Ebike Hub Motor
 Uprading my 20" fat tyre Ebike -500w to 750w - PART 1
 Ancheer Electric Bicycle Hub Motor PROBLEM - FIX AKA Eshion Cyclamatic
 Bafang G310 Motor Disassembly Video
 How to replace a damaged cable harness in an ebike hub motor
 BLDC Controller Learning Board for Beginners
 Ebike Hub Motor Disassembly and Reassembly
 A Look Inside a Geared Hub Motor After 5000km. Bad Failure!
 Bafang 750w Motor Upgrade and Install for your Rad Power Bike
 Bafang BBSHD Disassembly/Nylon Gear Replacement
 How to change E-Bike motor Hall sensor
 Finding and Replacing Blown Motor Controller Mosfets
 750w Bafang Hub Motor Install/Swap - Rad Rover Ebike
 How to quickly eliminate the noise of the BAFANG motor
 Hub Motor Testing and Diagnostic
 How to Make High Speed Electric Bike Using 775 Motor
 How to install a Brushless DC Controller on Ebike: The missing manual
 Electric Chopper Bike 60V 1000W Hub Motor Hall Sensors Change
 pasion ebike 48V 1500W Hub Motor Repair - Opening Testing Hall sensor replacement change hall sensor
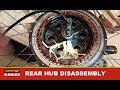 ELECTRIC BIKE TIPS: E bike, Rear Hub Motor Disassembly