GoPro Teardown Tips - 7 Repair Part II
After my GoPro Touchscreen cracked, i needed to repair it. Follow me on my repair adventure by watching part I, where i show how i took it apart,
and now this is part II where i got the front display yesterday.
I glued it in with silicone. Within the next days, i expect the touch screen to arrive, and i will record part III.
Most of this video explains what to look for when putting the camera together, and from that you'll learn how to take it apart without damaging anything.
For the models 5, 6, 7, and maybe even 8 and never, i see that the best advice i can give is to just take it as a given that you have to destroy the faceplate of the camera in order to get inside, and or to replace the rear touchscreen.
Make sure you don't damage the main case. I also do not recommend a heat gun on the front display. I think it is not necessary. The faceplate is glued to the main metal frame/heat sink with what i believe is some epoxy material that doesn't soften when heated. Therefore it doesn't make sense to heat up the camera. This kind of glue has to be removed mechanically.
As for the rear touch screen, i recommend to tape over it first. I used Kapton® tape for that, just in case you want to use a heat gun, and then it is relatively easy to break the glass all the way and take the screen out.
The glass that sticks to the glued areas can then be removed mechanically again.
Watch my screen replacement video part I
https://youtu.be/0_yatWQud5s
This video you are watching right now is part II
And subscribe to my channel to not miss the final part III
https://youtu.be/k8wpjp10AIw
The broken display video you find here:
https://youtu.be/0yXE822lm9o
This video was recorded with iPhoneX
Видео GoPro Teardown Tips - 7 Repair Part II канала mygiguser
Показать
Комментарии отсутствуют
Информация о видео
Другие видео канала
 Comparing Action Cams
 All the Details about the Osmo Action Remote Controller
 Walk Today 92823
 First Attempt to print a Filament Spool Winder
 2013 Jeep oIIIIo - V6 Oil Change
 Prusa MK4 Kit Noise
 Lexar NVMe Portable SSD
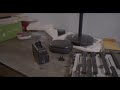 GoPro Hero11 Update to 12
 Osmo Action 4 with GoPro Assist
 owVlog005
 MAXDONE PH820W WiFi Trail Camera
 Beginner Tutorial : Make a Model for a 3D Printer
 Costco Gazebo Roof 1 Person Setup
 Startup Sound JBL
 JBL Reflect Aero Factory Reset, Pairing, and App
 JBL GO2 Bluetooth Speaker
 How to fix the SD Card Issue on Zoom H4nPro
 How to delete Røde Wireless GO II Recordings
 Dog Dremel Battery Fix
 XTAR DRAGON VP4 Plus Charge Current Test
 How to measure Capacity with the MiBOXER C4 Charger