Restoring Extremely Yellowed Sega Dreamcast - Retro Console Restoration
Sega Dreamcast restoration – In this video I will restore Dreamcast console launched by Sega in 1999. I bought this yellowed console and a game from Japan. This is a e version of the console, which can be seen from the red Dreamcast logo. Dreamcast has been one of the most requested consoles in the comments even though back in the day it was a flop.
For the disassembly of the Sega Dreamcast I used a phillips tip for my screwdriver. For the firs 3 screws I needed a screwdriver that didn’t have changeable bit because the holes for the screws were so deep and narrow. This console has so many different screws that I used an ice cube tray to hold the screws separately. This also helps me to remember what came from where because I can just put everything back together in reversed chronological order.
Once the top part is open you have to be careful to not turn the device upside down without holding the disk reader, because the top part of it is loose and if it falls it might rip out the cables on it or cause other damage in general the disk reader is a sensitive part so you want to be careful with it if you open it up like I did.
Once everything was pulled apart, I looked for any corrosion and dirt on the boards. Mainly I had some slight corrosion on the power unit. I used pressurized air to blow off any loose dust etc. and then I used isopropyl alcohol to clean off the corrosion and dirt. In general, there was not much dust or damage, it could be that this console was not used much ever. It also didn’t have the usual signs of previously opened consoles. I also cleaned the disk readers lens and the connection ports with alcohol because because on the very first try (which I didn’t film) I had some connection issue with my av-cable.
To get rid of the yellowing on the parts I put the parts in a bath with 12% hydrogen peroxide and left them in UV-light for around 2 days. Everything else was done much faster but the really yellowed parts of the body took ages to get done. After this I washed and dried the parts (this is very important). If moisture is left in the shell it will start corroding the parts again.
Thanks for watching! If you have any friends who had Sega Dreamcast, consider sharing this with them. Bellow are some affiliate link that support this channel and help you to figurer out what tool I use for my projects. It’s not a comprehensive list because a lot of my tools I have bought locally.
---------------------------------------------------------------------
Check out my new Instagram: https://www.instagram.com/odd.tinkering/
My T-shirts: https://teespring.com/stores/odd-tinkering-2
Support me on Patreon: https://www.patreon.com/oddtinkering
SOME TOOLS FROM THIS PROJECT:
SCREW DRIVER SET: https://amzn.to/2P0AmMp
HYDROGEN PEROXIDE: https://amzn.to/2K5OmTS
UV LED STRIP: https://amzn.to/2IqLmOA
MY FILMING GEAR:
MAIN CAMERA: https://amzn.to/2JvtKox
MAIN TRIPOD: https://amzn.to/2OlpYgn
MICROPHONE: https://amzn.to/2I80iDz
VIDEO LIGHTS: https://amzn.to/2FpJDaB
MAIN LENS: https://amzn.to/2Fm8yMk
CINEMATIC LENS: https://amzn.to/2TmNdHH
WIDE ANGLE LENS: https://amzn.to/2U7iJha
GOPRO: https://amzn.to/2U3eqU3
THE WATCH: https://amzn.to/2NpDMJJ
---------------------------------------------------------------------
SUBSCRIBE ▶▶▶ https://www.youtube.com/channel/UCf_s...
---------------------------------------------------------------------
Restoration playlist▶ https://www.youtube.com/playlist?list=PLVIxIjRNxFv5VRUXt66VzBxOys1GpmBp4
---------------------------------------------------------------------
Видео Restoring Extremely Yellowed Sega Dreamcast - Retro Console Restoration канала Odd Tinkering
Показать
Комментарии отсутствуют
Информация о видео
Другие видео канала
 Restoration of Extremely Yellow Broken Sega Saturn
 I Restored This Yellowed Junk Nintendo 64 - Retro N64 Console Restoration
 I Restored $5 Destroyed iPhone 4S Back to Brand New - Phone Restoration & Repair
 Restoring Old Rusty Table Fan with Laser Cleaning
 WWII Flashlight with Rust Holes - Restoration
 I Restored This $5 Ebay Junk Gameboy Advance. It Used to be Blue – Retro Console Repair
 Restoring Broken GoPro Hero 3+ a Subscriber Sent Me - Action Camera Restoration
 I Restored This Yellowed & Broken PSone - Retro Playstation Console Restoration
 Restoration & Repair of Xbox 360 with Red Ring of Death
 I Restored This Yellowed Keyboard for My Home Office - Retro Tech Restoration
 Restoration of Microsoft Xbox console | Restoring a game console
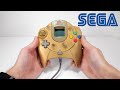 Restoring Sega dreamcast controller for my restored Dreamcast – Retro Console Restoration
 Screen burned Gameboy Pocket restoration and repair
 Nintendo Console Restoration - Yellowed Plastic Retrobright
 Yellowed and Dirty Playstation One Restoration
 I restored this $7 Junk Playstation 2 Slim - Retro Console Restoration & Repair
 Nuclear Submarine Light Restoration. Cold War Restoration
 Restoring the original PlayStation (PS1) - Vintage Console restoration & repair
 Restoring old German bench grinder - Tool Restoration (+customization)