How to Make DIY Powered Car Subwoofer Box
Hey what is going on YouTube, make your music listening more enjoyable while driving around in your car, van, truck or even on a boat! If you have the time and skills you can make your own active subwoofer enclosure for your car.
Yes, you read it right, has built-in subwoofer amplifier board mono channel. There are 10 steps in this tutorial so let's get this thing kicking:
STEP 1 - SUBWOOFER ENCLOSURE DESIGN AND CALCULATION
I used a free web 3D design software called TinkerCad and you might as well use the design for your reference. Here's the link of the project - https://www.tinkercad.com/things/8JlHfT78QPf
Enclosure volume calculator - http://www.hometheatershack.com/forums/enclosure-volume-calculator/
STEP 2 - UNBOXING OF MAIN COMPONENTS
I purchased a subwoofer plate amplifier on Aliexpress.
Subwoofer driver is a JBL CS1214 12" 4 Ohms Single Voice Coil car subwoofer, purchased on Lazada (Philippines).
STEP 3 - ENCLOSURE BUILDING
In this step, carpentry skills become very useful and I admit I need to practice more doing carpentry stuff. ^_^
A 3/4" (0.75") MDF board is the coolest choice over marine plywood. Stikwel wood glue as adhesive. Used a plunge or palm router in cutting the subwoofer hole. Hole saw for cutting smaller holes. And a bunch of clamps for holding the project while gluing and screwing. I prefer using jigsaw in cutting the board because I suck at cutting with circular saws.
STEP 4 - INSTALLATION PORT TUBE AND BRACES
JBL subwoofer box recommended a 4" port tube in a 1.75cuft enclosure but I made this slightly smaller. I used a 12" long with a diameter of 3" PVC pipe for port tube venting in this 1.65cuft enclosure.
STEP 5 - COMPLETE THE BOX BUILDING
Cut an angled edge MDF board for the back cover wedge shaped enclosure. Screw everything down and don't forget to flush drill holes. Protruding metal screw heads are not cool.
STEP 6 - CUT HOLE FOR AMPLIFIER PLATE
I enclosed the amplifier plate board using scrap MDF and plywood. Must enclose to prevent tiny electronic components on board get damage by strong bass air pressure inside enclosure.
STEP 7 - DRILL HOLES FOR SUBWOOFER DRIVER BOLTS
Secured the driver with 5mm stainless steel T-nuts. Bolts are Allen Hex, back steel.
STEP 8 - CARPETING
A 1 meter x 6 feet black speaker carpet and adhesive is a contact rubber cement. Box cutter with extra blades in cutting them into seamless look.
STEP 9 - SOLDER WIRE TO DRIVER AND BOLT DOWN
Original plan was to use Allen Hex screws in fastening the subwoofer plate. In the video, you see I used an ordinary black wood screws. Bolted down the subwoofer in this step and tighten good.
STEP 10 - VEHICLE WIRE WORKS
Must use an 8 AWG gauge automotive wire for power. Secured the power wiring with a 60A car audio fuse holder. Remote cable is a 16 AWG gauge wire with color blue soldered to head unit REMOTE PWR tab. Wrapped the cables using a cheap plastic spiral wrap. This tidy up eveything, aesthetic looks and added a marging of safety.
FINAL STEP - TIME FOR SOME BASS TEST!
Macbook Pro attached to head unit AUX playing the following tracks from YouTube:
1. Bass Outlaws - 3 Kinds Of Bass - https://youtu.be/XX5pDBM8w84
2. The Ultimate Bass/Subwoofer Tester - https://youtu.be/Udsefqice5A
That's it, 10 easy steps in building a car subwoofer with built-in amp! I hope you like and subscribe to my YouTube channel and thank you for watching!
Видео How to Make DIY Powered Car Subwoofer Box канала Charcoal Monkey
Показать
Комментарии отсутствуют
Информация о видео
Другие видео канала
 DIY: Multimedia Bluetooth Boombox Speaker
![Manufacturing bass subwoofer 12'' - [ Great sound ]](https://i.ytimg.com/vi/YTEJ6ElTUL8/default.jpg) Manufacturing bass subwoofer 12'' - [ Great sound ]
Manufacturing bass subwoofer 12'' - [ Great sound ] How to Make Underseat Downfiring Subwoofer Box-Mounted Amp
 Aero-Port Wedge Box for Infinity Kappa 1000w Subwoofer - DIY BUILD
 How to make 1 cuft 10" Powered Subwoofer _ DIY Build
 DIY Active Subwoofer Build | HOW TO
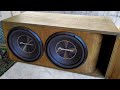 Stained Kerf Plywood Car Subwoofer Box - Build at Home
 Paano gumawa ng L Ported Box - How to make L Ported Sub Box (Bass Reflex) - Smooth Deep Bass - 32 Hz
 Cómo Hacer Mini Subwoofer de 4" ALTAVOZ BLUETOOTH Casero
 How to Make Box Mounted Amp Subwoofer - DIY BUILD
 Single 15 '' Bass Subwoofer Cabinet Design - Giant sound 1000w
 DIY: Portable Bluetooth "SoundBox" Speaker
 Making a Car Subwoofer Box
 Custom Labyrinth Style Subwoofer Box Build Sundown X8 V.3 Part1
 DIY 100W Bluetooth Tube Speaker with PVC Pipe || Ultra Bass Boombox
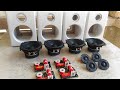 How to Make Small Speakers for Desktop and Home Theater Surround
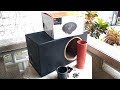 DIY How to Coarse Texture Paint Subwoofer
 Custom Build Flare Ported Box for Pioneer D Series Car Subwoofer
 TAP OUT Subwoofer Demos & LOUD Car Audio BASS Systems @ The XS POWER Show & SPL Competition
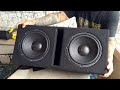 DIY 2 x 10 inch Subwoofer Box - Budget-Friendly Build