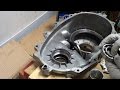
1999 Jeep Grand Cherokee Laredo NP247 Transfer Case Rebuild
Complete Tear Down of a Transfer Case for a 1999-2004 Jeep Grand Cherokee with an NP247
Removal Steps
Step Tasks: Disassemble
1 Remove drain plug and drain fluid
2 Remove four 13mm bolts holding the tail cone on
3 Break tail cone gasket loose with a dead blow hammer
4 Remove rubber plug in tail cone covering the snap ring
5 Spread the tail cone snap ring and remove the tail cone
6 Remove the oil pump tube
7 Remove the 12-point 10mm and 15mm bolts holding the two case halves together
8 Break the case halves gasket apart and separate
9 Remove the magnet
10 Remove snap ring holding the tail cone bearing in
11 Remove the tail cone/output shaft ball bearing
12 Remove the snap ring holding the oil pump on
13 Remove oil pump
14 Remove snap ring holding on the Viscous Coupler
15 Remove "copper" thrust ring that rubs on the VC
16 Remove the Viscous Coupler
17 Remove washer under VC that holds the roller/needle pins in
18 Remove snap holding the front drive chain gear on
19 Remove snap holding the main drive shaft chain gear on
20 Remove both gears and the chain
21 Put towels in the case to cover the planetary gears
22 Remove the geared hub holding the needle bearing pins in
23 Carefully remove the needle bearing pins (47 total)
24 Remove the thrust washer below the needle bearing pins
25 Remove the rod that goes through the shift fork
26 Remove the shift fork pin from the shift cam
27 Remove the Main Shaft along with the shift fork
28 Remove big snap ring holding planetary gears in
29 Mark transmission input cover with to insure oil port hole is properly aligned
30 Remove the four 10mm bolts holding on the main input shaft cover
31 Pry main input shaft cover off at the two pry points
32 Remove snap ring on main input shaft (to transmission)
33 Remove the planetary gears
34 Remove snap ring holding in the main input shaft bearing (transmission)
35 Press the main input shaft bearing out using a properly sized pipe
36 Remove 1-1/8" Nut holding on the front drive shaft yoke
37 Install nut on the front drive shaft and hammer the nut to separate the yoke from the shaft
38 Remove snap ring holding in the front drive shaft bearing
39 Press the front drive shaft bearing out using a properly sized pipe
40 Remove Seals (if desired)
Installation Steps
Step Tasks: Assembly
1 Press the front drive shaft bearing in using a properly sized pipe
2 Install new seals (if desired)
3 Install snap ring holding in the front drive shaft bearing
4 Install the front drive shaft through the case half and front shaft bearing
5 Install the front drive shaft yoke onto the front drive shaft
6 Install the 1-1/8" Nut holding on the front drive shaft yoke and torque
7 Press the main input shaft (transmission) bearing in using a properly sized pipe
8 Install the snap ring holding in the main input shaft bearing (transmission)
9 Install the planetary gears
10 Install the snap ring on main input shaft (to transmission) that hold the planetary gears in
11 Install main input shaft cover making sure to align the oil passage & hole in case
12 Install the four 10mm bolts holding on the main input shaft cover
13 Install big snap ring holding outer ring of the planetary gears in
14 Install the Main Shaft along with the shift fork
15 Install the shift fork pin from in the shift cam
16 Install the rod that goes through the shift fork
17 Install the thrust washer below the needle bearing pins
18 Put towels in the case to cover the planetary gears
19 Carefully Install the needle bearing pins (47 of them)
20 Install the geared hub holding the needle bearing pins in
21 Install both gears and the chain
22 Install snap holding the main drive shaft chain gear on
23 Install snap holding the front drive chain gear on
24 Install washer under VC that holds the roller/needle pins in
25 Install the Viscous Coupler
26 Install "copper" thrust ring that rubs on the VC
27 Install snap ring holding on the Viscous Coupler
28 Install the oil pump
29 Install the snap ring holding the oil pump on
30 Install the tail cone/output shaft ball bearing
31 Install snap ring holding the tail cone bearing in
32 Install the magnet
33 Install the oil pump tube & screen. Install new O-ring and install tube in pump
34 Install a thin bead of RTV silicon on one half of the case clam shell
35 Install the 12-point 10mm and 15mm bolts holding the two case halves together
36 Install a thin bead of RTV silicon on one half of the tail cone
37 Spread the tail cone snap ring and Install the tail cone. Verify the snap ring is in the bearing
38 Install rubber plug in tail cone covering the snap ring
39 Install four 13mm bolts holding the tail cone on
40 Install drain plug and add fluid
Видео 1999 Jeep Grand Cherokee Laredo NP247 Transfer Case Rebuild канала Jim Dandy
Показать
Комментарии отсутствуют
Информация о видео
Другие видео канала
 1999 Jeep Grand Cherokee Laredo 247 Transfer Case Assembly
 Front Axle Restoration/Rebuild (Dana 30)
 New Process Gear 261HD Transfer Case - Weekend Special
 Fixing common JEEP WJ Grand Cherokee ISSUES with CHEAP Junk Yard Parts - D&E in the U-Pull 34
 4L60-E Transmission Full Rebuild
 How To Install an SYE - A Comprehensive Guide - Rough Country
 Tera Low 4:1 Transfer Case Install
 Transfer Case Swap for Beginners - Everything you need to know!
 This Is What Happens If You NEVER CHANGE YOUR DIFFERENTIAL OIL!!
 WJ Buyers Guide - Jeep Grand Cherokee WJ Good, Bad, Ugly
 Dana 44 Carrier and Pinion Bearing Replacement Basics Jaguar XKE
 1999 Jeep Grand Cherokee Laredo Transfer Case Teardown Diagnosis
 Jeep WJ Driveshaft Special - Part 1 - Vortex Garage Ep. 16
 Jeep Grand Cherokee - Check Engine Light P0141 / P0155 / P0523
 I Lifted My 300K Mile Jeep WJ!
 Jeep WJ D44/D35 Axle Bearings, seals, plus parking brake - Vortex Garage Ep. 11 - OLD VERSION
 Changing Your Jeep's Differential Fluid
 Jeep Transfer Cases DECODED and EXPLAINED - New Process/New Venture
 Dana 300 Transfer Case Rebuild - Part 1 - Tear Down
 How to Fuel Tank Tuck a 99-04 Jeep Grand Cherokee WJ Part 1