Yamaha VSTAR 1100 Ignition Testing and Troubleshooting - From The Battery to the Spark Plugs
Today we will be going through the complete troubleshooting of the ignition system of the VSTAR 1100, before paying a mechanic to do it. You might find you can isolate and repair the problem yourself. A link to a movie is provided with instructions for the removal of the rank and required items. After the tank is removed the forward plastic trim is then removed. A spark testing tool is highly recommend for this job, found at any auto parts store.
This test begins with the battery, ensuring proper function, without which, nothing electrical is expected to work properly. The battery should be charged up, tested and if need be replaced before continuing. This is followed by testing the key switch function. horn and lights.
If the horn wasn't making noise, other electrical components may be faulty too, we should start at the main fuse 30A under the seat, from there, the fuse box on the side has a 10A that should be checked, along with all of the others. With the fuses good a check for good starter operation should be done to rule out the kill switch or the side stand switch.
The test in the video will be done with the rear cylinder, the front cylinder is the same process.
The chrome trim is removed from the engine cover. following the two wires from the coil, remembering their colour position. a reading is taken across the primary of the coil, looking for 3.57 to 4.83. The secondary through the 10k resistor of the cap should be 10.7k to 14.5k.
Next is the stator pickup, so the side cover is removed. the off white connector disconnected for this. reading the stator 189 to 231 is the nominal value. Next the wires on the coil is re-attached. With the meter on dc volts, on both of those leads and the key in the ignition in the off position. we check to see 0 volts, turning the key to on, we should see 12v.
Next, the spark gap tester , set to a gap around 6m is connected to the indication cable and grounded to the block. turning over the engine, checking for visual indication of spark. If spark is seen, the plug is then removed and inspected for fouling, rounding and damage, replaced if necessary.
If still no spark, on the connector that goes to the gas tank is a diode taped just under the connector. removing tape exposes this for removal. Testing on the meter as shown shows an indication only in one direction. Once tested it is reinstalled in place.
Next comes the start circuit relay, removed from the rubber mount as shown , pin 2-3 the diode is tested if forward and reverse.
If there is still a problem you will need to swap the ignitor for testing from a shop or friend, to see if this clears the issue.
#yamaha #vstar1100
Видео Yamaha VSTAR 1100 Ignition Testing and Troubleshooting - From The Battery to the Spark Plugs канала Retro Tech & Electronics
Показать
Комментарии отсутствуют
Информация о видео
15 августа 2020 г. 17:35:57
00:15:21
Другие видео канала
 Yamaha VSTAR 1100 Fuel System Testing and Troubleshooting - From The Fuel Tank to the Carbs
 2000 Yamaha VStar 1100, Starting issue resolved !!!!!
 Yamaha VStar V Star 1100 - Complete Carburetor Carb Clean - Bad Gas Dirty Fuel Not Running Rebuild
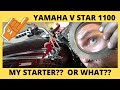 Yamaha V star 1100 replace starter clutch step by step
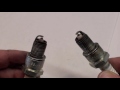 Replacing Spark Plugs on a Yamaha V-Star 1100
 VStar 650 Starting Problem
 How to diagnose a no spark situation on a motorcycle
 Virago electrics - 4. resistance checks, ignition test
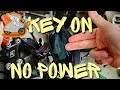 Motorcycle Won't Turn On! No Power at All | Blown Main Fuse Diagnosis
 XVS1100 Cam Timing Procedure 1
 Yamaha Star 650 Ignition Testing and Troubleshooting - From The Battery to the Spark Plugs
 2007 Yamaha V-Star backfiring repair (Part 1)
 Yamaha VSTAR 1100 Carb Install & Bike Reassembly after General Maintenance
 Yamaha VSTAR 1100 Strange Electrical issue - Intermittent Speedo & Signals
 2000 Yamaha VStar 1100, won't turn over.
 Diagnosing a Starting Issue on a V-Star 1300
 Road star ignition bypass
 Fix for 2001 Yamaha VStar 650 hot coil and firing on one cylinder.
 MaxAir Predator Pro kit for Yamaha Vstar 1100
 Removing Yamaha V Star 1100 Custom AIS System