In Memoriam ii: The reduction linocut process
**Clarification! For the purpose of keeping the time down on this video (already at 9min), I have not shown my carving between each printed colour layer (if you watch the block you will see it changes over time). The stencils are purely to separate areas of colour, not to make texture or build up tone. As stated in the title of the video this IS a reduction process as the block is carved between each colour step. As my carving process is the same as anyone doing a reduction linocut I left these steps out to save on time and show the interesting and different parts of my processes**
A quick demonstration of how the reduction linocut "In Memoriam ii" was made. This video shows how I approached the print and is by no means the best or only method to produce a reduction linocut. This demo was filmed over the 4 months (Sept-Jan 2018-2019) it took to complete the print. The print went through 22 stages or pulls, with each stage being built upon from the last using the same linocut block. It is printed with oil-based inks on cream Stonehenge paper (chosen for its toughness and resilience). I chose to dampen the paper at each stage in the same way to make it easier to handle when placing it into the registration block. The stencils I used to mask out areas in the beginning are made of a heavy tracing paper and some had to be reinforced with clear contact or tape to strengthen them. It was printed with a combination of hand printing with a plastic rice spoon and presses depending on the size of the area needed to be printed. Hand printing prolonged the life of the block, preventing it from being squished after so many pulls. Most of the process was completed in my home studio with the last few pulls printed at the QCA printmaking studios (as my wooden carjack press broke on the 18th layer). I started with 30 sheets of paper and ended with an edition of 28 prints.
Each stage:
1. Light blue on abdomen
2. Selective orange/yellow in blended roll (1)
3. Selective orange/yellow in blended roll (2)
4. Selective orange/yellow in blended roll (3)
5. Darker blue fade on abdomen
6. Selective transparent black and orange blended roll
7. Selective brown on eyes and wings in 2 stages
8. Selective brown on the body, legs and antennae
9. Darker brown on eyes and wings
10. Darker brown on eyes and wings again
11. Light transparent black over the whole block
12. Light transparent black over the whole block (2)
13. Adding blue flecks stage 1
14. Adding blue flecks stage 2
15. Light transparent black over the whole block (3) 16. Transparent black over the whole block (4)
17. Transparent black over the whole block (5)
18. Transparent black over the whole block (6)
19. Transparent black over the whole block (6)
20. Transparent black over the whole block (7)
21. Adding black fade to abdomen
22. Black background
Видео In Memoriam ii: The reduction linocut process канала Elyse Taylor
Показать
Комментарии отсутствуют
Информация о видео
Другие видео канала
 Reduction Linocut Process: Columbine
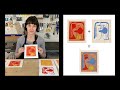 Artist Demonstrating Picasso’s Reduction Linocut Technique
 Jean-Pierre DAVID - Graveur sur Plexiglass
 David Frazer cuts Slow Boat
 Linocut: printing fine details - do your cutting justice with the right technique!
 Large Multiple Layer Linocut ''THE SMELL OF RAIN'' BY Emils Salmins
 How to make a Six Color Reduction Linocut Print - Tips and Tricks for your printmaking
 Linocut Printmaking: The Process
 LINDA COTE-The Making of My Fenland Trail Reduction Linocut
 MALSTRØM linocut | drawing, carving, printing
 Make Merry in June with Christine Hodges in making a Tetrapak print
 3 Color Reduction Print
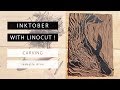 My inktober 2018 with linocut !
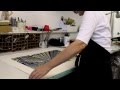 Poetry of Departures - A Linocut by Gail Brodholt
 Engraving and Printing Fred the Bug
 Two-color Linocut Printmaking by Maarit Hänninen
 Reduction Lino Printing
 Gary Ratushniak on the Art of Linocut
 Crossbill: Reduction Linocut Step by Step
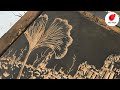 Linoleum Block Printmaking for Beginners