Using The HiTi S420 Digital Passport System
Info on this system:
http://www.cfsbinds.com/dipaphsycprp.html
Welcome to the HiTi S420 Passport Photo System tutorial brought to you by CFS.
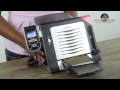
The first step is setting up the printer. Plug in the power cord and attach the hand controller to the back of the printer.
Hang the hand controller from the post on the left of the printer.
Push down on the ribbon door button and load an ink ribbon cartridge, with the orange end at the top left and the arrows pointing left. Insert the left side first, so that the spring loaded spindles align with the rollers. Make sure that the exposed ribbon film does not have excess slack.
Once in place, close the S420's front door.
Next power on the printer with rear switch.
Be sure to only handle the S420's paper by the perforated side strips.
Open the paper tray by lifting up on the curved edge. Insert the paper sheets, with the blank glossy side facing up.
Open the printer's lower door and slide the paper tray, open side first, all the way in until it stops.
Plug in the larger end of the camera's USB cable.
Passport photos require a white background, so here we're using the Freestanding Photo Backdrop also available from CFS.
Position your subject as close against the backdrop as possible to minimize shadows.
Compose the picture in the camera's viewfinder, from the mid shoulders up. Make sure there is only white space to the sides and above the head, then take the picture.
Next connect the camera to the printer with the USB cable and wait a few seconds for it to be recognized.
Now use the hand controller's oval directional control buttons to select the ID Photo mode in the upper right & press the OK button.
Next select the 2" x 2" A size and press OK.
Press the OK button to confirm the 2 identical photos format.
Use the oval directional controls to select the photo you'd like to print. Then press the OK button.
After the image loads, you may need to modify it. To rotate the image move to the 2nd icon on the top & press OK. Then rotate using the directional pad & press OK.
If the subject's nose is not aligned under the center grid line, select the MOVE icon in the upper left & press OK. Adjust the position using the directional pad & then press OK.
To finalize the image navigate to the OK icon in the lower right & press the OK button.
Now all that's left to do is press the PRINT button.
The paper makes 4 passes through the printer: yellow, magenta, cyan and finally the clear overcoat. In about 78 seconds your print is done, with 2 identical 2x2 images plus crop/cut marks!
Видео Using The HiTi S420 Digital Passport System канала CFS Binding Supplies
http://www.cfsbinds.com/dipaphsycprp.html
Welcome to the HiTi S420 Passport Photo System tutorial brought to you by CFS.
The first step is setting up the printer. Plug in the power cord and attach the hand controller to the back of the printer.
Hang the hand controller from the post on the left of the printer.
Push down on the ribbon door button and load an ink ribbon cartridge, with the orange end at the top left and the arrows pointing left. Insert the left side first, so that the spring loaded spindles align with the rollers. Make sure that the exposed ribbon film does not have excess slack.
Once in place, close the S420's front door.
Next power on the printer with rear switch.
Be sure to only handle the S420's paper by the perforated side strips.
Open the paper tray by lifting up on the curved edge. Insert the paper sheets, with the blank glossy side facing up.
Open the printer's lower door and slide the paper tray, open side first, all the way in until it stops.
Plug in the larger end of the camera's USB cable.
Passport photos require a white background, so here we're using the Freestanding Photo Backdrop also available from CFS.
Position your subject as close against the backdrop as possible to minimize shadows.
Compose the picture in the camera's viewfinder, from the mid shoulders up. Make sure there is only white space to the sides and above the head, then take the picture.
Next connect the camera to the printer with the USB cable and wait a few seconds for it to be recognized.
Now use the hand controller's oval directional control buttons to select the ID Photo mode in the upper right & press the OK button.
Next select the 2" x 2" A size and press OK.
Press the OK button to confirm the 2 identical photos format.
Use the oval directional controls to select the photo you'd like to print. Then press the OK button.
After the image loads, you may need to modify it. To rotate the image move to the 2nd icon on the top & press OK. Then rotate using the directional pad & press OK.
If the subject's nose is not aligned under the center grid line, select the MOVE icon in the upper left & press OK. Adjust the position using the directional pad & then press OK.
To finalize the image navigate to the OK icon in the lower right & press the OK button.
Now all that's left to do is press the PRINT button.
The paper makes 4 passes through the printer: yellow, magenta, cyan and finally the clear overcoat. In about 78 seconds your print is done, with 2 identical 2x2 images plus crop/cut marks!
Видео Using The HiTi S420 Digital Passport System канала CFS Binding Supplies
Показать
Комментарии отсутствуют
Информация о видео
Другие видео канала
 Impressora Hiti S420
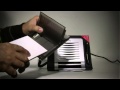 Hiti Photo Printer S420
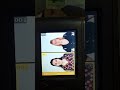 hiti s420 calibracion color fotopasaporte
 Full Installation Set-Up CANON PIXMA G3000 | Step-By-Step | By TECH MUKANS
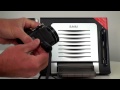 HiTi S420 Passport Photo System Setup
 Media Errors On The HiTi S420 Passport Photo Printer
 Começando o Sítios do zero. Construindo barraco de madeira. Finalizando Telhado, Concluído(Incrível)
 Top 5 Best Portable Photo Printers
 HiTi 310pw Printer Instructions Video
 DNP ID400 Passport Photo Printer Overview
 فتح صندوق طابعة || Canon selphy Cp100 ||وشرح جميع الميزات
 ThermoBind TB 500 Machine review/directions
 How to repair hp p1108 printer all work ¦¦ tech india breaking ¦¦
 Turn Any Old USB Printer Into A Wireless Printer With A Router | Ft Huawei + Hp M1005 MFP
 هذه الطابعة تسوي كلشي Brother T910DW
 Cheap & Best Portable Photo Printer - Glossy Paper , Passport Size , Stamp Size, etc || Epson PM-520
 Canon 50mm 1.4 vs Canon 50mm 1.8 STM - In Depth Comparison Review
 Paper Sizes Explained
 CANON PIXMA MG2470 All-in-One Inkjet Printer -Unboxing | Home & Office Budget Printer | In HINDI
 ورقة الطباعة (ورق صور-ورق مستندات) حجم A4(210mm*297mm) #إسأل_معلوميات_Online canon pixma TS 5000