How To Make a R410A Flare for a Mini Split AC Unit Installation
Eccentric Flaring Tool: https://amzn.to/2ziwIsh
R410A Flaring Tool With Depth Stop: https://amzn.to/36vHlnq
Ridgid Close Quarters Pipe Cutter: https://amzn.to/3eiFWDK
Knipex Needle Nose Pliers: https://amzn.to/2AUbm4I
The only difference between a standard flare and a R410A flare is that the R410A flare needs a slightly wider/longer flare surface. You can do this easily using a standard flaring tool by simply extending the pipe about 1/16th of an inch further through the flare.
Making a high quality flare on copper tubing is absolutely ESSENTIAL when making flare connections for refrigeration circuits. In this video I guide you through that process and also show you a few tips and tricks for how to prepare the pipe by removing the burrs and reaming out the inside of the pipe after cutting it. We also take a look at a very low quality factory flare as a comparison to the new flare that we create.
Thank you for watching and subscribing! Consider supporting the channel at NO cost to you by using one of the above affiliate links! I really appreciate it.
Blessings from MN,
Ben
Видео How To Make a R410A Flare for a Mini Split AC Unit Installation канала Benjamin Sahlstrom
Показать
Комментарии отсутствуют
Информация о видео
Другие видео канала
 How to CORRECTLY Solder A Vertical Copper Pipe (Complete Guide) | GOT2LEARN
 AIR CONDITIONER DETAIL INSTALL |SPLIT DUCTLESS AC HEATING INVERTER,MINI PUMP SYSTEM SETUP,DIY HOW TO
 10 Reasons Why A Mini Split Flare May Be Leaking Refrigerant!
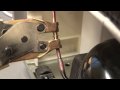 Remplacement Gaz R600a sans soudure
 SPIN Swage and SPIN Flare Copper Tubing Tools!
 How to make ductless flares that won't leak
 10 Plumbing Tools For Under $25 That Are Worth Getting | GOT2LEARN
 10 COOL PLUMBING TOOLS YOU NEED TO SEE 2020 AMAZON 3
 Full Installation of Mini Split Ductless Unit, Step by Step!
 How to Install Central Air Conditioning
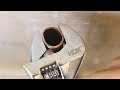 The BEST 25 Copper Pipe Tips & Tricks EVER! | GOT2LEARN
 10 COOL PLUMBING TOOLS YOU NEED TO SEE 2020 AMAZON 2
 Flaring Copper Tubing! Eccentric, Spin, Orbital Process & Block Kit!
 Mini Split A/C Full Installation Full Video
 The CORRECT Way To Fix A Leaking Joint (UNSOLDERING) | GOT2LEARN
 How to Check AC Freon Level
 Beginners Guide To SHARKBITE Fittings (Watch till end BEFORE Buying!) | GOT2LEARN
 HVAC Installation: Brazing Refrigerant Lines
 FAQ SPIN Tools: Flare Angle with the Flaring SPIN Tool