How to Etch Glass the Easy Way (Armour Etch & Vinyl Decals!)
Get the FREE pattern for the winged heart (Design #137) at https://jennifermaker.com/how-to-etch-glass-vinyl-cricut/
Learn the easy way to etch glass using vinyl decals you can cut on your Cricut using glass etching cream.
MATERIALS LIST (contains my affiliate links):
-Armour Etch glass etching cream https://amzn.to/2sB3A8z
-Glass to etch (I used these glass coasters https://amzn.to/2sCp3Oh and these wine glasses https://rstyle.me/n/devxc8cbznf )
-Premium vinyl (avoid stencil vinyl)
-Transfer tape
-Paintbrush, small (no foam brushes)
-91% isopropyl alcohol
-Scraper tool
-Masking or painter’s tape
-Disposable gloves
-Eye protection
-(Optional) LED base for the glass coasters https://amzn.to/2Mjruyu
-(Optional) Hot glue gun and glue to attach your glass to the base.
-A way to cut your vinyl (I used the amazing Cricut)
-My free SVG/DXF/PDF cut files/patterns (Design #137) (available in my free resource library https://jennifermaker.com/resource-library)
UPDATES/CHANGES: Check for any updates, changes, or additional videos for this project at https://jennifermaker.com/updates
STEP 1: GET THE FREE PATTERN AND GATHER YOUR MATERIALS
You’ll find my free Winged Heart pattern in my resource library https://jennifermaker.com/resource-library/
STEP 2: GET A VINYL STENCIL
You can easily make them on cutting machines like a Cricut. Use premium (self adhesive) vinyl — avoid stencil vinyl if you’re putting it on a curved surface.
I recommend you make a weeding box around your design that’s just a bit smaller than the glass surface you’ll be applying it too.
Carefully reverse weed your design.
Once your vinyl is weeded, cut a piece of transfer tape the size of your vinyl backing and apply it to the front of the vinyl decal.
Using your scraper, go over the entire decal to make sure it adheres to your transfer tape.
Gently remove the backing from the vinyl.
STEP 3: APPLY YOUR VINYL STENCIL
First, prep your glass by cleaning it well with 91% isopropyl alcohol and allow to dry.
Next, carefully place your vinyl decal on your glass.
Use your scraper over the entire surface of the vinyl to adhere it well to your glass. Gently remove the transfer tape, leaving only the vinyl.
Your goal is to have no wrinkles or creases at the edges of design.
If you are placing your vinyl decal on the curved surface of a wine glass, you WILL have wrinkles in the beginning. Get what you can pressed and scraped down well, then remove the transfer tape.
With the tape removed, check to see if you have wrinkles at the edges of your design. If so, lift up on the vinyl in those spots and gently pull the vinyl away from the center of the design to get it to conform to the curved surface.
If you don’t have a wide margin on your vinyl decal, put some masking or painter’s tape around the edge of the vinyl to prevent getting any etching cream there.
STEP 4: BRUSH THE ETCHING CREAM ON YOUR GLASS
First, remember to wear gloves and protective glasses. You should also shake or stir your Armour Etch etching cream before you use it.
Using a regular brush, brush on the minimum amount needed to cover the glass. You do NOT need to gob it one.
Brush the etching cream around for three full minutes. Brush up and down, side to side, and diagonally. Keep the cream moving around your design, getting into every nook and cranny.
STEP 5: RINSE OFF THE ETCHING CREAM AND REMOVE YOUR VINYL
After three minutes, rinse off the etching cream (or if you used a lot, scrape it back into the container first and then rinse). Make sure you get ALL of the cream off. You do not want to accidentally touch it or get it on your work surface.
Once it’s rinsed, dry it off and remove the vinyl. If you used permanent vinyl like me, it make take a little effort but it WILL come off.
With the vinyl all removed, wipe down the surface again with rubbing alcohol.
And that’s it — enjoy your beautiful etched glass!
#cricut #cricutmade #designspace
I appreciate every subscriber. It's free and easy to subscribe -- just click: http://bit.ly/sub2jennifer
Prefer to get my updates and free project patterns delivered straight to your e-mail inbox? Subscribe to my free newsletter at https://jennifermaker.com (scroll to the bottom)
Follow me at:
Blog: https://jennifermaker.com
Facebook Page: https://www.facebook.com/jennifermakercrafts
Facebook Group: https://www.facebook.com/groups/cricutcraftersandmakers/
Instagram: https://www.instagram.com/jennifer.maker
Pinterest: https://www.pinterest.com/jenuinemom
Please subscribe to my channel at https://www.youtube.com/c/jennifermaker for more video tutorials to craft a life you love!
Credits:
Introduction: PixelBytes (my child!)
Music: Cute by Bensound (licensed, royalty and copyright free)
Videography: Jennifer Marx on a Panasonic Lumix FZ-1000 DSLR 4K camera
Design: A Jennifer Maker original!
Видео How to Etch Glass the Easy Way (Armour Etch & Vinyl Decals!) канала Jennifer Maker
Показать
Комментарии отсутствуют
Информация о видео
Другие видео канала
 Etchall and Adding Color
 Glitter Tumbler Tutorial - Epoxy + Loctite Method - Full Process Start to Finish!
 🔥 *UPDATED* BURN PICTURES & DESIGNS INTO WOOD W/ ANY CRICUT MACHINE | CRICUT TUTORIAL FOR BEGINNERS
 Learn How to Quickly Etch Glass the EASY Way with Armour Etch and Cricut Vinyl.
 HOW TO MAKE A FRONT DOOR MAT WITH CRICUT FOR BEGINNERS | DIY Welcome Mat Outdoor | FlexSeal Tutorial
 DIY Etched Casserole Dish: Personalize a Glass Pyrex!
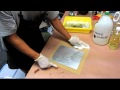 How to Etch with White Vinegar (Kitchen Lithography Variation)
 Glitter and Etched Wine Glass
 20 CRICUT HACKS I LEARNED ON TIKTOK
 HOW TO TRANSFER A PHOTO ONTO GLASS
 Cricut Engraving Tool: How Does It Work on Various Materials
 Make Personalized Door Mats with a Cricut! (Freezer Paper + Flex Seal Method!)
 GLASS ETCHING WITH CRICUT | HOW TO ETCH GLASS AT HOME | GLASS ETCHING CREAM
 How To: Etch Glass - Sand Blast Carving Technique - Royal Engineers Cap Badge
 Should I Seal Vinyl on a Wine Glass? - Sealing Cricut Wine Glasses
 GLASS ETCHING WITH COLOR (PERSONALIZED GIFTS) ♡ UNICAHIJA CREATIONS ♡
 Cricut Pens: Writing and Envelope Addressing Tutorial
 Everyday Crafting: How To Properly Etch Glass With Armour Etch
 10 Amazing DOLLAR TREE DIY Cricut Crafts & Hacks
 🔥 BURN PICTURES & DESIGNS INTO WOOD WITH ANY CRICUT CUTTING MACHINE | CRICUT TUTORIAL FOR BEGINNERS