- Популярные видео
- Авто
- Видео-блоги
- ДТП, аварии
- Для маленьких
- Еда, напитки
- Животные
- Закон и право
- Знаменитости
- Игры
- Искусство
- Комедии
- Красота, мода
- Кулинария, рецепты
- Люди
- Мото
- Музыка
- Мультфильмы
- Наука, технологии
- Новости
- Образование
- Политика
- Праздники
- Приколы
- Природа
- Происшествия
- Путешествия
- Развлечения
- Ржач
- Семья
- Сериалы
- Спорт
- Стиль жизни
- ТВ передачи
- Танцы
- Технологии
- Товары
- Ужасы
- Фильмы
- Шоу-бизнес
- Юмор
Chapter 35:Controlling seven segment display using serial monitor | Learn Arduino Programming
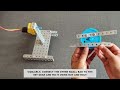
🔢 Controlling Seven Segment Display Using Serial Monitor and Arduino
In this project, learn how to control a seven segment display using the Serial Monitor in Arduino IDE. By sending numbers or characters through the Serial Monitor, the Arduino interprets the input and displays the corresponding digit on the seven segment display in real time.
📘 What You’ll Learn:
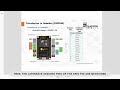
Working principle and pin configuration of a seven segment display
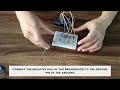
Serial communication between Arduino and computer
Controlling multiple digital output pins using serial input
🧩 Components Used:
Arduino Uno
Seven Segment Display
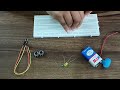
Resistors
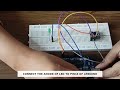
Breadboard
Jumper Wires
USB Cable
Follow along as we guide you through the wiring, coding, and testing process to build a serial-controlled numeric display system. This project is ideal for beginners to understand display interfacing and serial communication.
👉 Like, share, and subscribe for more Arduino tutorials and hands-on electronics projects.
#SevenSegmentDisplay #SerialMonitor #ArduinoUno #SerialCommunication #DIYElectronics #LearnElectronics #LearnRobotics #ElectronicsProjects #RoboticsProjects #ArduinoProjects #DIYProjects #ElectronicsTutorial #STEMEducation #ElectronicsForBeginners #RoboticsForKids #Mechatronics #STEMLearning #ElectronicsAndRobotics
Видео Chapter 35:Controlling seven segment display using serial monitor | Learn Arduino Programming канала Mechatron Robotics
In this project, learn how to control a seven segment display using the Serial Monitor in Arduino IDE. By sending numbers or characters through the Serial Monitor, the Arduino interprets the input and displays the corresponding digit on the seven segment display in real time.
📘 What You’ll Learn:
Working principle and pin configuration of a seven segment display
Serial communication between Arduino and computer
Controlling multiple digital output pins using serial input
🧩 Components Used:
Arduino Uno
Seven Segment Display
Resistors
Breadboard
Jumper Wires
USB Cable
Follow along as we guide you through the wiring, coding, and testing process to build a serial-controlled numeric display system. This project is ideal for beginners to understand display interfacing and serial communication.
👉 Like, share, and subscribe for more Arduino tutorials and hands-on electronics projects.
#SevenSegmentDisplay #SerialMonitor #ArduinoUno #SerialCommunication #DIYElectronics #LearnElectronics #LearnRobotics #ElectronicsProjects #RoboticsProjects #ArduinoProjects #DIYProjects #ElectronicsTutorial #STEMEducation #ElectronicsForBeginners #RoboticsForKids #Mechatronics #STEMLearning #ElectronicsAndRobotics
Видео Chapter 35:Controlling seven segment display using serial monitor | Learn Arduino Programming канала Mechatron Robotics
Комментарии отсутствуют
Информация о видео
8 марта 2026 г. 15:52:08
00:06:35
Другие видео канала