- Популярные видео
- Авто
- Видео-блоги
- ДТП, аварии
- Для маленьких
- Еда, напитки
- Животные
- Закон и право
- Знаменитости
- Игры
- Искусство
- Комедии
- Красота, мода
- Кулинария, рецепты
- Люди
- Мото
- Музыка
- Мультфильмы
- Наука, технологии
- Новости
- Образование
- Политика
- Праздники
- Приколы
- Природа
- Происшествия
- Путешествия
- Развлечения
- Ржач
- Семья
- Сериалы
- Спорт
- Стиль жизни
- ТВ передачи
- Танцы
- Технологии
- Товары
- Ужасы
- Фильмы
- Шоу-бизнес
- Юмор
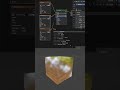
Blender Interior Design Course - Module 2 - Lecture 03 - English Version
In this lesson, we focus on one of the most critical aspects of realistic rendering: lighting.
Lighting is what gives shape, depth, and visual hierarchy to an object. Without a structured lighting setup, even a well-modeled piece of furniture will appear flat and undefined. In this session, we build a complete photographic lighting scheme for our sideboard inside a studio environment using Blender and Cycles
What you will learn in this lesson:
- How to prepare the limbo material to better evaluate contact reflections
- Why ambient light alone creates a flat and confusing result
- How to build a structured lighting hierarchy using:
- Fill Light
- Key Light (Primary Light)
- Secondary Left and Right Lights
- Butterfly Light for global control
- How to use Light Linking to preserve reflections and contact shadows
- How to optimize rendering performance using GPU and Render Region
- How to refine the final look through Color Management (AgX + Very High Contrast)
By comparing the scene lit only with ambient light versus the structured area-light setup, you will clearly understand how controlled lighting dramatically improves realism, contrast, and depth
This lesson follows a practical, studio-based workflow inspired by real photographic lighting techniques — allowing you to control shadows, reflections, and exposure with precision.
In the next lesson, we will apply materials to the sideboard and refine the lighting accordingly.
Видео Blender Interior Design Course - Module 2 - Lecture 03 - English Version канала Umberto Oldani - Rendering 3D per l'architettura
Комментарии отсутствуют
Информация о видео
11 февраля 2026 г. 13:31:42
00:10:48
Другие видео канала